VSX-47TX
Important Notice
Page
Table of Contents
Table of Contents
Features
Preparing the Remote Control
Checking the Supplied Accessories
Remote Control Battery Indicator
Before You Start
Operating range of remote control unit
Installing the Receiver
Opening the Front Panel
Before You Start
Home Theater The Basics
Quick Start Guide Part1
Quick Start Guide Part1
Hooking Up Your DVD Player & TV
Digital Connections
Speaker terminals
Speaker Connections
Memo
Speaker terminals also
Receiver exits the setup process
Setting up the Main Unit
Assigning the Digital Inputs
Use the 5∞ buttons to select Return and press Enter
Switch on the receiver and your TV
Auto Surround Sound Setup
Arrow should be pointing at Auto Surround SETUP, press
Quick Start Guide Part2
Quick Start Guide Part2
Check the speaker settings on the OSD
Personalizing Your Sound
Playing a DVD with Surround Sound
Connecting your TV
Connecting Your Equipment
Component Video Input Default Settings
Video Component video
Connecting a DVD, DVD/LD or LD player
Connecting Video Components
Connecting Your Equipment
DVD/LD player
Connecting a Video Component to the Front Panel
Connecting VCRs or DVRs
TV tuner
Connecting Satellite TV SAT Components
Audio cords
Connecting Analog Audio Components
Recorder 2 CD-R/TAPE/MD
Connect red plugs to
5.1 channel analog output jack
Cassette deck placement
Not a PCM-only output
Connecting Digital Audio Components
Coaxial cords/Optical cables
Digital Input Default Settings
Coaxial cord
Optical cable
Using outdoor antennas
Connecting the Radio Antennas
FM wire antenna AM loop antenna
To improve FM reception
Use Speakers with a
Connecting Speakers
Nominal impedance
Rated 6 Ω to 16 Ω
AC Outlet switched 100 w max
AC Power Cord
Speaker placement
Placing Your Speakers
Displays & Controls
Remote Control
Displays & Controls
Volume +/- buttons
Remote Setup button
# Multi Operation button
$ Receiver button
Back Panel
Shaped connectors
14 RS-232C Connection
AC in Power
Radio antenna terminals
MULTI-ROOM & Source Remote in terminals
Front Panel
Tone control buttons Tone button
SET UP MIC jack see p.13
BASS/TREBLE button see p.52
+ buttons see p.52
Display
Turn on the receiver and your TV, press
Setting Up for Surround Sound
Receiver button on the remote
Control
Setting Up for Surround Sound
Use the 5∞ buttons to select Speaker system setting
Speaker Systems should be
Selected. If it isn’t use the 5∞ buttons
If you want to change a setting before proceeding
Use this setting
Auto All speakers are set automatically. The remote
Control must be hooked up to the front panel in order to
Channel Delay
Channel Delay should be
Channel Level channel balance
Level setting mode, then press Enter
It isn’t use the 5∞ buttons to select
Use the 5∞ buttons to select a channel
If you are using a Sound Pressure Level SPL meter
Manual manual test tone mode
Semi Auto automatic test tone mode
Acoustic Calibration EQ
ALL CH ADJ mode flat curve All the speakers are
Acoustic CAL EQ should be selected
If it isn’t use the 5∞ buttons to select
To check the next settings select Next
Check the Auto Settings
Order of the settings menus is Speakers Channel
With the 5∞ buttons and press Enter
Stereo and Multichannel Playback
Basic Operation
Volume buttons on the remote
Adjust the volume by using
Master Volume dial
Control. On the front panel use
Press the Signal Select button to
Switching ANALOG/DIGITAL Signal Input
Select the input signal corresponding
Press Receiver
Stereo modes
Listening Modes
Standard modes
For 2 Channel Sources
TX Technical extension
Home THX modes
For all speaker playback of any source
For 2 channel sources only
THX ULTRA2 Cinema
Advanced Cinema modes
Use the +/- buttons to add or subtract the amount of effect
Adjusting the Effect of Advanced Listening Modes
Advanced Concert modes
Reducing Noise During Playback Digital NR Function
Listening with Acoustic Calibration EQ
Listening in Loudness Mode
Listening in Midnight Mode
Press Receiver Press the Loudness button on Remote control
Press the Midnight button on
Tone control can be adjusted in a range of ±6 dB
Adjusting Bass and Treble Tone Control
Stereo Direct mode
Press the BASS/TREBLE button repeatedly to select Bass or
See Multi CH in Select p.94 for more on Multi CH in playback
DVD Audio/MULTI Channel in Playback
Tape 2 Monitor
Dual Mono setting and playback
Input Attenuator
Video Select
Using Headphones
Status Display
Adjusting the Brightness of the Display
Automatic and Manual Tuning
Using the Tuner
Using the Tuner
Direct Access Tuning
To cancel before inputting the frequency
Example
Memorizing Frequently Used Stations
Each press switches the display
Tune in the station you want
Press the Enter button to input your choice
Naming Memorized Stations
Press Enter when you have got Characters you want to enter
Press the Tuner button on
To select the class
Use the Number buttons to select Channel you desire
Recalling Memorized Stations
To step through each channel in order
Press the Station -/+ buttons repeatedly
Setting Up the Remote Control to Control Other Components
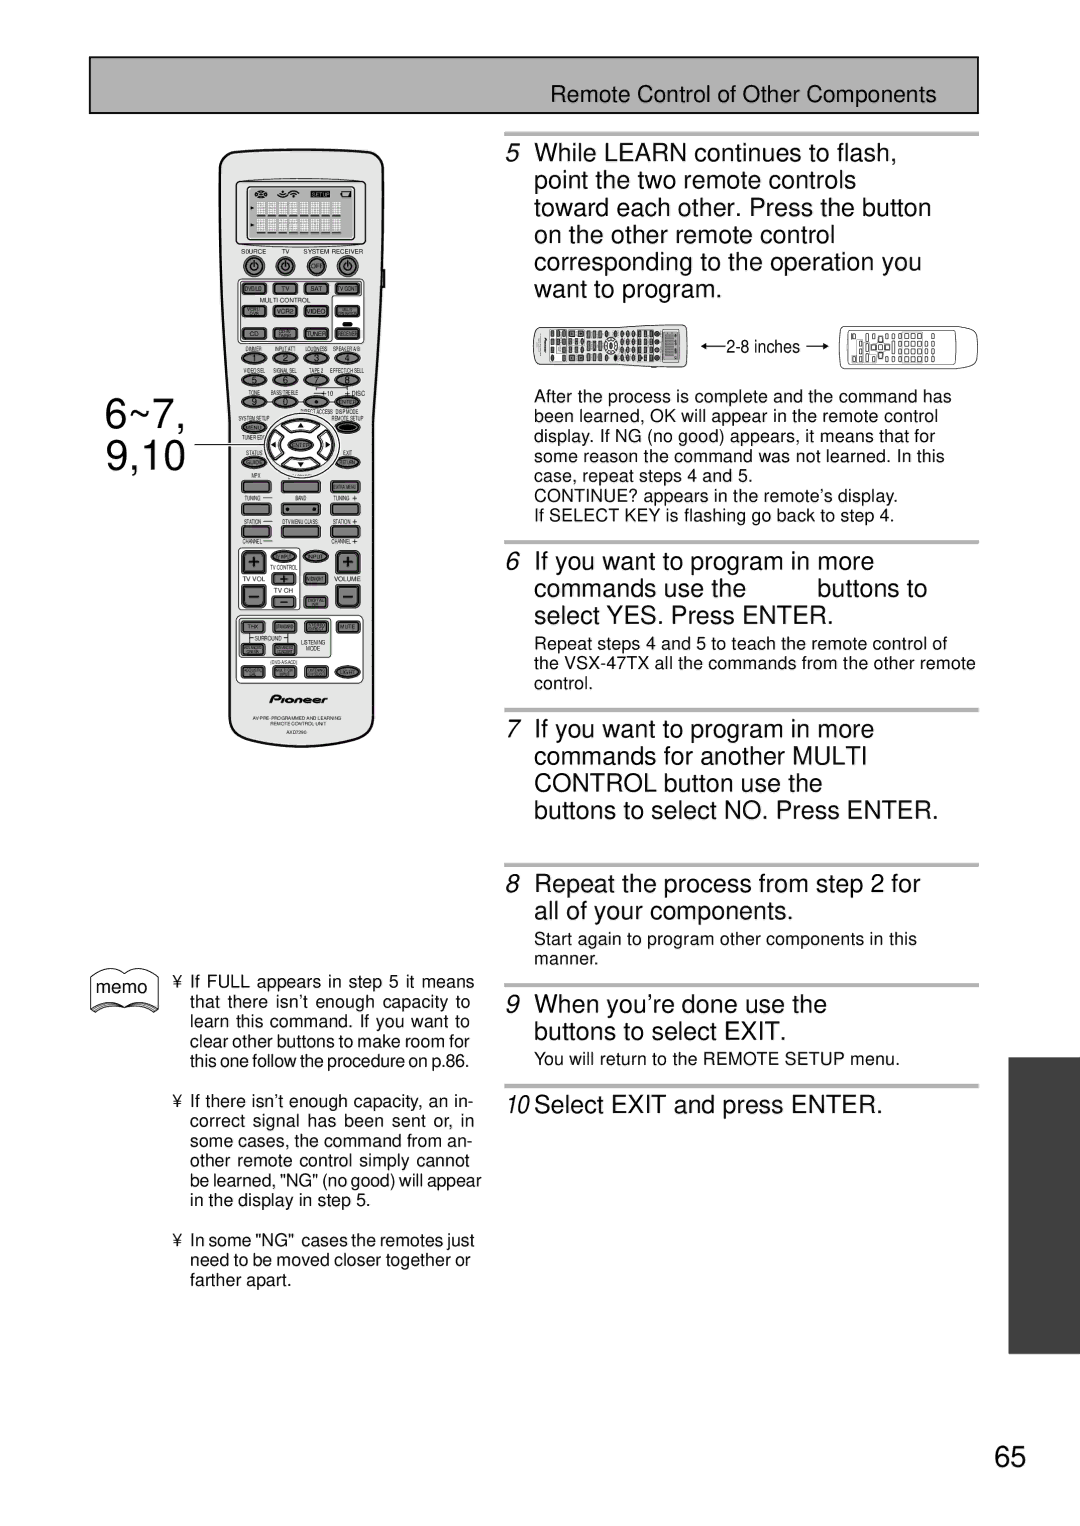
Remote Control of Other Components
Remote Control of Other Components
Press ENTER. The preset code has Been entered
Use the 5∞ buttons to select Learning and press Enter
Select Function blinks on the remote control
For the component you want to
For example DVD/LD
You will return to the Remote Setup menu
When youre done use the 5∞ Buttons to select Exit
Select YES. Press Enter
Repeat the process from for All of your components
CD/MD/CD-R/VCR/DVD/LD/DVD recorder/Cassette Deck operations
Using Remote Control with Other Components
Yellow
Cable TV/Satellite TV/Digital TV/TVoperations
Use the 5∞ buttons to select Dirctfnc and press Enter
Setting up the Direct Function
Component whose direct
Function you want to turn on or off
Recording from Audio/Video Components
Using Other Functions
Record monitor Tape 2 Monitor
Functions that can be recorded
Bi-wiring your speakers
Speaker System B Setup
Stereo playback in another room
Bi-amping the front speakers
These two speakers and the same signal is output from
Switching A/B Speaker System
Front speakers. If you have set the Front speakers
From the B speakers and the Front pre out terminals
Connecting Additional Amplifiers
Using a separate power amplifier for main room stereo sound
Pre Out Power Setup
Using an separate stereo pre-amplifier
Multi-Room
Setup example
MULTI-ROOM connections
Sub room Main room
Use the 5∞ buttons to select MULTI-ROOM Setting . Press
Then select Expert Setup using
Select the Volume Level by Selecting Variable or Fixed
∞. Press Enter
Press the Control button to enter
Control mode
Press Volume +/- to adjust
Remote control at the IR Receiver
Controlling the MULTI-ROOM system from the sub room
From the sub room, point
IR receiver remote sensor window
Pioneer SR System Operating other Pioneer components
To setup a command select Change and press Enter
Press the Remote Setup button for More than three seconds
Multi Operations
Use the 5∞ buttons to select Multi OPE and press Enter
Select Exit and press Enter again
When done select Exit and press
Performing Multi Operations
Press the Multi Operation Button
You can assign System OFF information for up to 5 commands
Up the Remote Control to Control Other Components, p.62-65
System Off
Use the 5∞ buttons to select SYS OFF and press Enter
Do the following to use the System OFF function
Select Exit and press Enter again Using System Off
Press the System OFF button
Press the Remote Setup for more Than three seconds
Editing Remote Control Display Names
Use the 5∞ buttons to select Funcname and press Enter
Select Function will flash in the display
Editing Button Names KEY Label
LOW, or Exit and press Enter
Adjusting the Light on the Remote Control
Clearing Remote Control Settings You Have Input
Resetting the Main Unit
Turn on the receiver and your TV
Advanced Setup
Your TV, use the 5∞ buttons to
Select Input ASSIGN. Press
Assigning the Component Video Inputs
Advanced Setup
Use the 5∞ buttons to select
Cnent Video in then press Enter
Expert Setup
Your new screen display will be set. Next, move on to
OSD On-screen Display Adjustment
Bass Peak LEVEL, if necessary
Start over from step one
Setting in step
Setting Start The Master Volume is set to
Setting Cancel This setting wont limit the peak
For Setting START, select it and press ENTER. Then
OFF No Dynamic Range Control
RETURN. Press Enter
MID a moderate amount of Dynamic Range Control
MAX The most Dynamic Range Control available is
Press Enter button
Use the 5∞ buttons to select Return
Function Rename should be
Symbol
Selected if it isn’t use the 5∞
Buttons to select it. Press Enter
THX Audio Setup
Surback SP Position should be
Surround Back Speaker Position
Selected, if it isn’t use the 5∞
Buttons to select it, and press
RE-EQUALIZATION should be
Re-Equalization
Buttons to select it
Standard or Stereo
Chart Comparing Dolby Pro Logic and Dolby Pro Logic
Techno Tidbits & Problem-solving
Dolby
Dolby Digital
Dolby Digital Surround EX
Techno Tidbits & Problem-solving
DTS Neo6
DTS 96/24
101
102
Speaker Placement Information
Through
Speaker Placement for a Complete THX Speaker System
Speaker Placement for DVD-Audio etc. Sources
Audio Block Diagram
Troubleshooting
Subwoofer
Center speakers
Surround back speakers
From digital components
Signal Select is on 2 RF
When playing an LD
Other audio problems Subwoofer output is very
Playback Over indicator is
Signal Select button
Come up when using
Digital format indicators
Indicators show
During playback of a DVD
Remote control Cannot be remote
Audio source, the player
Shows a transfer rate
EIA
Power cord Caution
Furnished Parts
Specifications
TNGZF/01K00001
0 4 2 1 1 4 0