Installation Operation
Hot glass will cause burns
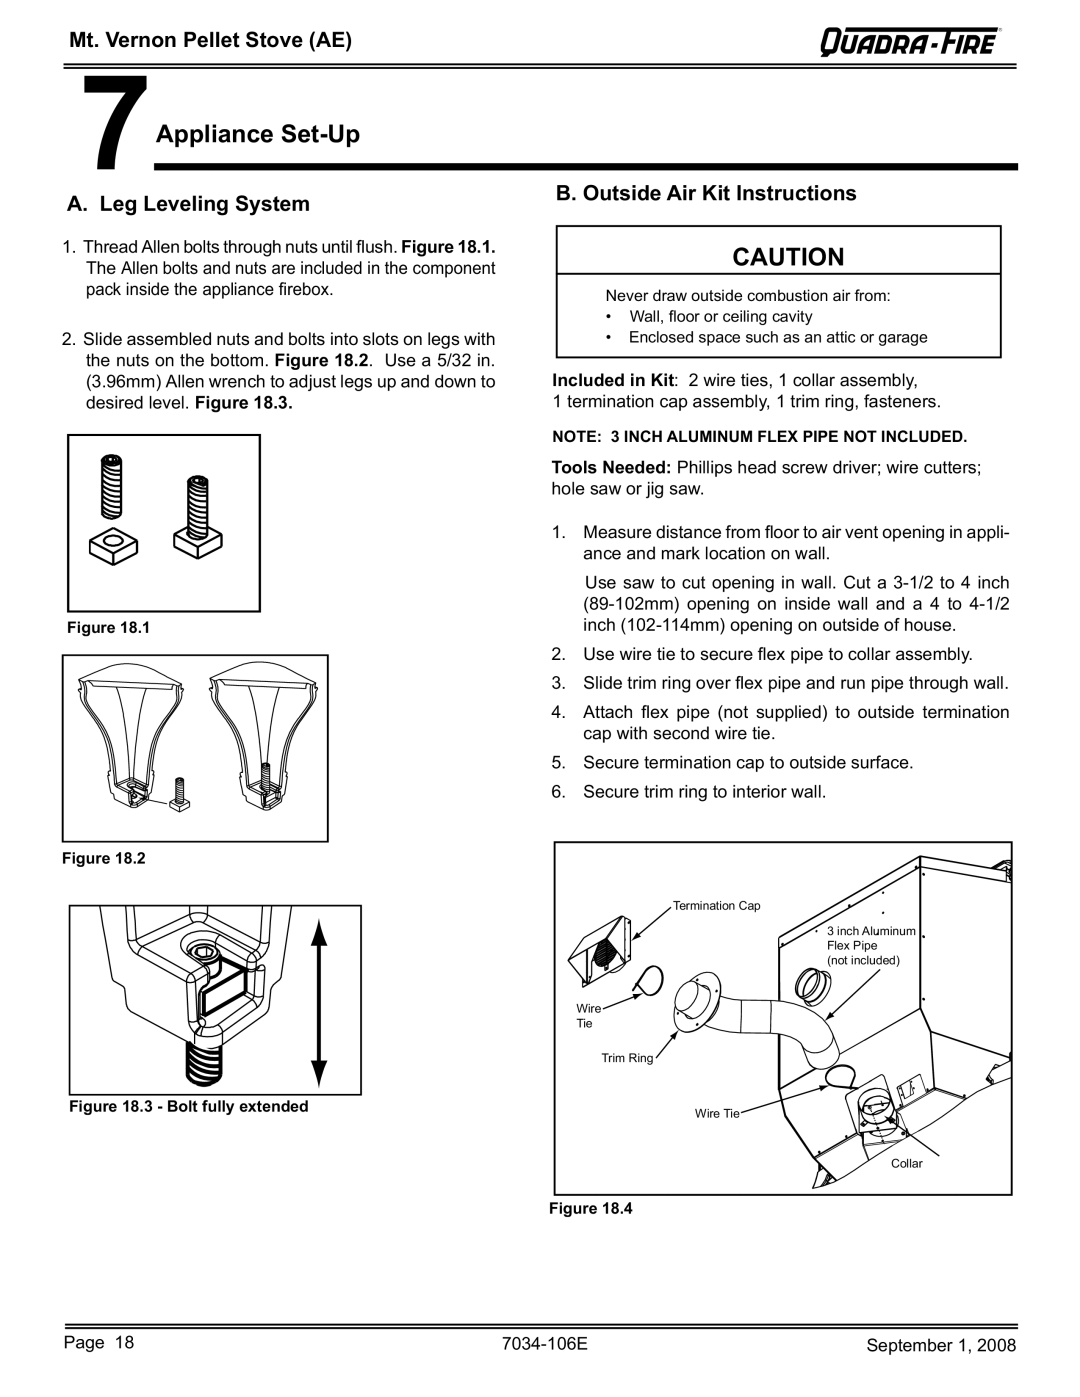
Mt. Vernon Pellet Stove AE
Mfg Date Test Lab & Report No
Table of Contents
Listing and Code Approvals
Getting Started
Appliance Location
Wall Control Thermostat
Negative Pressure
Draft
Mt. Vernon Pellet Stove AE Fire Safety
Tools And Supplies Needed
Inspect Appliance & Components and Pre-Use Check List
3Dimensions and Clearances
Appliance Dimensions
76-152mm Adapter To 6 in 76-152mm Offset Adapter
Exception for Horizontal Installations
Hearth Pad Requirements UL and ULC
Do not Terminate Vent
4Vent Information
Venting Termination Minimum Requirements
Termination must exhaust above air inlet elevation
Example of 3 Elbow-Rear Vent Termination Calculation
Mt. Vernon Pellet Stove AE Chimney and Exhaust Connection
Equivalent Feet of Pipe
See Figure
Mt. Vernon Pellet Stove AE Pipe Selection Chart
Altitude in Thousands of Feet
5Venting Systems
Alcove
Straight Out
Degree
Mt. Vernon Pellet Stove AE Through The Wall
Vertical Interior Typical Installation
Through The Wall & Vertical Exterior
Mt. Vernon Pellet Stove AE Masonry
Alternate Masonry
6Mobile Home Installation
7Appliance Set-Up
Leg Leveling System
Outside Air Kit Instructions
Installing the Top Vent Adapter
Mt. Vernon Pellet Stove AE Top Vent Adapter Installation
Adapter Installation
Rear Vent and Rear Vent to Top Vent
Piece LOG SET Installation
Back Side of Wall Control with Cover Off
Operating Instructions
Fuel Size, Material and Storage
See Wall Control Thermostat Manual
For detailed operating instructions
Starting Your First Fire
Start-Up
Battery Back-up System Optional
Ignition Cycles
Auto / Man L, ML, M, MH, H
Shutdown
Auto-Clean
Auto / Man L, ML, M, MH, H Cont’d
Additional Screen Messages
Mt. Vernon Pellet Stove AE Quick Start Guide
Wall Control for Reference
Setting Comfort Level
Mt. Vernon Pellet Stove AE Quick Start Guide Cont’d
Mt. Vernon Pellet Stove AE Frequently Asked Questions
Issues Solutions
Error Message
Possible Cause Corrective Action
10Maintaining & Servicing Your Appliance
Quick Reference Maintenance Chart
Cleaning or Inspection
Weeks
Alternate Fuel Daily
Cleaning Ash Pan Frequency
Types of Fuel
See Disposal of Ashes below
Cleaning Heat Exchanger & Drop Tube
Mt. Vernon Pellet Stove AE
Cleaning Convection Blower Requires No Lubrication
Cleaning the Hopper
Cleaning the Glass
Cleaning the Top Vent Adapter if installed
High Ash Fuel Content Maintenance
Preparing Firebox for Non-Burn Season
Convection Blower Replacement
Combustion Exhaust Blower Replacement
Reference Materials
Component Functions
Overheat Sensor Snap Disc
Power Supply
Thermocouple Drop Tube Vacuum Switch
Thermocouple Firepot
Mt. Vernon Pellet Stove AE Component Locations
Left Side
Mt. Vernon Pellet Stove AE Exploded Drawings
Description Part Number
Mt. Vernon Pellet Stove AE
Mt. Vernon Pellet Stove AE Service Parts and Accessories
Item No Accessories
Mt. Vernon Pellet Stove AE
TOUCHUP-CSB
Item No
Mt. Vernon Pellet Stove AE Service And Maintenance Log
Date of Service Performed By Description of Service
Date of Service Performed By Description of Service
Mt. Vernon Pellet Stove AE Homeowner’s Notes
Mt. Vernon Pellet Stove AE Warranty Policy
CONDITIONS, Exclusions & Limitation of Liability
Hearth & Home Technologies Limited Warranty Cont’d
T O T O