Page
Please read as needed
Please read this first
Memo
Glossary
Table of Contents
Enjoying Images on a Comput
Getting Started
Optional Accessories
Quick Start Guide Warranty Card
Checking Everything is Packed
Video Cable USB Cable AA Alkaline Batteries Handstrap
Rear View
Names of Parts
How to Use the Mode Dial
Inserting the Batteries
When the batteries wear out
Using the AC Adaptor
Auto Power-off
Turning the Power On/Off
„To turn the camera On
„To turn the camera Off
Setting the Date and Time
Inserting the SD Memory Card
Where to record
Still Image Mode Movie Mode
How to Use the LCD Monitor
Screen Examples when Shooting Pictures
ISO Setting
Auto Bracket
Protect
Screen During Playback
„When Shot
Switching the Screen Display
„When Playing Back
Display Symbols No Display Button
Button Functions
Screens
„Shooting Menu Shooting Mode
„Shooting Menu Movie Mode
„Shooting Menu Text Mode
„Scene Selection Screen Scene Mode
Press the buttons
Basics of the Shooting Menu/Playback Menu
Press the buttons to select the desired item
Press the button to select YES
Switch the Mode Dial to another mode
Basics of the Setup Screen
Turn the Mode Dial to Setup Mode
Basic Shooting
How to Hold the Camera
When the shot is in focus If the camera did not focus
How to Focus
Before focusing Half-press the shutter button
Page
Check the Focus and Shoot Half-press
Shooting Still Images
Capture the Moment Shooting Full-press
Buttons used here
Shooting with Scenery-Matching
Text Mode
Turn the Mode Dial to Scene Mode
Press the buttons to select the mode you want to use
To use Scene Mode, follow the steps below
Press the shutter button
Initial setting Flash Off Disabled
Combination of Scene Mode and Function
Fixed on Flash Off Disabled
Forced flash is disabled Disabled Initial setting Auto
Mcont M Multi-Shot
Shooting with Multi-Shot
Scont S Multi-Shot
Turn the Mode Dial to Shooting Mode Press the button
Making Multi-Shot Settings CONT. Mode
To make Multi-Shot settings, follow the steps below
Shooting with S Multi-Shot
Shooting with Multi-Shot
Shooting with M Multi-Shot
AVI File
Shooting Movies
Shooting with the Zoom
Optical Zoom
Shooting with the Digital Zoom
Shooting Close-ups Macro Photo
Press the shutter button Turn the Mode Dial to Shooting Mode
Using Special Features for Improved Photography
Symbol Mode Name Description
Using the Flash
Red-Eye
Slow Synchronized
Using the Self-Timer
Changing the Exposure Exposure Comp
When your subject is whitish
Select Exposure COMP. and then press Button Press the button
To make White Balance settings, follow the steps below
Using Natural and Artificial Lighting White Balance
Press the buttons to select a mode
„If you select One Push
Fine Mode
About Picture Quality Mode About Image Size
Choosing Picture Quality Mode/Image Size
Saving
Changing Picture Quality Mode/ Image Size of a Still Image
Combining Picture Quality Mode and Image Size
Press the buttons to select Size
Turn the Mode Dial to Movie Mode Press the button
Changing the Image Size of a Movie
Manual Focus Shooting
Manual Focus Shooting Focus
For Manual Focus Shooting, follow the steps below
Press the buttons to focus the camera
Shooting at a Fixed Shooting Distance
To select light metering method, follow the steps below
Press the buttons to switch between displays as required
Changing the Light Metering Photometry
Select Photometry and then press the button Press the button
Press the buttons to select the desired setting
Making Sensitivity Settings ISO Setting
Press Button
Changing the Edge Quality of Still Images Sharpness
Select Sharpness and then press
Select on and then press the button Press the button
Select Auto Bracket and then press
Button To shoot with Auto Bracket, follow the steps below
Press the shutter button
Press the buttons to select Exposure Time
Setting the Exposure Time Time Exposure
Select Time Exposure and then press Button
Shooting Pictures Automatically at Set Intervals Interval
To stop shooting, press the button
Inserting the Date into a Still Image Date Imprint
Restore Defaults
Returning the Shooting Menu Settings to their Defaults
Displaying the Grid Guide on the LCD Monitor
To make changes to the DENSITY, follow the steps below
Changing Shading for Shooting Text Density
Viewing Still Images and Movies
Viewing the Photo You Just Took
Press the Enlarged View button
Displaying an Enlarged View of the Still Image Displayed
Deleting the Displayed Still Image or Movie
Move to the still image you want to view Using the buttons
Turn the Mode Dial to Playback Mode
Viewing a Still Image or Movie
Viewing Still Images Recorded on an SD Memory Card
Viewing Still Images Recorded on Internal Memory
Viewing Movies
Move to the movie you want to see using the buttons
To view photos, follow the steps below
Movie Frames
Thumbnail Display
Viewing at a Glance
Press the Thumbnail Display button
Thumbnail Display button
Enlarged Viewing
Showing Photos in Order Automatically Slide Show
Viewing on a Television
Deleting Still Images and Movies
To delete a still image or movie, follow the steps below
Deleting Unwanted Still Images or Movies
Deleting One Still Image
To delete all still images or movies, follow the steps below
Deleting All Frames at Once
Deleting Multiple Frames at Once
To protect a still image or movie, follow the steps below
Write-protecting Your Images Protect
Protecting the Displayed Still Image
Press the button
Protecting All Still Images
Turn the Mode Dial to Playback Mode Press the button
Press the button to select Protect Then press the button
Protecting Multiple Still Images or Movies at Once
Buttons used here
Setting Dpof for the Still Image Displayed
Using a Printing Service Print
Setting Dpof for All Still Images
Press the button to select Print Then press the button
Setting Dpof for Multiple Still Images
Changing Camera Settings
To format, follow the steps below
Write-protecting your images
Select Card Format and then press the button
Formatting
Select in Format and then press the button
Formatting Internal Memory in Format
Changing Power-Save Mode Settings Power Save
Changing Auto Power-Off Settings Auto Power OFF
Buzz at Recording Beep Sound
Press the button to select Sequential no
Changing File Name Settings Sequential no
Extension
Jpeg Files
Changing Image Confirmation Time LCD Confirm
Press the buttons to adjust the brightness
Adjusting the Brightness of the LCD Monitor
When you attain the desired brightness Press the button
Press the button to select LCD
Press the button to select Language
Changing the Display Language Language
You can change the language displayed on the LCD Monitor
PAL
Computer Pictures/Movies
Installing DirectX
Using the Software Provided
Software and OS Applicability Table
For Macintosh
Windows
Necessary Environment for Using the Software Provided
Macintosh
OS in Use Software to be Installed Installation Method
Installing the Software
Confirm where you want to install and then click Next
Click Install Software
For Windows 98/98SE/Me/2000
Click Next
Installation is complete
Double-click the Add/Remove Programs. icon
Uninstalling the Software For Windows 98/98SE/Me/2000
Select Settings and then Control Panel
For Windows XP
Confirm the software you want to install and then click Next
Select Control Panel from the Start menu
Uninstalling the Software For Windows XP
For Mac OS 8.6 to
Uninstalling the Software For Mac OS 8.6 to
For Mac OS X 10.1.2 to
Click Continue Installation
Double-click the Mounter icon Caplio Mounter.pkg
Click the key icon
Uninstalling the Software For Mac OS X 10.1.2 to
Disconnecting your camera from computer
Connecting the Camera to a Computer
Downloading Pictures to Your Computer
For Windows 98/98SE/Me/2000
Uncheck images you do not want to transfer Click Next
Make the necessary settings and then click the Next button
Double-click the displayed icon
Click on the File menu and select Quit
For Mac OS
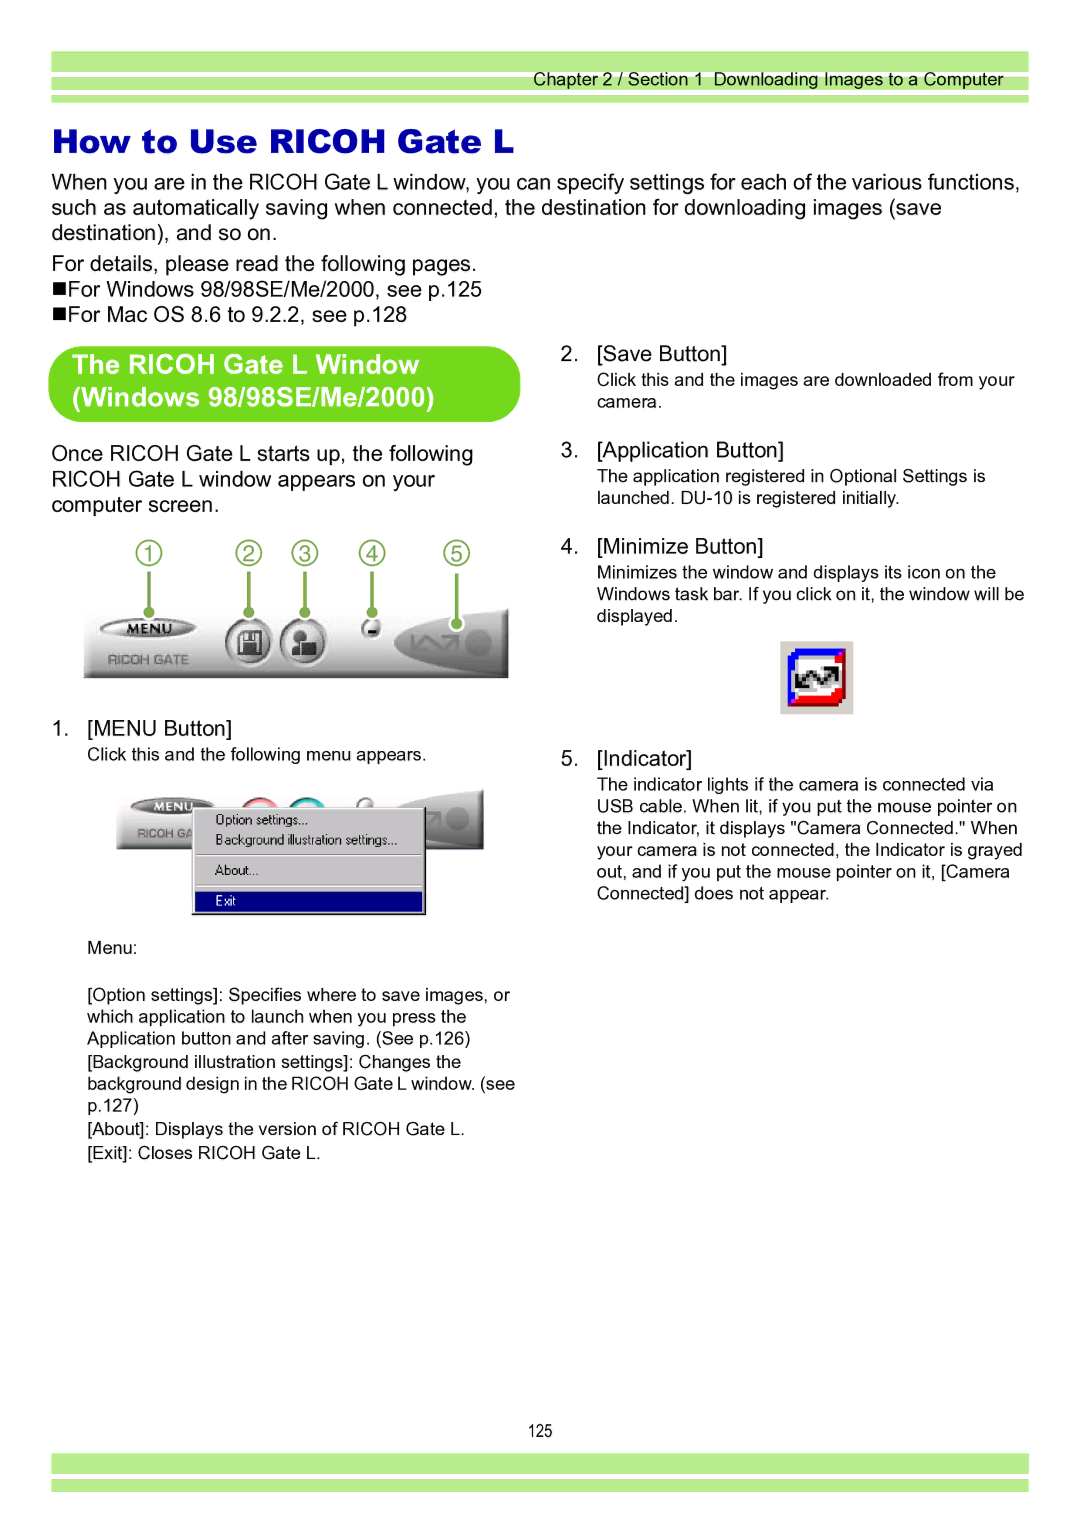
Ricoh Gate L Window Windows 98/98SE/Me/2000
How to Use Ricoh Gate L
How to Use the Optional settings
Background illustration pattern
How to Use the Background Illustration Settings
You can select a background for the Ricoh
Gate L window from three types of patterns
Ricoh Gate L Window For Mac OS 8.6 to
Option settings
About Ricoh Gate
Quit
Choose
How to Use Optional Settings
Card Reader
Images in a PC Card
RIMG0001.jpg RIMG0002.jpg
Displaying Thumbnail Image How to Use DU-10
DU-10 Window Exiting DU-10
Starting and Exiting DU-10
Thumbnail Display Area
Thumbnail Display Description
Menu Bar
Name order
Switching the Ordering of Images
Type order
Date order
Changing the Display Size
„Running a Slideshow
Using one of the steps below, select Slideshow
To View a Slideshow
How to Use the Slideshow Dialog Box
Using Auto Slideshow
Viewing Image Information
Using the File Menu
Using the Shortcut Menu
Viewer Screen
Displaying the Viewer Screen
Save
Rotate 90 counter-clockwise Rotate 90 clockwise
Appendix
Camera
Specifications
Page
SD Memory Card Recording Capacities
Optional Accessories
Using Your Camera Abroad
Care and Storage
Precautions regarding care of your camera
„Care
„Storage
„Shooting
Troubleshooting
SYNCHRO-MONITOR Mode
„Playback/Deleting
„Other Problems
„About connecting to your computer/software
Appendix
File Number Over Limit
Error Messages
About the Warranty and Servicing
153
USA FCC Part15 Class B
Information to the User
Telephone Support Numbers in Europe
Koolhovenlaan NB Schiphol-Rijk Netherlands
Ricoh Service Offices