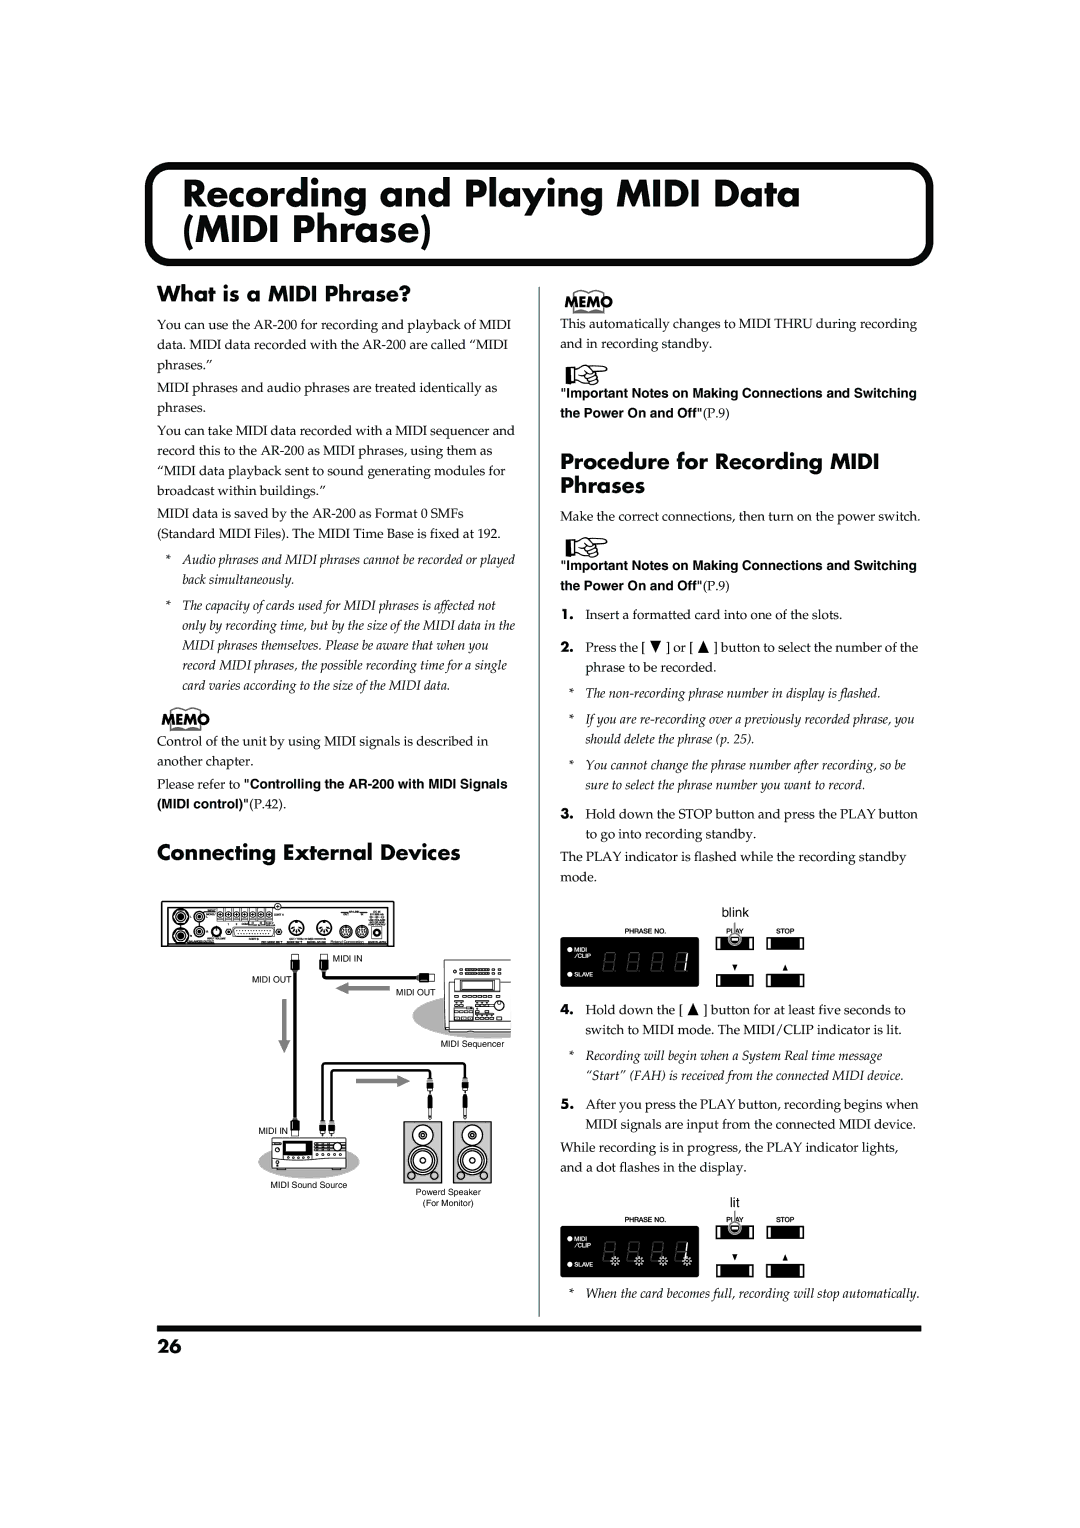
Recording and Playing MIDI Data (MIDI Phrase)
What is a MIDI Phrase? |
|
|
| |||
|
|
| ||||
You can use the | This automatically changes to MIDI THRU during recording | |||||
data. MIDI data recorded with the | and in recording standby. | |||||
phrases.” |
|
|
| |||
MIDI phrases and audio phrases are treated identically as | "Important Notes on Making Connections and Switching | |||||
phrases. | ||||||
the Power On and Off"(P.9) | ||||||
|
|
| ||||
You can take MIDI data recorded with a MIDI sequencer and |
|
|
| |||
record this to the | Procedure for Recording MIDI | |||||
“MIDI data playback sent to sound generating modules for | ||||||
Phrases | ||||||
broadcast within buildings.” | ||||||
MIDI data is saved by the | Make the correct connections, then turn on the power switch. | |||||
(Standard MIDI Files). The MIDI Time Base is fixed at 192. |
|
|
| |||
* Audio phrases and MIDI phrases cannot be recorded or played | "Important Notes on Making Connections and Switching | |||||
| back simultaneously. | |||||
| the Power On and Off"(P.9) | |||||
|
|
| ||||
* The capacity of cards used for MIDI phrases is affected not | 1. Insert a formatted card into one of the slots. | |||||
| only by recording time, but by the size of the MIDI data in the | |||||
|
|
|
| |||
| MIDI phrases themselves. Please be aware that when you | 2. Press the [ ] or [ ] button to select the number of the | ||||
| record MIDI phrases, the possible recording time for a single |
| phrase to be recorded. | |||
| card varies according to the size of the MIDI data. | * The | ||||
|
|
| ||||
|
|
| * If you are | |||
|
|
| ||||
Control of the unit by using MIDI signals is described in |
| should delete the phrase (p. 25). | ||||
another chapter. | * You cannot change the phrase number after recording, so be | |||||
Please refer to "Controlling the |
| sure to select the phrase number you want to record. | ||||
(MIDI control)"(P.42). | 3. Hold down the STOP button and press the PLAY button | |||||
|
|
| ||||
Connecting External Devices |
| to go into recording standby. | ||||
The PLAY indicator is flashed while the recording standby | ||||||
| mode. | |||||
|
|
|
| |||
blink
MIDI IN
MIDI OUT
MIDI OUT
| 4. | Hold down the [ ] button for at least five seconds to |
|
| switch to MIDI mode. The MIDI/CLIP indicator is lit. |
| MIDI Sequencer |
|
| * | Recording will begin when a System Real time message |
|
| “Start” (FAH) is received from the connected MIDI device. |
| 5. | After you press the PLAY button, recording begins when |
MIDI IN |
| MIDI signals are input from the connected MIDI device. |
|
| |
| While recording is in progress, the PLAY indicator lights, | |
| and a dot flashes in the display. | |
MIDI Sound Source |
| |
| Powerd Speaker | lit |
| (For Monitor) | |
* When the card becomes full, recording will stop automatically.
26
