202
Do not open or modify in any way the unit or its AC adaptor
Page
Memory Backup
Power Supply
Maintenance
Placement
Additional Precautions
Contents
Playing Along with Songs
Contents
Quick Start
Advanced Use
SETUP/TRIG
Editing Songs Song Edit
Global Settings for the TD-6V
Factory Reset
Setting the Metronome Click Edit
Features Using Midi and Setting Examples 105
Making the Midi Settings
Troubleshooting 110
Messages and Error Messages 116
Appendices 109
Rich Expression
Features
Expandability/Compatibility
Features
Function and Operations Perfect for Live Performances
Convenient Functions for Practicing
Shift + KIT
How to Use This Manual
Composition of This Manual
Terms Used in This Manual
Setup Guide
Front Panel
Panel Descriptions
Enter Button
Edit Setup Button
Panel Descriptions
Exit Button
MIX in Jack
Rear Panel
Mounting the TD-6V to the Stand
Making the Settings
Connecting the Pads and the Pedals
Setting Example
Making the Settings
Fig.P-012.e
TD-6V Rear Panel
Connect the supplied AC adaptor to the AC adaptor jack
Audio system or amp. If using headphones, connect them to
Plug the AC adaptor plug into a power outlet
Any connections
Precautions When Turning on the Power
Turning On/Off the Power
Turning Off the Power
No Sound Even When Pressing Shift + KIT Preview
Volume
While holding down SHIFT, press Edit Setup
Press to select FactoryReset
Press Enter
ALL
While holding down KIT, press Song
Listening to the Demo Songs
Press Play
TC R&B
SETUP/TRIG Advncd p
Selecting the Pad Type
Press to select Trig Basic
Pad Trigger Type
Selecting the Pad Type Strike the pad you wish to set
Fig.P-018
Adjusting the Sensitivity of the Pad
Press + or to adjust the sensitivity of the pads
Setting the Overall Target
Adjustments
Trigger Inputs and the Pads You Can Use
About the Pads
About the Pads
Combinations of Pad and Trigger Type
Recommended Parameters for the Pads
Trigger Input 2 Snare
Playing the Pads
PD-6, PD-80, PD-100, RP-2
Trigger Input Snare
Bell Shot
CY-6, CY-12H, CY-14C
CY-12R/C,CY-15R
Bow Shot
Foot Closed
Hi-Hat Control Pedal
Open Hi-Hat
Closed Hi-Hat
Quick Start
Press + or to select the drum kit
Pattern Inadvertently Starts Playing When Pad is Struck
To stop the song from playing when the pad is struck
Choosing a Drum Kit
Switching the Click On and Off
Press Click
Click is played Click is not played
Press Edit
Adjusting the Click Volume Level
Playing While Listening to the Metronome/Click
Confirm that Edit is not lit
While holding down SHIFT, press Click Tempo
Adjusting the Click Tempo
Press Song
Song stops suddenly When playing the pads
Playing Along with Songs
Choosing a Song and Playing Back
Playing Along with Songs
Press the Play button, and the song will begin playing
To stop playback of the song, press Stop
Adjusting the Song Volume
Fig.Q-014
Temporarily Changing the Tempo of a Song
Press + or to select Song #8
Muting the Pre-programmed Drums in Songs
To hear the drums, press Part Mute once more
Press Part Mute
Velo Pad Pattern Velocity KIT/ CONTROL/Pad Ptn Velo p
Using the Pads to Play Songs
Reset Time
Pad Ptn Pad Pattern
TD-6V
Make the connections as shown in the following figure
Output jack
MIX in jack
When Using the TD-6V as a GM Sound Module p
Using the TD-6V As a General Midi Sound Module
Advanced Use
KIT
About Drum Kits and the Drum Kit Screen
About the Drum Kits
Drum Kit #99 Drum Kit #1
Choosing a Pad by Hitting It
Choosing a Drum Kit Drum Kit
Choosing the Pad to Edit
About the Drum Kit Screen
Listening to an Inst Instrument assigned to a Pad Preview
Notation Used in the Screen
Helpful Edit Functions
Choosing on the TD-6V
Choosing an Instrument
About the Instruments
Choosing from the Group Names Inst Group
Press + or to select the instrument
Instrument Settings Inst
Press + or to make the setting
Choosing an Instrument Inst
Adjusting the Decay Length of Sound Decay
Adjusting the Volume of the Pad Level
Setting the Pan Position Pan
Adjusting the Pitch Pitch
Ambience Send Level for Each Instrument Ambience Send Level
Ambience Settings Ambience
Switching Ambience On/Off Ambience Switch
Choose Location Where the Drums are Played Studio Type
Room Size SMALL, MEDIUM, Large
Changing the Wall Surface Material Wall Type
Determine the Room Size Room Size
WallType Wall Type WOOD, PLASTER, Glass
Adjusting the Sound High Gain, Low Gain
Equalizer Settings Equalizer
Settings for Various Functions Control
Switching the Equalizer On/Off Master Equalizer Switch
With Playing Dynamics Pad
Playing a Song by Hitting a Pad
Pad Pattern
Control the Level of the Pattern
Pitch Ctrl Pitch Control Assign OFF, on
Midi Note Number for Each Pad Note Number
Gate Time 0.1-8.0 sec 0.1 sec. steps
Midi Gate Time for Each Pad Gate Time
Overall Drum Kit Settings Common
Overall Drum Kit Volume Master Volume
Pedal HH Vol Pedal Hi-Hat Volume
Dst Copy Destination U01-U99 Drum Kits
Copying a Drum Kit Copy
Naming the Drum Kit Kit Name
KitName Drum Kit Name 8 characters
Src Exchange Source
Switching the Order Drum Kits Exchange
Restoring the Factory Settings for
Edited Drum Kit
Selecting the Pad Type Trigger Type
About the Input Indicator
Setup
About the Screen Display
TrigTyp Trigger Type
PD-8, PD Type, PD-80R, PD-120, PD-125, KD-8
KD Type, CY-8, CY Type, RT-7K, RT-5S, RT-3T
Adjusting the Pad Sensitivity Sensitivity
Setting the Pad Sensitivity Making Other Settings
TrigCurve Trigger Curve
Setting the Minimum Levels for the Pads Threshold
Making the Pad and Trigger Settings SETUP/TRIG Sensitivity
Threshold
Press to select Trig Advncd
Fine-Tuning the Trigger Parameter Settings
Eliminate Crosstalk Between Pads Crosstalk Cancel
Making the Pad and Trigger Settings SETUP/TRIG
Scan Time 0-4.0 ms 0.1ms steps
Adjusting the Trigger Signal Detection Time Scan Time
Retrig Cancel Retrigger Cancel
Double Triggering Prevention Mask Time
Mask Time 0-64ms 4ms steps
Using the TD-6V with Acoustic Triggers
Set the Mask Time SETUP/TRIG ADVNCD/Mask Time p
Set the Threshold SETUP/TRIG BASIC/Threshold p
LCD Contrast
Making the Global Settings Utility
Display Contrast Adjustment LCD Contrast
Percussion Part Volume Control Percussion Part Level
BackingLevel Backing Level
Backing Instruments Volume Control Backing Level
Tuning the TD-6V Master Tune
Muting Parts of a Song Mute
Restoring the Factory Settings Factory Reset
Preview Volume Control Preview Velocity
Checking the Remaining Amount of Memory Available Memory
Setting the Way the Click Sounds
Setting the Metronome Click Edit
Switching the Click On/Off Click
Tempo Adjustment Tempo
Stereo Position Pan
Setting the Time Signature Time Signature
Setting the Interval Interval
Selecting the Click Sound Inst
Song
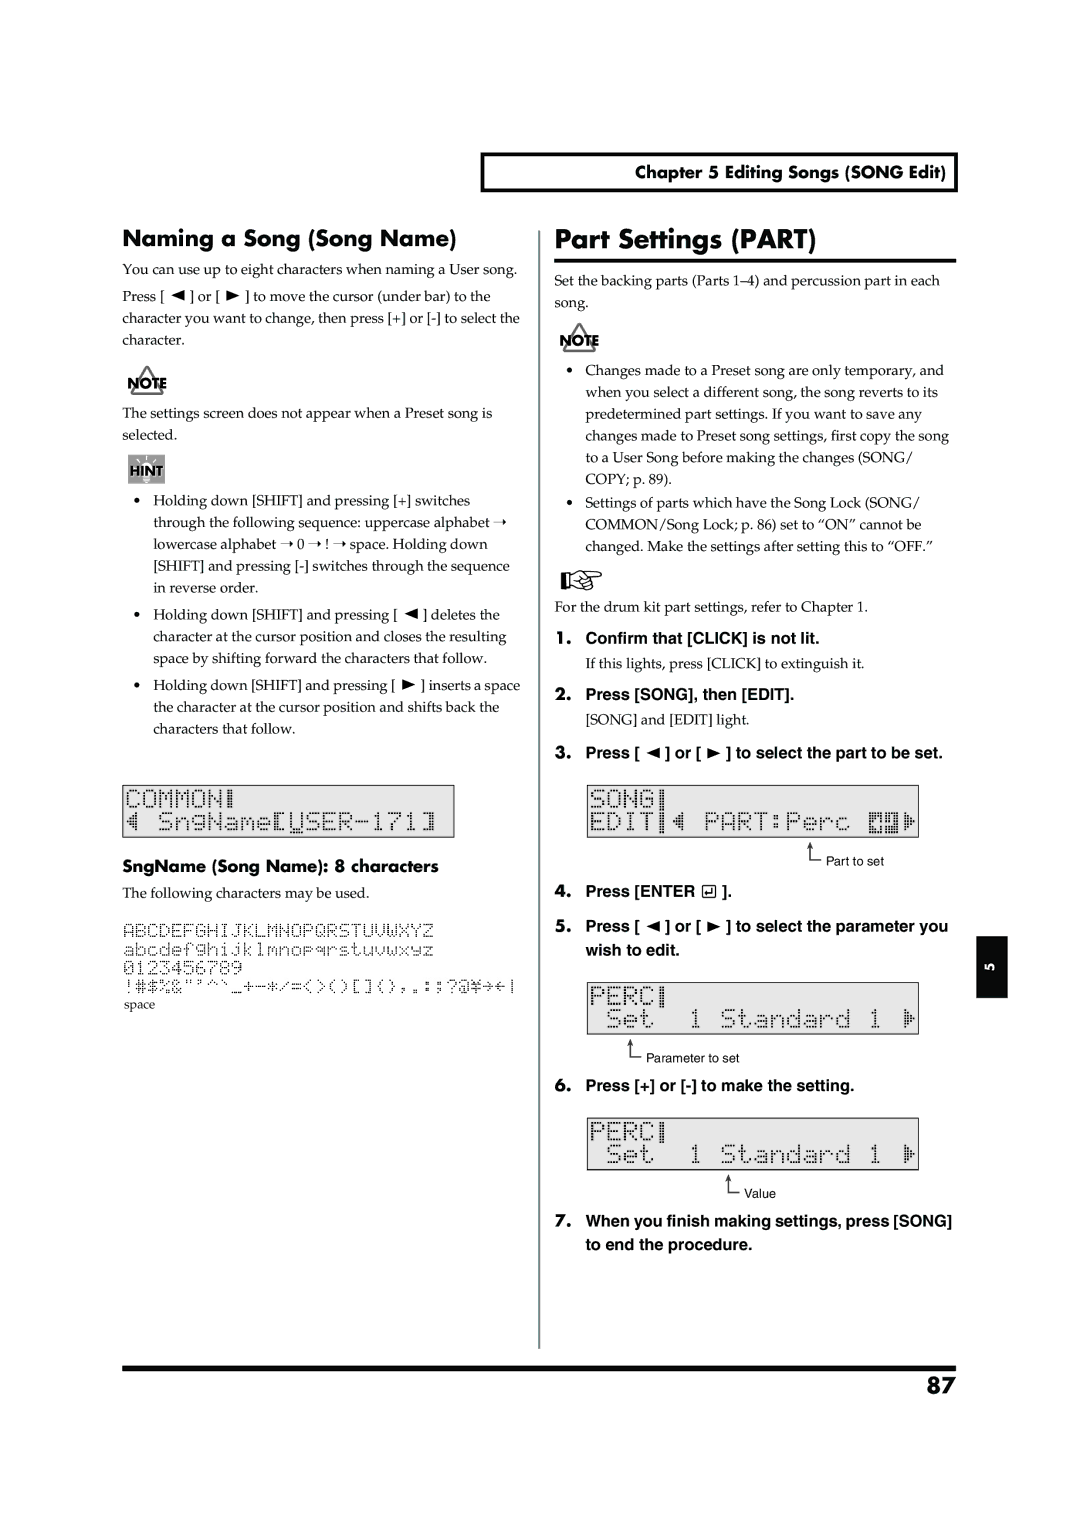
Editing Songs Song Edit
About Songs and the Song Screen
About Songs
Editing Songs Song Edit Song #250 Song #1
Overall Settings
Part Settings
About the Song Screen
Choosing a Song Song
Choosing a Song
Playing Back a Song
Choosing from a Category Song Category
Editing Songs Song Edit Press
Adjusting the Song Volume
Muting a Selected Part
Part Mute
While holding down SHIFT, press Click
Overall Song Settings Common
Setting the Tempo Tempo
Press SONG, then Edit
Reset Time When Using Tap Playback Reset Time
Protecting User Song Settings Song Lock
Playing Back the Song from the First Note/Event Quick Play
Press or to select the part to be set
Part Settings Part
Naming a Song Song Name
SngName Song Name 8 characters
Adjusting the Part Volume Level
Set Percussion Set
Backing Inst
Copying a Song Copy
Adjusting the Stereo Position Pan
Adjusting the Amount of Ambience Ambience Send Level
Adjusting the Bend Range Bend Range
Deleting a Song Delete
Part Erase Part
Erasing Performance Data
Song Erase
Song Erase Song
Select the User Song to be recorded p
When Recording Pad Performances
Preparations for Recording
Recording Performances by External Midi Devices
How To Record
Setting the Number of Measures Length
Setting the Song Tempo Tempo
HitPadStart Hit Pad Start OFF, on
RecMode Recording Mode
Quantize During Recording Quantize
Start Recording with a Pad or Pedal Trigger Hit Pad Start
Example
Midi Connectors
About Midi
Midi Channels and Multi-timbral Sound Modules
Making the Midi Settings
Making the Midi Settings SETUP/MIDI, Bulk Dump
How the Internal Sequencer Operates
LocalControl Local Control OFF, on
TD-6V
External Midi Sequencer
Synchronizing with an External Midi Device Sync Mode
Sync Mode INT, EXT, Remote
CH10
PdlDataThin Pedal Data Thin OFF, 1
Switch to the GM General Midi Mode GM Mode
Hi-Hat Control Pedal Data Reduction Pedal Data Thin
CH10Priorty Channel 10 Priority KIT, Perc
GM Mode OFF, on
100
Soft Thru OFF, on
101
Tx PC Sw Tx PC Switch OFF, on
Rx PC Sw Rx PC Switch OFF, on
Set the Device ID Device ID
Midi Channel Settings for a Part Midi Part
102
Part CH Part Tx Rx Channel CH 1-CH16, OFF
Stop recording on the external sequencer Bulk Dump
Saving Data to an External Midi Device Bulk Dump
103
Press Enter to start the data Transmission
Returning Saved Data to the TD-6V
Data Compatibility Between the TD-6 and the TD-6V
104
Set the Midi Gate Time. KIT/CONTROL/Gate Time p
About Transmitting/Receiving Program Changes
Triggering an External Sound Device by Playing the TD-6V
105
Midi Sequencer
Combining with an External
Using the TD-6V As a Sound
Module
107
Memo
109
Appendices
No Sound
Troubleshooting
No sounds from pads connected to Trigger Inputs 6 AUX TOM4
Volume levels for the rims of TOM2
No Sound When Shift + KIT
No Sound When the Pad is Struck
No Sound/Low volume from
Device Connected to the MIX
Jack
Pad Does Not Sound As Intended
Drum Kit Does Not Sound As Intended
Sound is distorted
Song Does Not Sound As Intended
Display Is Too Light Or Too Dark
Problems Operating the TD-6V
116
Messages and Error Messages
System and Battery Error Messages
Messages and Error Messages Related to Sequencers and Songs
Messages and Error Messages Related to Midi
Messages and Error Messages
117
118
Drum Kit List
Funk Kits
119
Drum Kit List
Drum Kit Name Remark Jazz Kits Acoustic Drum Kits
Drum Instrument List
120
No. Name Remark
Drum Instrument List
121
Name Remark
122
Melodic
123
124
Preset Percussion Set List
125
Preset Percussion Set List
126
Backing Instrument List
Backing Instrument List
127
128
Preset Song List
129
Preset Song List
Parameter List
Drum Kit Parameters
130
Song Parameters
131
Parameter List
132
Setup Parameters
133
SETUP/MIDI Common
134
Click Parameters
Song Recording
Tempo
135
Midi Implementation Chart
136
137
138
Drum Kit
139
Specifications
140
Index
Index
141
Pitch Ctrl Pitch Control Assign
142
143
Memo
Memo
Memo
For EU Countries
Apparatus containing Lithium batteries
03458934 5RCC

 ] or [
  ] to select the part to be set.