3

Wählen Sie mit den Tasten “Standard-

Timer”, und drücken Sie oder OK.


DVD-RAM(VR)


Timer-Übersicht


Nr. To PR Tag

Start Ende Speed V/P Bearb.


DO 01


Aus


DO 01


Aus


BEWEGEN

OK

ZURÜCK

BEENDEN


Programmierte Timeraufnahme löschen

DVD-RAM DVD-RW DVD-R

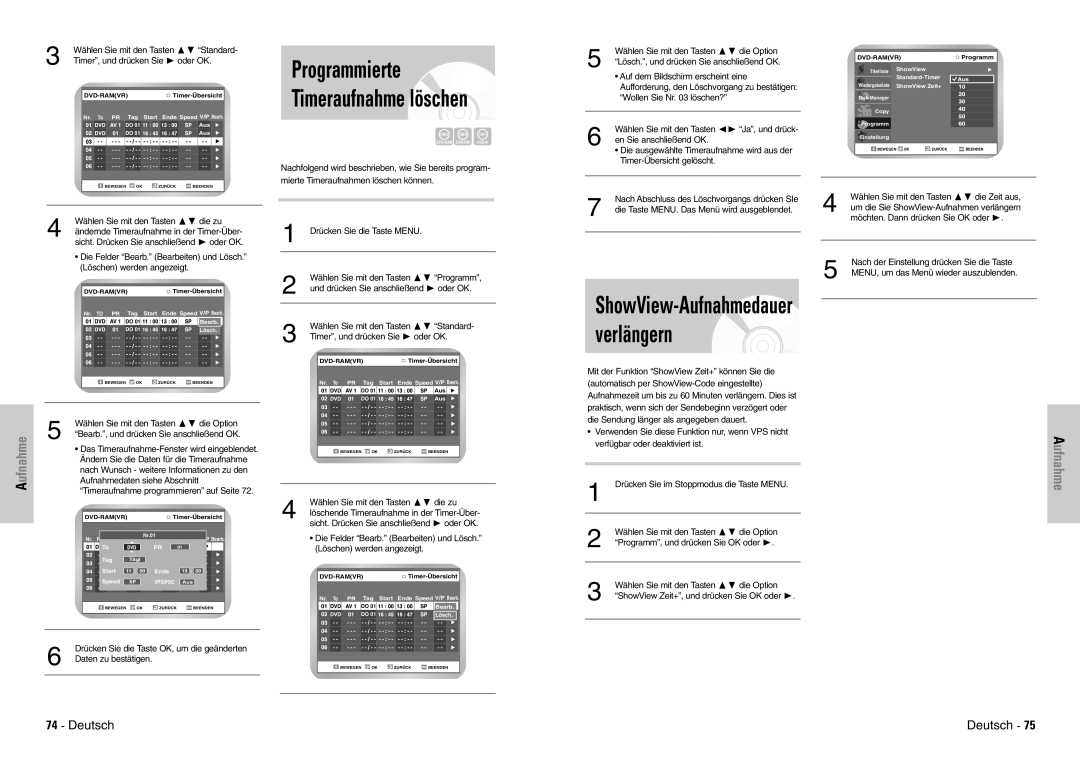
Nachfolgend wird beschrieben, wie Sie bereits program- mierte Timeraufnahmen löschen können.

5

Wählen Sie mit den Tasten die Option

“Lösch.”, und drücken Sie anschließend OK.


• Auf dem Bildschirm erscheint eine


Aufforderung, den Löschvorgang zu bestätigen:


“Wollen Sie Nr. 03 löschen?”


6

Wählen Sie mit den Tasten ➛❿ “Ja”, und drück-

en Sie anschließend OK.

• Die ausgewählte Timeraufnahme wird aus der Timer-Übersicht gelöscht.

DVD-RAM(VR)

Programm


Titelliste

ShowView


Standard-Timer

Aus

Wiedergabeliste


ShowView Zeit+


Disk-Manager

Copy

Programm

Einstellung

BEWEGEN OK

ZURÜCK

BEENDEN


4

Wählen Sie mit den Tasten die zu

ändernde Timeraufnahme in der Timer-Über-

sicht. Drücken Sie anschließend oder OK.

1 Drücken Sie die Taste MENU.

Nach Abschluss des Löschvorgangs drücken SIe

4

Wählen Sie mit den Tasten die Zeit aus,

7 die Taste MENU. Das Menü wird ausgeblendet.

um die Sie ShowView-Aufnahmen verlängern

möchten. Dann drücken Sie OK oder .


ufnahme

Die Felder “Bearb.” (Bearbeiten) und Lösch.” (Löschen) werden angezeigt.


DVD-RAM(VR)


Timer-Übersicht


Nr. TO PR

Tag

Start Ende Speed V/P Bearb.


DO 01


Bea

rb.


DO 01


Lösch.


BEWEGEN

OK

ZURÜCK

BEENDEN


5

Wählen Sie mit den Tasten

die Option

“Bearb.”, und drücken Sie anschließend OK.

• Das Timeraufnahme-Fenster wird eingeblendet.

Ändern Sie die Daten für die Timeraufnahme

nach Wunsch - weitere Informationen zu den

Aufnahmedaten siehe Abschnitt

2

Wählen Sie mit den Tasten

“Programm”,

und drücken Sie anschließend oder OK.


3

Wählen Sie mit den Tasten

“Standard-

Timer”, und drücken Sie oder OK.


DVD-RAM(VR)


Timer-Übersicht


Nr. To PR Tag

Start Ende Speed V/P Bearb.


DO 01


Aus


DO 01


Aus


BEWEGEN

OK

ZURÜCK

BEENDEN


5

ShowView-Aufnahmedauer verlängern

Mit der Funktion “ShowView Zeit+” können Sie die (automatisch per ShowView-Code eingestellte) Aufnahmezeit um bis zu 60 Minuten verlängern. Dies ist praktisch, wenn sich der Sendebeginn verzögert oder die Sendung länger als angegeben dauert.

Verwenden Sie diese Funktion nur, wenn VPS nicht verfügbar oder deaktiviert ist.

Nach der Einstellung drücken Sie die Taste MENU, um das Menü wieder auszublenden.

Aufnahme

A

“Timeraufnahme programmieren” auf Seite 72.

DVD-RAM(VR)

Timer-Übersicht


Nr.

Nach

Nr.01

Bearb.


To


PR


- -

- - -

- - / - - - - : - - - - : - -

- -

- -

- -Tag- - -

Tägl - - : - - - - : - -

- -

- -

- -Start- - -

- - / - - - - : -Ende- - - : - -

- -

- -

- - - - -

- - / - - - - : - - - - : - -

- -

- -

Speed

VPS/PDC

Aus


- -

- - -

- - / - - - - : - - - - : - -

- -

- -


BEWEGEN

OK

ZURÜCK

BEENDEN


6

Drücken Sie die Taste OK, um die geänderten


Daten zu bestätigen.


4

Wählen Sie mit den Tasten die zu

löschende Timeraufnahme in der Timer-Über-


sicht. Drücken Sie anschließend oder OK.


• Die Felder “Bearb.” (Bearbeiten) und Lösch.”

(Löschen) werden angezeigt.


DVD-RAM(VR)


Timer-Übersicht


Nr. To PR

Tag

Start Ende Speed V/P Bearb.


DO 01


Bea

rb.


DO 01


Lösch.


BEWEGEN

OK

ZURÜCK

BEENDEN


1

Drücken Sie im Stoppmodus die Taste MENU.


2

Wählen Sie mit den Tasten

die Option


“Programm”, und drücken Sie OK oder .


3

Wählen Sie mit den Tasten

die Option


“ShowView Zeit+”, und drücken Sie OK oder .

74 - Deutsch

Deutsch - 75

Page 38
Image 38
Samsung DVD-VR300E/COM, DVD-VR300E/XEG manual Ufnahme

DVD-VR300E/COM, DVD-VR300E/XEG specifications

The Samsung DVD-VR300E/XEG and DVD-VR300E/COM are versatile DVD recorders that combine the functionality of a traditional DVD player with the powerful capabilities of a video recorder. This device is perfect for those who want to enjoy their favorite shows and movies while also having the ability to record new content for later viewing.

One of the main features of the DVD-VR300E is its integrated HDD (hard disk drive) storage, offering varying capacities that allow users to record and store hours of high-quality video. This internal storage eliminates the need for external media, making it convenient to access recorded content. Users can start recording their favorite shows with just the touch of a button, thanks to an easy-to-navigate interface designed for simplicity and efficiency.

The DVD-VR300E supports multiple formats, making it compatible with various DVDs, including DVD-R, DVD-RW, DVD+R, and DVD+RW, ensuring flexibility with playback and recording options. This versatility allows users to play previously recorded discs from other devices or create new recordings that can be finalized for playback on compatible players.

One of the standout technologies integrated into the DVD-VR300E is its progressive scan capability. This feature enhances video quality by eliminating interlacing, providing a smoother, clearer image when playing back DVDs. Additionally, its built-in advanced audio technology ensures that sound quality matches the high-definition visuals, delivering an immersive experience for viewers.

For those who want to keep their recorded content organized, the DVD-VR300E includes useful features such as a timer record function and a user-friendly program guide. These features allow users to schedule recordings ahead of time, ensuring they never miss their favorite shows. Furthermore, users can easily edit recorded content, providing the opportunity to trim unwanted segments and enhance their viewing experience.

The Samsung DVD-VR300E models are also designed with a variety of connectivity options, including USB ports, making it easy to transfer content to and from external storage devices. This feature not only simplifies the process of moving recorded files but also extends the user's ability to share content with friends and family.

Overall, the Samsung DVD-VR300E/XEG and DVD-VR300E/COM offer a comprehensive solution for home entertainment enthusiasts. With their advanced recording capabilities, high-quality playback features, and user-friendly design, these DVD recorders set a standard for versatility and performance in the market. Whether recording live television, playing DVDs, or organizing recordings, the DVD-VR300E models are equipped to meet the demands of modern viewing habits and enhance the overall home entertainment experience.