AK68-01293E
DVD-VR350 DVD-VR355
Getting
Getting Started
Precaution
DVD-Video
Disc Specifications
Audio CD
DVD±R Disc Playback and Recording
DVD-RAM Disc Playback and Recording
DVD+RW Disc Playback and Recording
Protection
Do not use the following discs
Contents
Troubleshooting Specifications
EZ REC Mode
ShowView Extended
General Features
Recording
Select the disc type
Format the disc to start recording
Preparing the Remote Control
Accessories
Unpacking
Playing
Button Function
Controllable TV Codes
Front Panel DVD-VR350
Description
Front Panel DVD-VR355
Rear Panel DVD-VR350
Front Panel Display
Hdmi Output DVD-VR355 only
Rear Panel DVD-VR355
Tour of the Remote Control
Connecting the Scart Cable
Connecting & Setting Up
Connecting DVD Recorder & VCR to the TV using the RF Cable
By means of RF Cable
AV1TV By means of 21-pin Scart Cable
Connecting the S-Video Cable
Connecting the Audio/Video Cable
Progressive Scan
Connecting the Component Video Cable
Case 1 Connecting to a TV with Hdmi Jack
Connecting HDMI/DVI to a TV DVD-VR355 only
Case 2 Connecting to a TV with DVI Jack
To change Hdmi output resolution, see pages 28~29
Case 2 Connecting a DV Device to the DV in jack
Connecting External Devices
AV Receiver Connections
Plug & Auto Setup
System Setup
On-Screen Menu Navigation
Auto Setup
Setting the Date and Time
Selecting the RF OUT Sound Mode B/G-D/K
Manual Setup
Video Output CH
Setting Up the Language Options
Norwegian, Portuguese, Spanish, Swahili, Swedish
Central
This is only active when a Dolby Digital signal is detected
Setting Up the Audio Options
Digital Output
Dynamic Compression
This function allows you to setup the TV screen settings
Setting Up the Display Video Options
TV Aspect
Video Output
‹ Setting up the Progressive scan
HDMI/DVI Resolution DVD-VR355 only
‹ Canceling the Progressive scan
Available Video Output Jack
Output selection DVD-VR355 only
DivXR Registration
About the Change Password
Setting Up the Parental Control
About the Rating Level
Tape Length
VCR Setting
Auto Play
Auto Repeat
Automatic Chapter Creator
DVD EP Mode Time
Colour System
Black and White
Anynet+HDMI-CEC DVD-VR355 only
Quick Recording
TV Menu
For using Anynet+HDMI-CEC
Region code DVD-Video only
Playback
Disc types that can be played
Discs that cannot be played
Playing a Disc
CVD/CD-ROM/CDV/CD-G/CD-I
Using the Search & Skip Functions
Using the Disc Menu and Title Menu
For DVD-VIDEO disc
For DVD-RAM/DVD±RW/DVD±R disc
Skipping Chapters or Tracks
Slow Motion Play/Step Motion Play
Skipping ahead 30 seconds
Slow Motion Play
No sound is heard during Step or Slow mode
Using the Anykey button
Step Motion Play
Moving to a desired scene directly
Selecting the Subtitle Language
Repeat Play
Playing Repeatedly
Playing a Certain section Repeatedly
Changing the Camera Angle
Selecting the Audio language
Zooming-In
Setting Bookmarks
Using the Bookmarks
Playing back a Bookmark
Clearing a Bookmark
Setting Markers
Using the Markers
VR mode
Playing back a Marker
Playing back an Audio CD CD-DA/MP3
‹ Audio CD CD-DA Screen Elements Play mode icon
Playing back an Audio CD CD-DA
Repeat Playback of an Audio/MP3 Disc
Playing back an MP3 Disc
To return to normal playback
Playing back a Picture Disc
Play Option Mode
To Programme Tracks
You can register a maximum 30 tracks in the playlist
MPEG4 Function Description
Playing back an MPEG4 Disc
Function Description Skip Scene
Forward or backward 5 minutes
Playing back a VHS Tape VCR
Special VCR Playback Features
Tracking
Variable Search System
Recordable discs
Recording
Compatibility between Samsung and Other Company’s Recorder
This section shows various DVD recording methods
DVD-RAM/-RWVR mode
Recording Mode
Recording Formats
DVD-RWV mode/-R
‹ Content Protection for Recordable Media Cprm
Concerning Copy Control Signals
Unrecordable video
DVD+R
Before you start
Recording immediately
Recording the current programme you are watching
Recording from external equipment you are watching
Making a One Touch Recording OTR
Recording through a DV Input jack
To stop recording
Making a Timer Recording
To exit without saving the current setting
If the timer settings overlap
‹ Recording Speed DVD
‹ Recording Speed VCR
Editing the Scheduled Record List
Follow these directions to edit the timer record list
Deleting the Scheduled Record List
Before presetting your DVD Recorder & VCR
Using the ShowView Feature
ShowView Extended
EZ REC Mode
Maximum Recording Time SP vs. LP
Basic VCR Recording
Before starting
Tape Length SP Standard Play LP Long Play
Check Remaining Time
Special Recording Features
To copy from DVD to VCR
Copy to DVD or VCR
Direct copy DVD to VCR
Direct copy VCR to DVD
To copy from VCR to DVD
Playing the Title List
Editing
Title List Screen Elements
Recording on Free space
Basic Editing Title List
Renaming Labeling a Title
Deleting a Title
Locking Protecting a Title
Editing a Chapter
Deleting a Section of a Title
Edit Title List Screen Elements
Playback bar d Playtime
Deleting a chapter
Adding a chapter
Hiding a chapter
‹ Chapter Edit Screen Elements
Deleting all chapters
Dividing a Title
Creating a Playlist
Advanced Editing Playlist
To make a new playlist
To return to Edit Playlist menu
Renaming a Playlist Title
Playing Titles in the Playlist
Editing a Scene for the Playlist
Follow these instructions to play the playlist titles
Modifying a Scene Replacing a Scene
Playing a Selected Scene
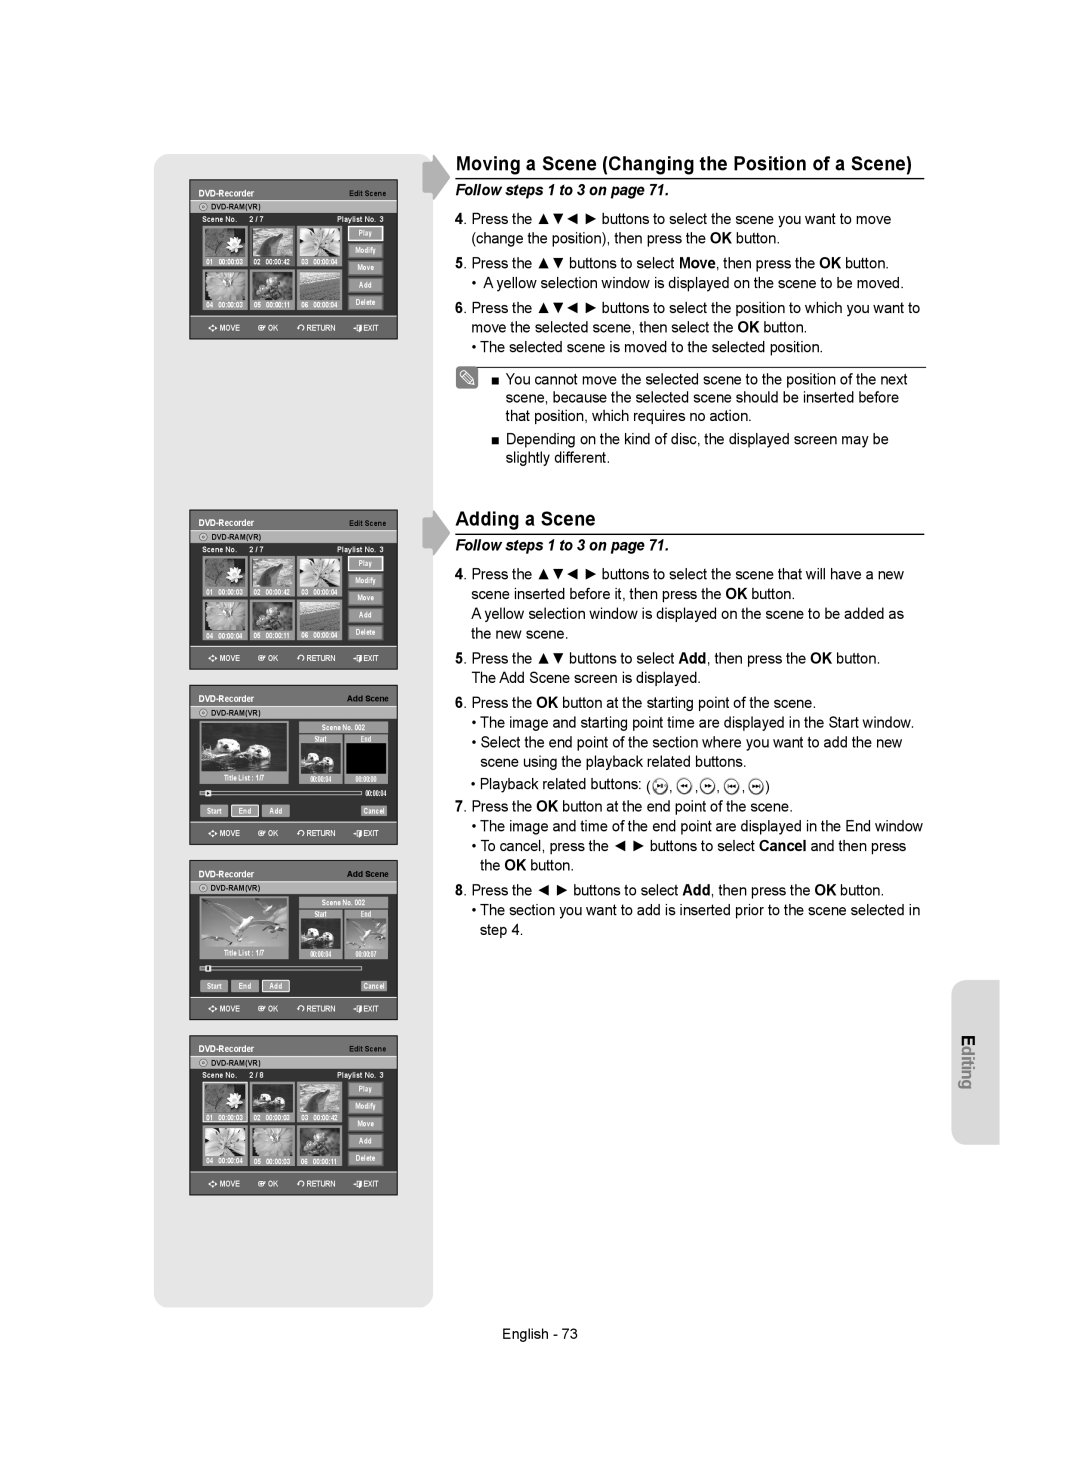
Follow steps 1 to 3 on
Adding a Scene
Moving a Scene Changing the Position of a Scene
Deleting a Playlist from the Playlist
Copying a Playlist to the VCR
Deleting a Scene
Editing the Disc Name
Disc Manager
Disc Protection
Follow these instructions to give a name to a disc
Finalising a Disc
Formatting a Disc
Disc DVD-RAM DVD-RW
DVD-RWVRF
Unfinalising a Disc V/VR mode
Edit Compatible
Delete All Title Lists
Reference
Troubleshooting DVD
Play mode settings Are different from
Problem Explanation/Solution Icon appears on
Settings configured
Other problems
Troubleshooting VCR
PAL
Specifications
MPEG-II
Audio Output
Επικοινωνήστε με τη Samsung World Wide
Contact Samsung World Wide
Свържете се със Samsung World Wide
Contactaţi centrele Samsung World Wide
AK68-01293E
Εγχειρίδιο οδηγιών
Προειδοποίηση
Έναρξη
Σημαντικές οδηγίες για την ασφάλεια
Προφυλάξεις
Προφυλάξεις κατά το χειρισμό
Συντήρηση του περιβλήματος
Προδιαγραφές δίσκου
Αποθήκευση δίσκων
CD ήχου
Αναπαραγωγή και εγγραφή δίσκου DVD±R
Αναπαραγωγή και εγγραφή δίσκου DVD+RW
Αναπαραγωγή και εγγραφή δίσκου DVD-RW
Αναπαραγωγή και εγγραφή δίσκου DVD-RAM
Προστασία
Προδιαγραφές δίσκου Περιεχόμενα Γενικά χαρακτηριστικά
Μεταχείριση του δίσκου
Αποσυσκευασία Περιγραφή Πρόσοψη DVD-VR350 Πρόσοψη DVD-VR355
Παρουσίαση τηλεχειριστηρίου
OTR
Γενικά χαρακτηριστικά
Χρήση της συσκευής εγγραφής DVD και βίντεο
Βήμα 1 Επιλέξτε τον τύπο δίσκου
Χρήση ενός DVD-RΑΜ
Χρήση δίσκου DVD±RW/+R
Βήμα 3 Εγγραφή
Αποσυσκευασία
Βήμα 4 Αναπαραγωγή
Πρόσθετα εξαρτήματα
Μαρκα Επιλογη Αριθμου Thomson Asia
Μαρκα Επιλογη Αριθμου Samsung
Κουμπί
PLAY/PAUSE
Θύρα δίσκου DVD
Πίσω όψη DVD-VR350
Οθόνη πρόσοψης
EXT
Coaxial
Τηλεόρασης AV1 TV Ελληνικά
Υποδοχή εξόδου προς τηλεόραση
Παρουσίαση τηλεχειριστηρίου
Σύνδεση της συσκευής με την
Συνδέσεις και ρυθμίσεις
Τηλεόραση μέσω καλωδίου RF
Περίπτωση 1 Σύνδεση της συσκευής με
Μέσω καλωδίου RF
Συνδέστε το ένα βύσμα του καλωδίου βίντεο στην
Σύνδεση καλωδίου ήχου/βίντεο Σύνδεση καλωδίου S-Video
Συνιστωσών, καθώς διαχωρίζει τα στοιχεία της
Υποδοχή εξόδου Video στο πίσω μέρος της συσκευής
Προοδευτική σάρωση
Σύνδεση καλωδίου βίντεο συνιστωσών
Περιγραφή σύνδεσης Hdmi
Περίπτωση 1 Σύνδεση με τηλεόραση που διαθέτει υποδοχή Hdmi
Γιατί η Samsung χρησιμοποιεί Hdmi
Σύνδεση εξωτερικών συσκευών
Συνδέσεις δέκτη ήχου/βίντεο
Περίπτωση 1 Σύνδεση εξωτερικής Συσκευής στις υποδοχές AV3
Περίπτωση 2 Σύνδεση μιας συσκευής DV στην υποδοχή DV
Πλοήγηση στο μενού επί της οθόνης
Ρύθμιση συστήματος
Σύνδεση και αυτόματη ρύθμιση
Αυτόματη ρύθμιση
Ρύθμιση ημερομηνίας και ώρας
Επιλογή του τρόπου λειτουργίας ήχου RF OUT B/G-D/K
Μη αυτόματη ρύθμιση
OK στο PR5
Ρύθμιση των επιλογών της γλώσσας
Κανάλι εξόδου βίντεο
Αγγλικά, Αζερικά, Λευκορωσικά, Βουλγαρικά, Καζάχικα
Ψηφιακή Έξοδος
Ρύθμιση των επιλογών ήχου
Δυναμική Συμπίεση
Αυτό είναι ενεργό μόνο όταν ανιχνεύεται σήμα Dolby Digital
TV Διάσταση
Ρύθμιση των επιλογών οθόνης βίντεο
3D Μείωση Θορύβου
Έξοδος Βίντεο
‹ Ρύθμιση της προοδευτικής σάρωσης
Ανάλυση HDMI/DVI μόνο για DVD-VR355
‹ Ακύρωση της προοδευτικής σάρωσης
Επιλογή εξόδου μόνο για DVD-VR355
DivXR Καταγραφή
Composite/S-Video/Component
Πληροφορίες σχετικά με το επίπεδο αξιολόγησης
Ρύθμιση του γονικού ελέγχου
Μήκος ταινίας
Ρυθμίσεις βίντεο
Αυτόμ. παίξιμο
Αυτόμ. επανάληψη
Αυτόματη δημιουργία κεφαλαίων
EP χρόνος Θέσης
Σύστημα χρωμάτων
Ασπρόμαυρο
Ταχεία Εγγραφή
Για να χρησιμοποιήσετε το Anynet+ Hdmi CEC
Anynet+HDMI-CEC μόνον DVD-VR355
Μενού τηλεόρασης
Λογότυπα δίσκων που μπορούν να αναπαραχθούν
Αναπαραγωγή
Κωδικός περιοχής μόνο για DVD-Video
Τύποι δίσκων που μπορούν να αναπαραχθούν
Τύποι δίσκων που δεν μπορούν να αναπαραχθούν
Αναπαραγωγή ενός δίσκου
Για τους δίσκους DVD-VIDEO
Χρήση του μενού του δίσκου και του μενού τίτλων
Για δίσκους DVD-RAM/DVD±RW/DVD±R
Αναζήτηση σε κεφάλαιο ή κομμάτι
Παράλειψη 30 δευτερολέπτων προς τα εμπρός
Παράλειψη κεφαλαίων ή κομματιών
Αναπαραγωγή σε αργή κίνηση
Πάτημα του κουμπιού l
Αναπαραγωγή καρέ-καρέ
Χρήση του κουμπιού Anykey
Απευθείας μετάβαση στην επιθυμητή σκηνή
Επιλογή της γλώσσας υποτίτλων
Επανάληψη αναπαραγωγής
Επαναλαμβανόμενη αναπαραγωγή
Επαναλαμβανόμενη αναπαραγωγή μιας Συγκεκριμένης ενότητας
Αλλαγή της οπτικής γωνίας της κάμερας
Επιλογή της γλώσσας διαλόγων
Μεγέθυνση
Κανονικό μέγεθος
Ρύθμιση Σελι/δείκτη
Χρήση Σελι/δείκτη
Αναπαραγωγή από ένα Σελι/δείκτη
Διαγραφή Σελι/δείκτη
Ρύθμιση Σημειωτής
Χρήση Σημειωτής
Αναπαραγωγή από ένα Σημειωτής
Διαγραφή ενός Σημειωτής
Αναπαραγωγή δίσκων CD CD-DA ήχου
Αναπαραγωγή ενός CD CD-DA ήχου/MP3
Κουμπί l Αναπαράγει το επόμενο κομμάτι
Πατήστε τα κουμπιά / γρήγορη αναπαραγωγή
Επανάληψη αναπαραγωγής δίσκων ήχου/ΜΡ3
Αναπαραγωγή δίσκων MP3
Για επιστροφή στην κανονική αναπαραγωγή
Τρόπος λειτουργίας επιλογής αναπαραγωγής
Αναπαραγωγή δίσκου με φωτογραφίες
Προγραμματισμός κομματιών
Περιγραφή λειτουργίας MPEG4
Αναπαραγωγή δίσκου MPEG4
Ρύθμιση ίχνους
Αναπαραγωγή βιντεοκασέτας
Ειδικά χαρακτηριστικά αναπαραγωγής σε βίντεο
Παράλειψη
Σύστημα μεταβλητής αναζήτησης
Αναπαραγωγή σε αργή κίνηση
Προς το 00000 Παύση
Εγγράψιμοι δίσκοι
Εγγραφή
Μορφή
Μορφές εγγραφής
Τρόπος λειτουργίας εγγραφής
DVD-RAM/-RWτρόπος λειτουργίας VR
DVD-RWτρόπος λειτουργίας V/-R
Σχετικά με τα σήματα απαγόρευσης της αντιγραφής
Μη εγγράψιμο βίντεο
Ελεύθερη Αντιγραφή μία Δεν επιτρέπεται Μέσο Φορά
DVD+RW
Πριν ξεκινήσετε
Άμεση εγγραφή
Εγγραφή από εξωτερικές συσκευές που παρακολουθείτε
Για παύση της εγγραφής
Εκτέλεση εγγραφής με το πάτημα ενός κουμπιού OTR
Εγγραφή μέσω υποδοχής εισόδου DV
Για να διακόψετε την εγγραφή
Εκτέλεση εγγραφής με χρονοδιακόπτη
‹ Recording Speed VCR Ταχύτητα εγγραφής βιντεοκασέτας
‹ Recording Speed DVD Ταχύτητα εγγραφής DVD
Αν οι ρυθμίσεις του χρονοδιακόπτη επικαλύπτονται
Με τη συσκευή σε τρόπο λειτουργίας διακοπής της αναπαραγωγής
Από τη λίστα εγγραφών με χρονοδιακόπτη
ShowView Εκτεταμένη
Χρήση της λειτουργίας ShowView
Αλλιώς πατήστε Off
Μέγιστος χρόνος εγγραφής SP ως προς LP
Βασικές λειτουργίες εγγραφής σε βίντεο
Προτού ξεκινήσετε
Διάρκειας
Ειδικά χαρακτηριστικά εγγραφής
Έλεγχος χρόνου που απομένει
Παρακολούθηση άλλου τηλεοπτικού καναλιού
Προσθήκη χρόνου εγγραφής
Απ’ ευθείας αντιγραφή DVD σε βιντεοκασέτα
Αντιγραφή σε DVD ή βιντεοκασέτα
Απ’ ευθείας αντιγραφή βιντεοκασέτα σε DVD
Αντιγραφή βιντεοκασέτας σε DVD
Αναπαραγωγή της λίστας τίτλων
Eπεξεργασία
Στοιχεία οθόνης λίστας τίτλων
Εγγραφή σε Ελεύθερος χώρος
Βασική επεξεργασία λίστα τίτλων
Μετονομασία ενός τίτλου
Διαγραφή ενός τίτλου
Κλείδωμα Προστασία ενός τίτλου
Επεξεργασία ενός κεφαλαίου
Διαγραφή μιας ενότητας τίτλου
Πατήστε το κουμπί Title List
Στοιχεία οθόνης επεξεργασίας της λίστας τίτλων
Διαγραφή ενός κεφαλαίου
Προσθήκη κεφαλαίου
Απόκρυψη ενός κεφαλαίου
‹ Στοιχεία οθόνης επεξεργασίας κεφαλαίου
Διαγραφή όλων των κεφαλαίων
Χωρισμός ενός τίτλου
Για να δημιουργήσετε μια καινούργια λίστα αναπαραγωγής
Δημιουργία λίστας αναπαραγωγής
Για να επιστρέψετε στο μενού Επεξεργασία Λίστα Αναπαραγωγής
Επεξεργασία μιας σκηνής για τη λίστα αναπαραγωγής
Αναπαραγωγή τίτλων από τη λίστα αναπαραγωγής
Τροποποίηση μιας σκηνής αντικατάσταση μιας σκηνής
Αναπαραγωγή μιας επιλεγμένης σκηνής
Μετακίνηση μιας σκηνής αλλαγή της θέσης μιας σκηνής
Προσθήκη μιας σκηνής
Διαγραφή μιας σκηνής
Αντιγραφή μιας λίστας αναπαραγωγής στο βίντεο
Επεξεργασία του ονόματος του δίσκου
Λειτουργία Disc Manager
Προστασία δίσκου
Ακολουθήστε αυτές τις οδηγίες για να δώσετε όνομα στο δίσκο
Ολοκλήρωση δίσκου
Διαμόρφωση ενός δίσκου
Δισκοσ DVD-RAM DVD-RW
Κατάργηση ολοκλήρωσης δίσκου Τρόπος λειτουργίας V/VR
Συμβατότητα επεξεργασίας
Διαγραφή όλων των λιστών τίτλων
Αντιμετώπιση προβλημάτων DVD
Παραπομπές
Λειτουργούν σωστά
Μενού Settings
Λόγος πλευρών είναι σταθερός για δίσκους DVD
Ούτε βίντεο. Η θήκη του
Αντιμετώπιση προβλημάτων Βιντεο
Μορφή συμπίεσης ήχου Dolby AC-3 256 kbps
Τεχνικές προδιαγραφές
Έξοδος ήχου
48 / 96KHz 44.1KHz
Page
Region Country Customer Care Center Web Site
AK68-01293E