Preparation
Parts |
|
|
|
|
| Icons |
|
| Description | ||
|
|
|
|
|
|
|
|
|
|
| |
|
|
|
|
|
|
|
| Turn the power on or off. |
| ||
|
|
|
|
|
|
|
|
| |||
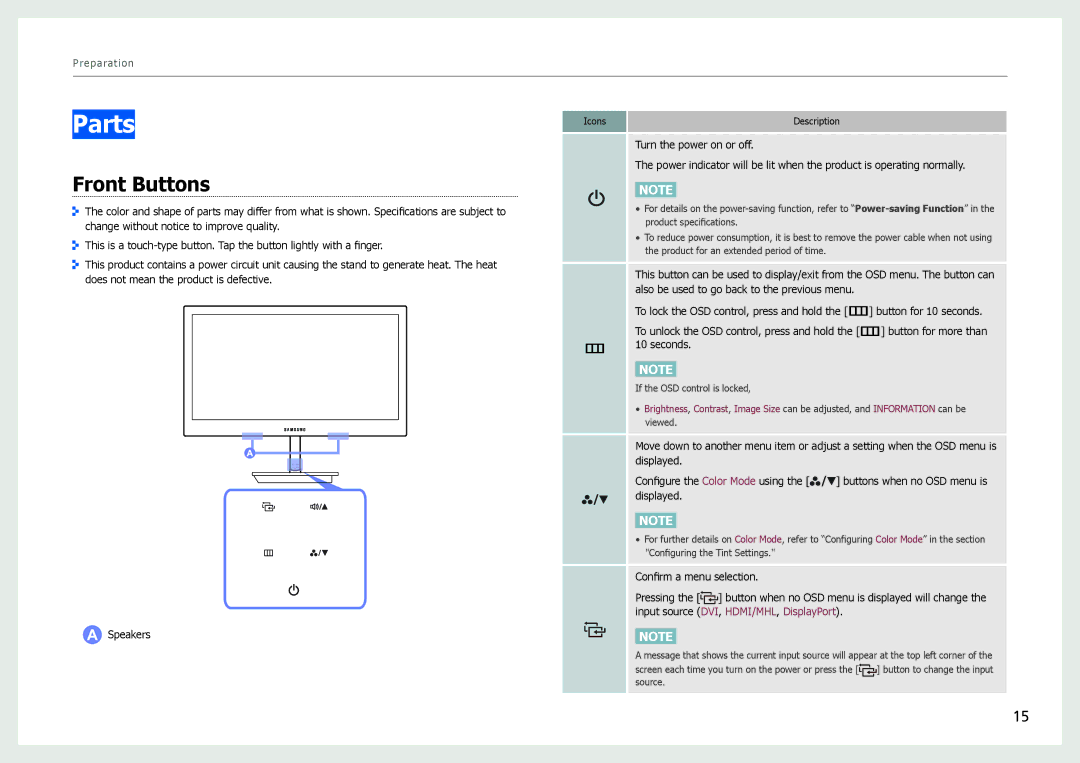
Front Buttons |
|
| The power indicator will be lit when the product is operating normally. | ||||||||
|
|
|
|
|
| ||||||
|
|
| NOTE |
| |||||||
|
|
| |||||||||
The color and shape of parts may differ from what is shown. Specifications are subject to |
|
| • For details on the | ||||||||
change without notice to improve quality. |
|
|
| product specifications. |
| ||||||
|
| • To reduce power consumption, it is best to remove the power cable when not using | |||||||||
This is a |
|
| |||||||||
|
|
| the product for an extended period of time. |
| |||||||
|
|
|
|
|
|
|
|
|
| ||
This product contains a power circuit unit causing the stand to generate heat. The heat |
|
| This button can be used to display/exit from the OSD menu. The button can | ||||||||
does not mean the product is defective. |
|
| |||||||||
|
| also be used to go back to the previous menu. | |||||||||
|
|
|
|
|
|
|
| ||||
|
|
|
|
|
|
|
| To lock the OSD control, press and hold the [m] button for 10 seconds. | |||
|
|
|
|
|
|
|
| ||||
|
|
|
|
|
|
|
| To unlock the OSD control, press and hold the [m] button for more than | |||
|
|
|
|
|
| m | 10 seconds. |
| |||
|
|
|
|
|
|
|
|
|
|
|
|
|
|
|
|
|
|
|
|
| NOTE |
| |
|
|
|
|
|
|
|
| If the OSD control is locked, |
| ||
|
|
|
|
|
|
|
| • Brightness, Contrast, Image Size can be adjusted, and INFORMATION can be | |||
|
|
|
|
|
|
|
|
| viewed. |
| |
|
|
|
|
|
|
|
|
| |||
|
|
|
|
|
|
|
| Move down to another menu item or adjust a setting when the OSD menu is | |||
|
|
|
|
|
|
|
| ||||
|
|
|
|
|
|
|
| displayed. |
| ||
|
|
|
|
|
|
|
| Configure the Color Mode using the [ | ] buttons when no OSD menu is | ||
|
|
|
|
|
|
|
| displayed. |
| ||
NOTE
• For further details on Color Mode, refer to “Configuring Color Mode” in the section "Configuring the Tint Settings."
Confirm a menu selection.
Pressing the [![]() ] button when no OSD menu is displayed will change the input source (DVI, HDMI/MHL, DisplayPort).
] button when no OSD menu is displayed will change the input source (DVI, HDMI/MHL, DisplayPort).
Speakers |
|
NOTE |
A message that shows the current input source will appear at the top left corner of the
screen each time you turn on the power or press the [![]()
![]() ] button to change the input source.
] button to change the input source.
15