Real Time DVR
Key features of your DVR
WHAT’S Included with Your DVR
Safety regulations
Before start
Battery
Operating Temperature
Standards Approvals
Contents
Search and Play
Introducing your real time DVR
Controls on the DVR
Stop Button
Power LED
Fast/Step Rewind Button
PLAY/PAUSE Button
Rear Panel Jacks
Rear
Release, and wait 3 seconds
Remote Control
Press the 1 to 9 button respectively
FR fast rewind FR fast reverse Used for
Changing the Remote Control ID
HDD Addition
Installation
Checking Installation Environment
How to add hard disks
Things to consider when adding a hard disk
Setting the jumper
Slave
Bracket Hddb Hdda
Screwdriver
BRACKET-HDDB
Connecting to Internet through Ethernet 10/100BaseT
Connecting with other devices
Connecting VIDEO, AUDIO, and Monitor Connecting the Network
Illustrations are described based on SHR-5162
Connecting to Internet through Adsl
Connecting the USB
Connecting the Alarm INPUT/OUTPUT
5082 Alarm IN/OUT Ports 5162 Alarm IN/OUT Ports
Connecting the RS-485 Device
Operating the System
Live Screen Mode
Live
Live screen icons
Live screen modes
Audio On/Off setting in full screen mode
Setting Audio ON/OFF
Selecting live screen mode
Audio On/Off setting in 16-split mode
Freeze function
Freezing and Zooming
Event Monitoring
Zoom function
Fan Information Error occurs in the fan Refer to the manual
SPOT-OUT Monitoring
Before USE
Menu setup
Date/Time/Language Setup
System
Password
Event Log
Load Factory Default
System Log
System Information and Setup
Storage Setup
Export/Import the Configuration
Remote Control Device
Camera Configuration
Camera
PTZ Device
Screen Setup
Monitoring
Record Mode
Record Quality & Auto Deletion
Record Rate & Video Size
Event Record Duration
Motion Detection Setup
Event Record Mode
Alarm Detection Setup
Record Schedule
Video Loss Detection Setup
Schedule
Network
Alarm Out Schedule
IP Settings
Transfer Protocol Settings
Callback Settings
Callback Settings
Transfer Picture Settings
Transfer Picture Settings
Poor image problem in Smart Viewer
Configuring Network
Port configuration for connecting Smart Viewer
Case of TCP transfer protocol
Backup
Backup
To configure the related settings
Basic PTZ Operations
PTZ Camera Control Mode
PTZ camera control
To set a preset
Preset Setup
Camera Menu Setup
Samsung
Preset View
Other View
Pan
Record Schedule
Recording
REC Normal Recording
Event Search
Search and play
Calendar Search
To perform a calendar search
To perform an event search
Date Time Search
GO to First Search
To perform a date/time search
GO to Last Search
Backup Search
Backup Search Can Select
Playback
Viewing still images
Playback mode
Speed play
Audio playback
Smart Viewer
Main Features
PC Specification Recommended
Introduction
Execution
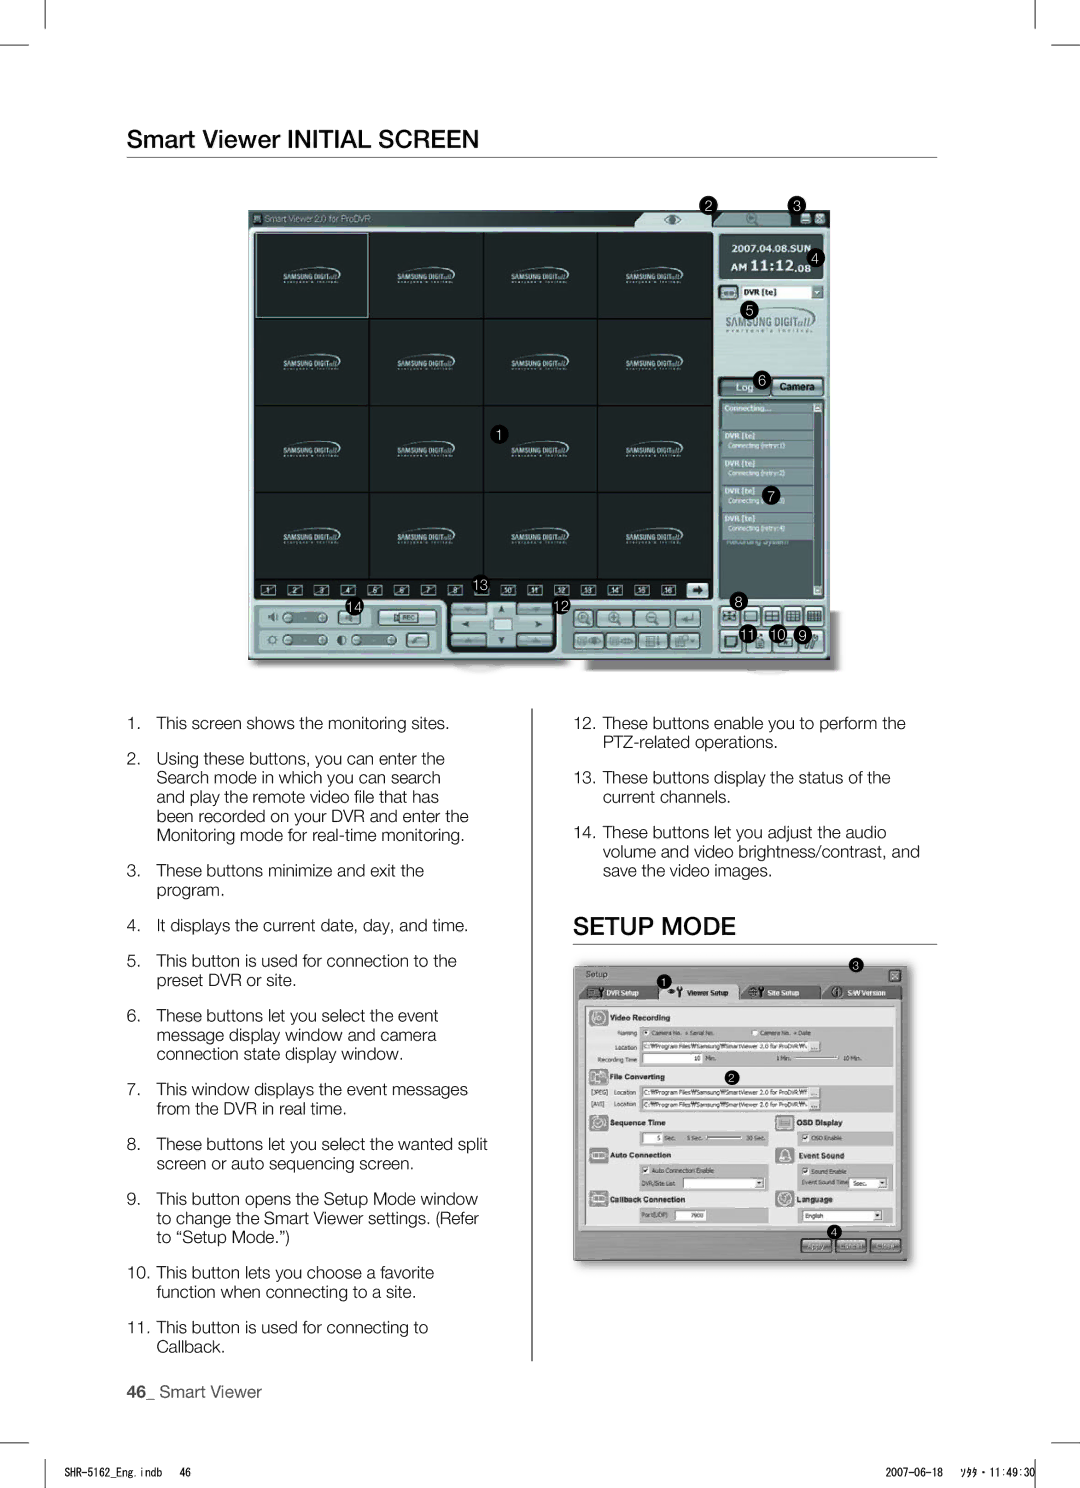
This screen shows the monitoring sites
Setup Mode
This button is used for connecting to Callback
Save/Cancellation of Revised Information
DVR Setup
Setup Item Selection buttons
Closing the setup window
For more details, see , Menu Setup Admin Password
User Password
Only English is available for the title
Camera Configuration
Camera
Retype it
Monitoring Setup
Recording
Schedule
Network
Network Password
For the network password, you can
Viewer Setup
DVR List
Site Setup
You can set the language to be displayed on Smart Viewer
DVR and retry to modify it
Smart Viewer, the following message appears
If you really want to modify the DVR, disconnect
Site List
To add a DVR to the site, select a DVR and click Add
Version
To edit the DVR, go to the DVR list
Connection Failure Cases
Monitoring Mode
Password certification failure
Upgrading the DVR software
Time Information
Mode Conversion Button
Connection Screen
Connection Information
Click Log to activate the log display window
Time Change When the date and time of the DVR are changed
Event Log Display Window
Camera Connection Indication Window
Sequence Mode Button
Black When Smart Viewer cannot be connected to a DVR
Screen Split Selection Buttons
Favorite Button
Next Button
Callback Button
Video Recording Button
PTZ Camera Control Buttons
Audio Volume Control Button
Video Brightness/Contrast Control Button
Self Menu Setup of PTZ device
The other cameras do not support those functions
Search Mode
Video Save Backup/Video Conversion/Print/Setup
Remote Mode
Audio Volume, Video Brightness/ Contrast Buttons
Calendar Window
Setup Mode button
Viewer Setup File Converting Jpeg Location
Viewer Setup File Converting AVI Location Print button
File Conversion button
Reload button
Local Mode
Time Line
It renews the recording time information
Product Specification
Appendix
True Recording ips 0.781/1.563/3.125/6.25/12.5/25i
Video MPEG4
True Recording ips 0.938/1.875/3.75/7.5/15/30ips
15ipsNTSC/12.5ipsPAL 5ipsNTSC/6.2ipsPAL
Triplex 16 split 15 Channel Live +1Channel PB
Outline Drawings
5082 Outline Drawings
5162 Outline Drawings
Factory Default
Classification Detailed Items Factory Setup
CH1
Off
On / Off
Retry
If all your efforts as above end up with nothing, check
Troubleshooting FAQ
If you forget the password, you shall reset the DVR to
When you use DHCP/ADSLPPPoE for connection
DVR has problem. DVR will not work in order to protect
Works for the shop where you bought the product
Check if 3 Smart Viewer users are in connection with
Make sure that the additional external HDD installed
Make sure that the external storage device installed is
Open Source License Report on the Product
Preamble
Appendix
No Warranty
How to Apply These Terms to Your New Programs
Repair or Correction
We protect your rights with a two-step method
You must cause the whole of the work to
SHR-5162Eng.indb 2007-06-18 ソタタ・115043
Executable
License, or at your option any later version
How to Apply These Terms to Your New Libraries
Foundation
OpenSSL License
Loss of USE, DATA, or Profits or Business Interruption
This Software is Provided by Eric Young ‘‘AS IS’’