VPC-AZ1EX VPC-AZ1E VPC-AZ1
Important note
For American Users
Declaration of Conformity
For Canadian Users
Before Reading the Manual
Regarding the data storage media
Symbols used in this manual
Contents
Appendices
Using Your Digital Camera Safely and Correctly
Do not place on an unstable surface
Do not use where there is risk of explosion
Do not use during a storm
Do not look through the digital camera into the sun
Concerning the Batteries
Concerning the supplied nickel metal hydride batteries
General precautions
Concerning the digital camera
Concerning the supplied battery charger
Do not pull on the power cord to unplug it
Keep the battery charger out of the reach of children
Do not handle with wet hands
Unplug the power cord from the power outlet when finished
Do not damage the power cord
Operating and storage conditions
Concerning the accessories
For correct use of your digital camera
When not using the digital camera for a long period
Be careful of condensation under the following conditions
Speaker
Hand-strap page 15 œ CompactFlash
Checking the Included Accessories
Hydride battery Interface cable Charger and power Cord
16MB Hydride Protective case Rechargeable
Using the HAND-STRAP and Soft Case
Using the soft case
Attaching the hand-strap
Media cards that can be used with this digital camera
Use of card in this manual
CompactFlash Microdrive
Remove the batteries from the battery charger
Quick Start for Capturing Images
Recharging the batteries see
Installing the batteries and card see pages 26
Insert the batteries
Insert the card
Press the shutter release button halfway focus-lock
Capturing images see
Point the camera lens at the subject
What if the digital camera turns off by itself
Viewing the image see pages 96
Set the main switch to Ô
When finished, press the power button to turn it off
How was it? Did everything turn out fine?
Speaker
Self-timer indicator
Parts Names
Cover page 26 Tripod stand hole
Indications in the viewfinder
Recharging nickel metal hydride batteries
Insert the power cord into the socket on the battery
Preparation of Batteries
Charger
Plug the power cord into a power outlet AC 100 to 240
Recharge time of the supplied nickel metal hydride batteries
Using the nickel metal hydride batteries properly
Preparation of Batteries
Memory effect
Installing the batteries
Confirm that the power is turned off
Close the battery compartment cover
Open the card slot cover
Installing and Removing the Cards
Installing a card
Fold down the eject button and close the card slot cover
Make sure the accessing indicator is not flashing, then
Removing a card
Raise the eject button
To capture images
Turning the Power ON/OFF
Turning the power on
To play back images
Turning the power off
Turning the power on when the power save function is active
Shooting Playback
Displaying the Setting and Option Setting Screens
Set the main switch
If no Image appears
Press the Mode button
Exiting the Setting Screen
Exiting the Option Setting Screen
Turn the selector dial to a mark other than P
Shooting Setting Screens
Still Image Shooting Setting Screen
Resolution
Compression menu
Resolution menu
Self-timer menu
Quick Shot menu
Sequential Shot Shooting Setting Screen
Shooting Setting Screens
Shutter operation menu
Sequential shot method menu
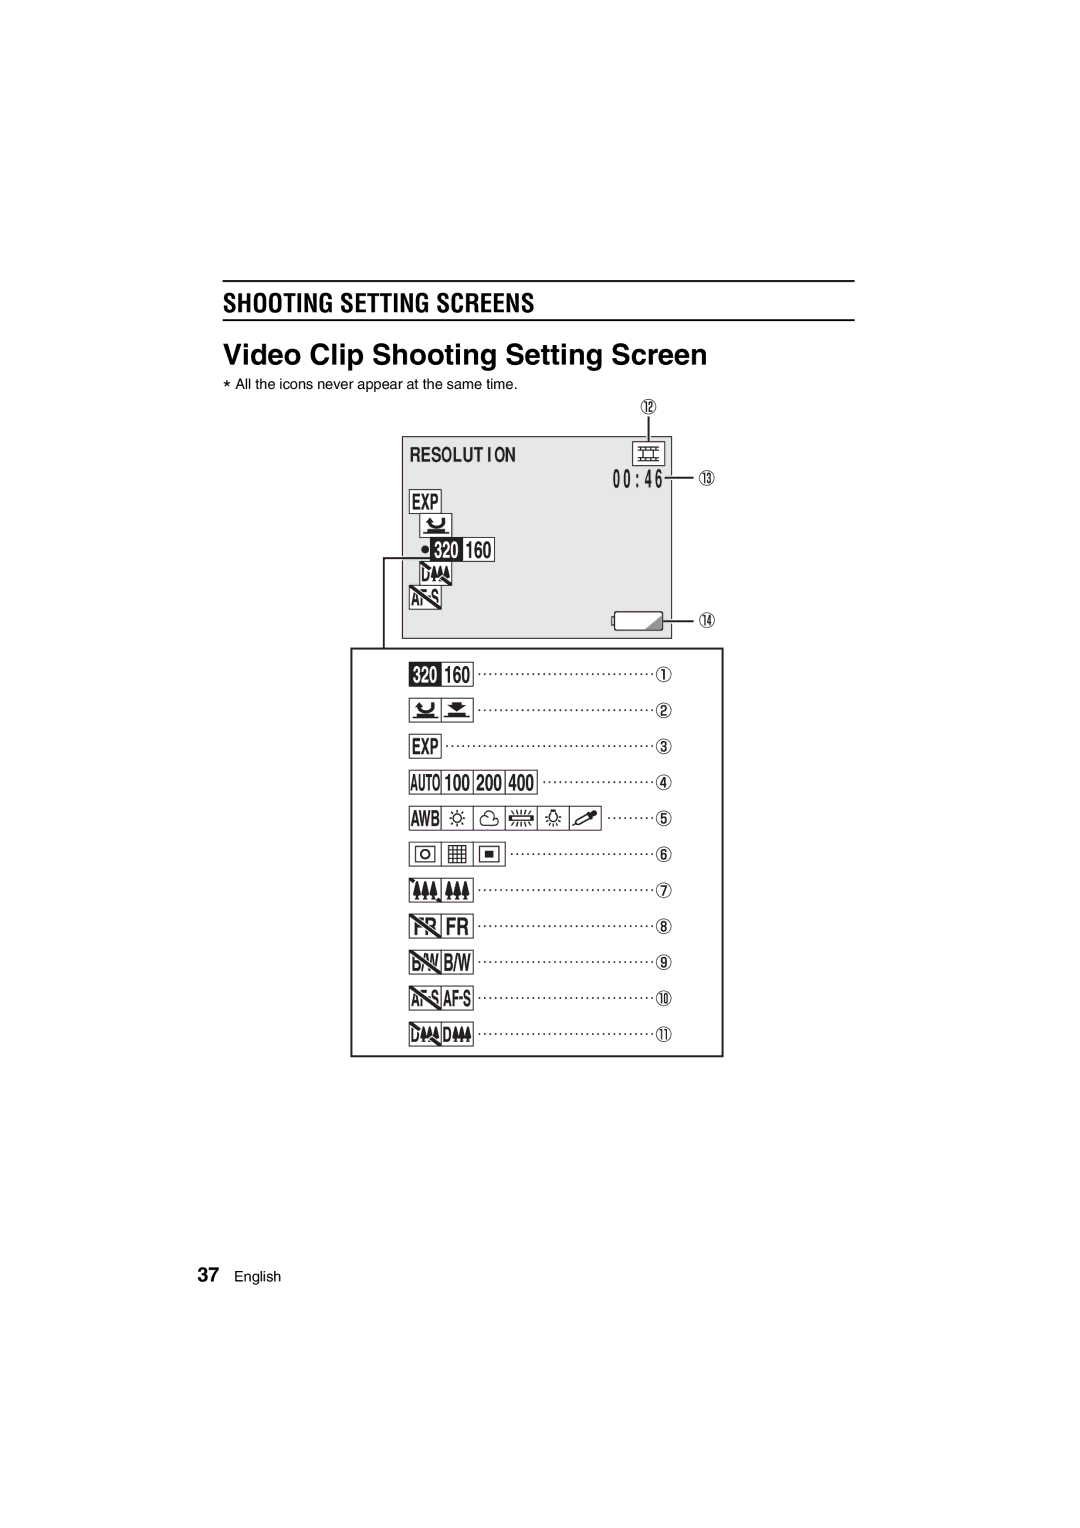
Video Clip Shooting Setting Screen
0046
Shutter release button is pressed
Optical zoom menu
Focus indicator
Shooting status display area
Playback Setting Screen
Option Setting Screen
Shooting Option Setting Screen
Playback Option Setting Screen
Information Display
Information Screen during shooting
For still images
Displaying the shooting settings during playback
Information Display
Value
For sequential shots
For video clips
Setting Screen Basic Operations
Basic button operations
Clock SET
Setting the Date and Time
Setting
Set the order of the date display during playback
Setting the Date and Time
Setting
Select
To cancel the display, press the Mode button
Set the main switch to Õ, and press the power button
Indicator
Remaining charge
Remaining Battery Charge Indication
If the LCD monitor goes off suddenly
0024
Audio REC
Display the Shooting Option Setting Screen see
Checking the remaining audio recording time
Press the SET button
Data file formats
Video clip data
Concerning Image and Audio Data Storage
Sequential shots data
Audio recording data
Setting the Shooting Mode
Turn the selector dial to the desired shooting mode
Setting the Resolution
Display the Shooting Setting Screen see
To exit the Shooting Setting Screen, press the Mode button
About the resolution and compression settings see
Setting the Compression Ratio
Compression
Capturing Images
Capturing images using the viewfinder
Finish pressing the shutter release button all the way
Capturing images using the LCD monitor
Capturing Images
Point the camera lens to the subject
To lock the focus on an object that is not in the center
Sequential Shot
Sequential shot methods
Maximum number of sequential shots
Method
Display the Sequential Shot Shooting Setting Screen
Standard sequential shot Ö
Shutter
AE shift sequential auto bracket shot a
Sequential Shot
Shortcut for setting the exposure correction
Exposure
Best select shot Ä
Save Image Erase Others
Exit
Save Image Erase Others YES
Display the Video Clip Shooting Setting Screen see
Video Clip
Short cut for setting the exposure correction
Press the shutter release button to record the video clip
Using the Autofocus
Conditions that may cause incorrect focus
About sequential shots
Press the Macro button to display the macro icon c
Macro photography
Press the Macro button
Compose the image
Shooting using the viewfinder
Using the flash
Using the Various Shooting Functions
Press the flash button to set the flash mode
Shooting using the LCD monitor
Using the self-timer
SELF-TIMER
Using the zoom
Press 0or 1on the zoom switch to compose the desired image
Display the Shooting Settings Screen see
Monochrome Photography
Monochrome
Press the shutter release button to capture the image
Display the Still Image Shooting Setting Screen see
Adding a Voice Memo
Then talk into the microphone
Performing AN Audio Recording
REC
Recording
Stop
Exposure Correction
Setting the Exposure Control
EXP Control
If shutter speed priority AE Ìis selected
Setting the Exposure Control
If aperture priority AE Îis selected
If manual exposure control Íis selected
Setting Quick Shot Still Image Shooting only
How to shoot with the quick shot
Quick Shot
Setting the ISO Sensitivity
ISO
Sensitivity menu, and press the SET button
Setting the White Balance
To capture sepia-tone images
Flicker Reduction Setting Video Clip Shooting only
Setting the Zoom
Setting the optical zoom video clip shooting only
Setting the digital zoom
Setting the Zoom
Setting the Noise Reduction
Noise Reduct
Setting the Light Measuring Method
When the spot measuring method is selected
EXP Measure
Setting the Focus Method
When the spot focus setting is selected
Spot Focus
Selecting from stored shooting settings
Scene Select Function
Adjust the various settings
Storing shooting settings
Input Setting Title Abcde Scroll Select
Confirm the settings, and press the SET button
Play back a captured image and store the shooting settings
Scene Select Function
Abcde Scroll Select
Set the main switch to Ô, and press the power button
Setting the Playback Mode
Turn the selector dial to the desired playback mode
Playback modes
Audio
Setting the Playback Mode
Setting Push Mode to Exit
Audio
Playing Back Still Images
Playing back the still images one by one
Playing Back Still Images
For continuous playback
Time
Select the Start indicator, and press the SET button
Automatic playback slide show
Effect
If ?appears in the 9-image display
Push the zoom switch towards
Image display playback
What if the image numbers are not consecutive?
To display rotated sequential images
Select the sequential shot playback mode see
Playing Back Sequential Shots
To quickly display a different sequential shot
Playing Back Video Clips
Select the video clip playback mode see
Below Press the zoom switch towards
Use the arrow button to move the ymark to
To pause playback of a video clip
To switch to other video clips quickly
To adjust the volume of the video clip sound
To play back the video clip one image at a time
Display the image that you want to magnify
Press the zoom switch towards O
Enlarging Zooming in the Image
To magnify the image, turn the jog dial
Playing Back Images on a TV SET
Connections
Playback
Listening to Audio Recordings
Turn the selector dial to P
Select Ô, and press the SET button
To adjust the volume of the audio recording sound
Listening to Audio Recordings
To quickly change to a different audio recording
Edit Photo ADD Audio
Display the image you wish to add a voice memo to see
Select the ADD Audio icon p
ADD Audio Record
ADD Audio Recording
If Memory Full appears
Entering Text
Edit Photo
ADD Text
You can change the color of the text
If the message can not ADD appears
Entering Text
Parade
Resizing Images
Resize
RESIZE? YES
Display the data that you want to protect
To cancel the protect mode for an image
Protect UNLOCK? YES
Select YES and press the SET button
Erasing Data
Erase ONE Erase Group Erase Exit
No Image
Erasing Data
Erase ONE ERASE? YES
Press j on the arrow button to select YES
Copying Images
Copy
Auto Rotate Playback Setting
If the auto rotate playback function does not work
Requesting Printing
Displaying the Print Setting Screen
Print Setting
Index ALL Clear Exit
Standard print
Setting the Number of Printouts
Select Setting
Requesting Printing
Index print
Print Setting Standard Index ALL Clear Exit
Display the Print Setting Screen see Select Index
Specifying the Printout of the Date
YES To clear the print settings for all images
Clearing the print settings
Display the Print Setting Screen see
Select ALL Clear
Reformatting the Card
Select Reformat and press the SET button
Select the desired setting and press the SET button
Beep
Select Beep and press the SET button
Select Discharge and press the SET button
Discharging the Batteries
Discharge
Select Start and press the SET button
Select Language and press the SET button
Changing the Display Language
Language
Select the desired language and press the SET button
Setting the TV System
Select TV SYSTEM, and press the SET button
Using the Camera with a Computer
Set the selector dial to Ü
Troubleshooting
Problem Cause Action
Troubleshooting
Problem Cause Action
Video
Specifications
Digital Camera
Specifications
Digital Camera Connectors
Battery Operation
CompactFlash 16MB Microdrive 1GB
Specifications
Supplied Battery Charger
Supplied CompactFlash
Supplied Nickel Metal Hydride Batteries