2.Since the work is pushed along the fence, it must have a straight edge in order to make sliding contact with tire fence. Also, the work must make solid contact with the table, so that it will not wobble. Provide a straight edge,
even if this means temporarily nailing of an auxiliary
3.Always use the saw guard and make sure the spreader is
correctly aligned with the saw kerf and antikickback pawls properly adjusted. Wood cut with the grain tends to spring the kerf closed and bind the blade and a kickback could occur.
4.Stand a little to one side of center to be clear of work n case of kickback.
6.When ripping short or narrow work, always use a push
_tick applied to the section of the workpiece between the blade and fence . . . push the work past the blade so t is clear of the blade. This procedure will minimize the
_ossibility of kickbacks.
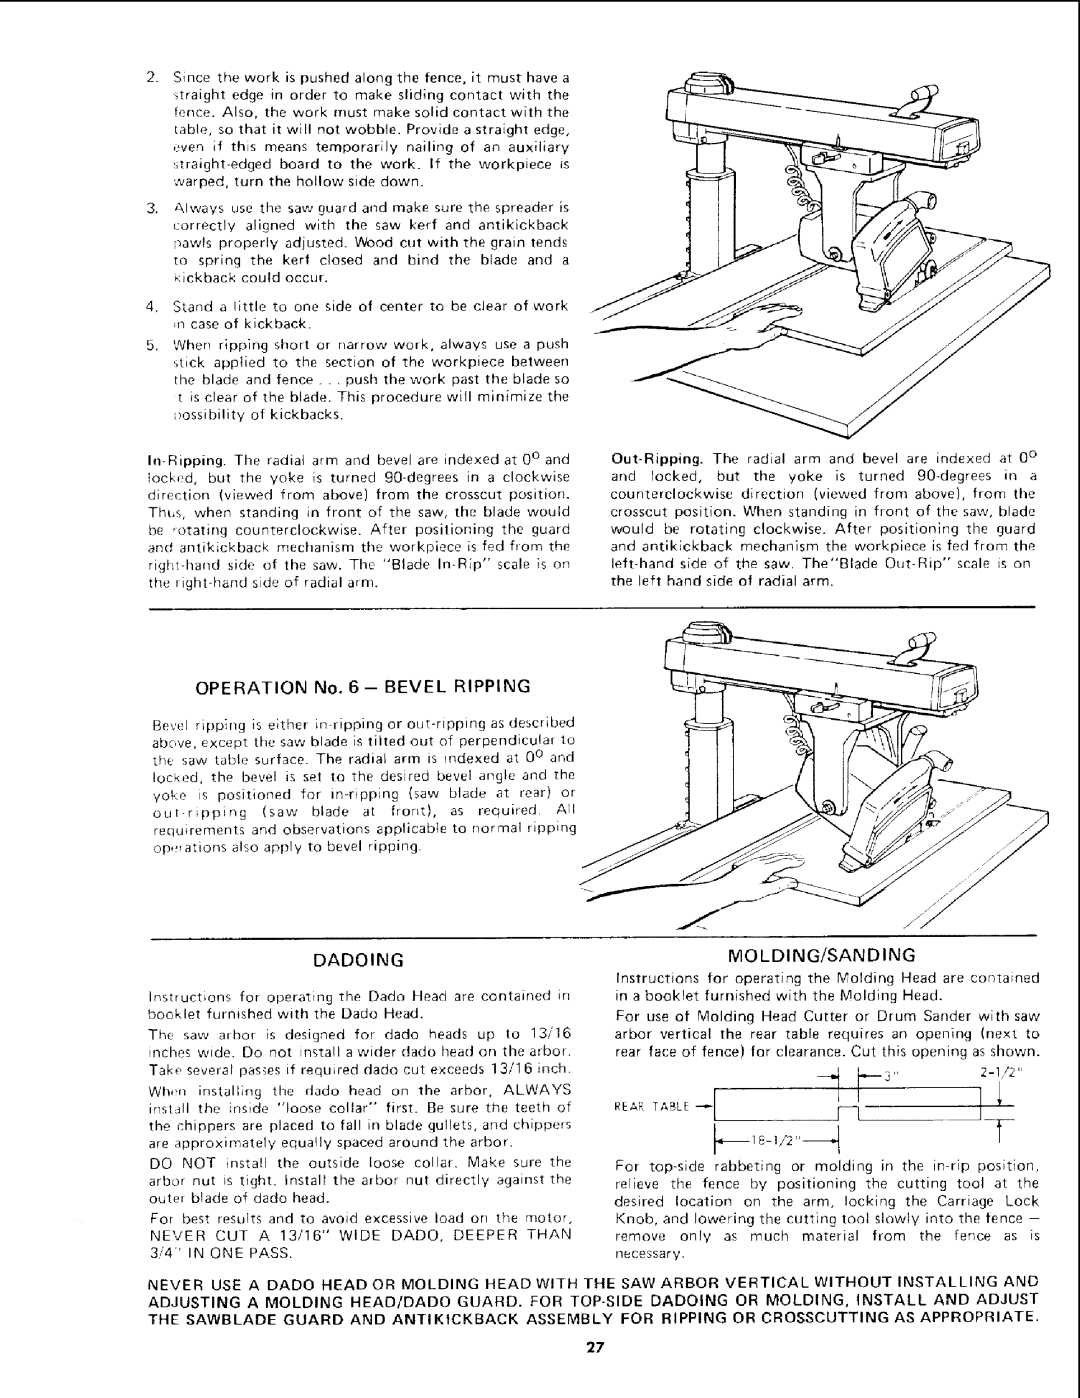
The | radial | arm | and | bevel | are | indexed | at 0° | and | Tbe | radial arm and bevel are | indexed | at 0 | ° | |||||||||||||||||||||
locked, | but | the | yoke | is | turned |
| in | a | clockwise | and | locked, | but |
| the | yoke | is | turned | 90*degrees | in | a | ||||||||||||||
direction | (viewed |
| from |
| above) | from | the | crosscut | position. | counterclockwise |
| direction |
|
| (viewed | from | above), | from | the | |||||||||||||||
Tht_s, | when | standing | in | front | of | the | saw, | the | blade | would | crosscut | position. | When | standing | in | front | of | the | saw, | blade | ||||||||||||||
be ,otatmg | counterclockwise. |
| After | positioning |
| the | guard | would | be rotating |
| clockwise. |
| After | positioning | the guard |
| ||||||||||||||||||
and | antikickback |
| mechanism | the | workpiece | is | fed | from | the | and | antikickback | mechanism |
| the | workpiece |
| is fed from | the | ||||||||||||||||
right | hand side | of | the | saw. | The | "Blade | scale |
| is on | side | of | the | saw. | The"Blade | scale | is on |
| |||||||||||||||||
the | side | of radial | arm. |
|
|
|
|
|
|
|
| the | left | hand | side | of | radial | arm. |
|
|
|
|
|
|
| |||||||||
OPERATION No. 6 - BEVEL RIPPING
Bewg ripping is either
above, except thf_'saw blade is tilted out of perpendicular to [he saw table surface. The radial arm is indexed at 0 ° and
locked, the bevel is set to the desired beveI angle and the
yol. e is positioned for
out r_pping (saw blade at front), as required All
requirements and observations applicable to normal iipping op,_ations also apply to bevel ripping.
|
|
|
|
|
| DADOING |
|
|
|
|
|
|
|
|
|
|
|
|
|
| MOLDING/SANDING |
|
|
|
|
|
|
| |||||||||||
|
|
|
|
|
|
|
|
|
|
|
|
|
|
|
|
|
|
|
|
|
|
|
|
|
|
|
|
|
|
|
|
|
|
| |||||
|
|
|
|
|
|
|
|
|
|
|
|
|
|
|
|
|
|
|
|
| Instructions | for operating the Molding Head are contained | |||||||||||||||||
Instructions | for |
| operating |
| the | Dado | Head | are contained | in |
| in a booklet | furnished |
| with | the | Molding | Head. |
|
|
|
| ||||||||||||||||||
booklet furnished with the Dado Head. |
|
|
|
|
|
|
|
| For use of Molding Head Cutter or Drum Sander with saw | ||||||||||||||||||||||||||||||
|
|
|
|
|
|
|
|
|
|
|
|
|
|
|
|
|
|
|
|
| |||||||||||||||||||
The saw a_bor is designed | for dado heads up to | 13/16 |
| arbor |
| vertical | the | rear | table | requires | an | opening | (next | to | |||||||||||||||||||||||||
inches wide. | Do |
| not | install | a wider | dado |
| head on the | arbor. |
| rear | face of | fence) | for | clearance. | Cut | this | opening | as shown. | ||||||||||||||||||||
Take several pas_es if required dado cut exceeds 13/1 6 inch. |
|
|
|
|
|
|
|
|
|
|
|
|
|
|
|
|
|
|
|
| |||||||||||||||||||
Whin | installing |
| the | dado | head |
| on | the | arbor, | ALWAYS |
| REAR TABLE _ |
|
|
|
|
| _ | b3"r_ |
|
|
|
|
|
| ||||||||||||||
install | the inside | "loose | collar" | first. | Be | sure | the | teeth | of |
|
|
|
|
|
|
|
|
|
|
|
| ||||||||||||||||||
|
|
|
|
|
|
|
|
|
|
|
|
|
|
|
|
|
|
|
| ||||||||||||||||||||
the chippers are placed to fall in blade gullets, and chippers |
|
|
|
|
|
|
|
|
|
|
|
|
|
|
|
|
|
|
|
| |||||||||||||||||||
are approximately |
| equally |
| spaced | around |
| the | arbor. |
|
|
|
|
|
|
|
|
|
|
|
|
|
|
|
|
|
|
|
|
|
|
| ||||||||
DO | NOT | install | the | outside | loose | collar. | Make | sure | the |
| For | rabbeting | or | molding | in the | position, | |||||||||||||||||||||||
|
|
|
|
|
|
|
|
|
|
|
|
|
|
|
|
|
|
|
|
| |||||||||||||||||||
arbor | nut | bstight. | Install | the | arbor | nut | directly | against | the |
| relieve | the | fence | by | positioning | the | cutting | tool | at | the | |||||||||||||||||||
outer blade of dado head. |
|
|
|
|
|
|
|
|
|
|
|
|
| ||||||||||||||||||||||||||
|
|
|
|
|
|
|
|
|
|
|
|
| desired | location |
| on | the | arm, | locking | the | Carriage | Lock | |||||||||||||||||
|
|
|
|
|
|
|
|
|
|
|
|
|
|
|
|
|
|
|
|
|
| ||||||||||||||||||
For | best | results |
| and | to | avoid | excessive | load | on | the |
| motor, |
| Knob, |
| and | lowering |
| the | cutting | tool | slowly |
| into | the | fence |
| ||||||||||||
NEVER | CUT |
| A | 13/16" |
| WIDE |
| DADO, |
| DEEPER |
| THAN |
| remove | only | as | much | material | from | the | fence | as | is | ||||||||||||||||
3/4"' | IN ONE | PASS. |
|
|
|
|
|
|
|
|
|
|
|
|
|
|
| necessary. |
|
|
|
|
|
|
|
|
|
|
|
|
|
|
|
| |||||
|
|
|
|
|
|
|
|
|
|
|
|
|
|
|
|
|
|
|
|
|
|
|
|
|
|
|
|
|
|
|
|
|
|
|
|
| |||
NEVER | USE | A | DADO | HEAD | OR MOLDING |
| HEAD | WITH | THE | SAW |
| ARBOR | VERTICAL |
| WITHOUT | INSTALLING |
| AND | |||||||||||||||||||||
ADJUSTING | A | MOLDING | HEAD/DADO |
| GUARD. |
| FOR | DADOING | OR | MOLDING, | INSTALL |
| AND | ADJUST | |||||||||||||||||||||||||
THE | SAWBLADE |
| GUARD | AND |
| ANTIKICKBACK |
|
| ASSEMBLY | FOR |
| RIPPING | OR | CROSSCUTTING |
| AS APPROPRIATE. |
| ||||||||||||||||||||||
|
|
|
|
|
|
|
|
|
|
|
|
|
|
|
|
|
|
|
| 27 |
|
|
|
|
|
|
|
|
|
|
|
|
|
|
|
|
|
|
|