Manuals
/
Sears
/
Power Tools
/
Saw
Sears
113.19771
owner manual
+
Models:
113.19771
1
36
44
44
Download
44 pages
45.13 Kb
33
34
35
36
37
38
39
40
Troubleshooting
Specification
Install
Repair parts
Wire Sizes
Maintenance
USE Recommended Accessories
Assembly and alignment
Alignment Procedure
Vertical Heel Adjustment
Page 36
Image 36
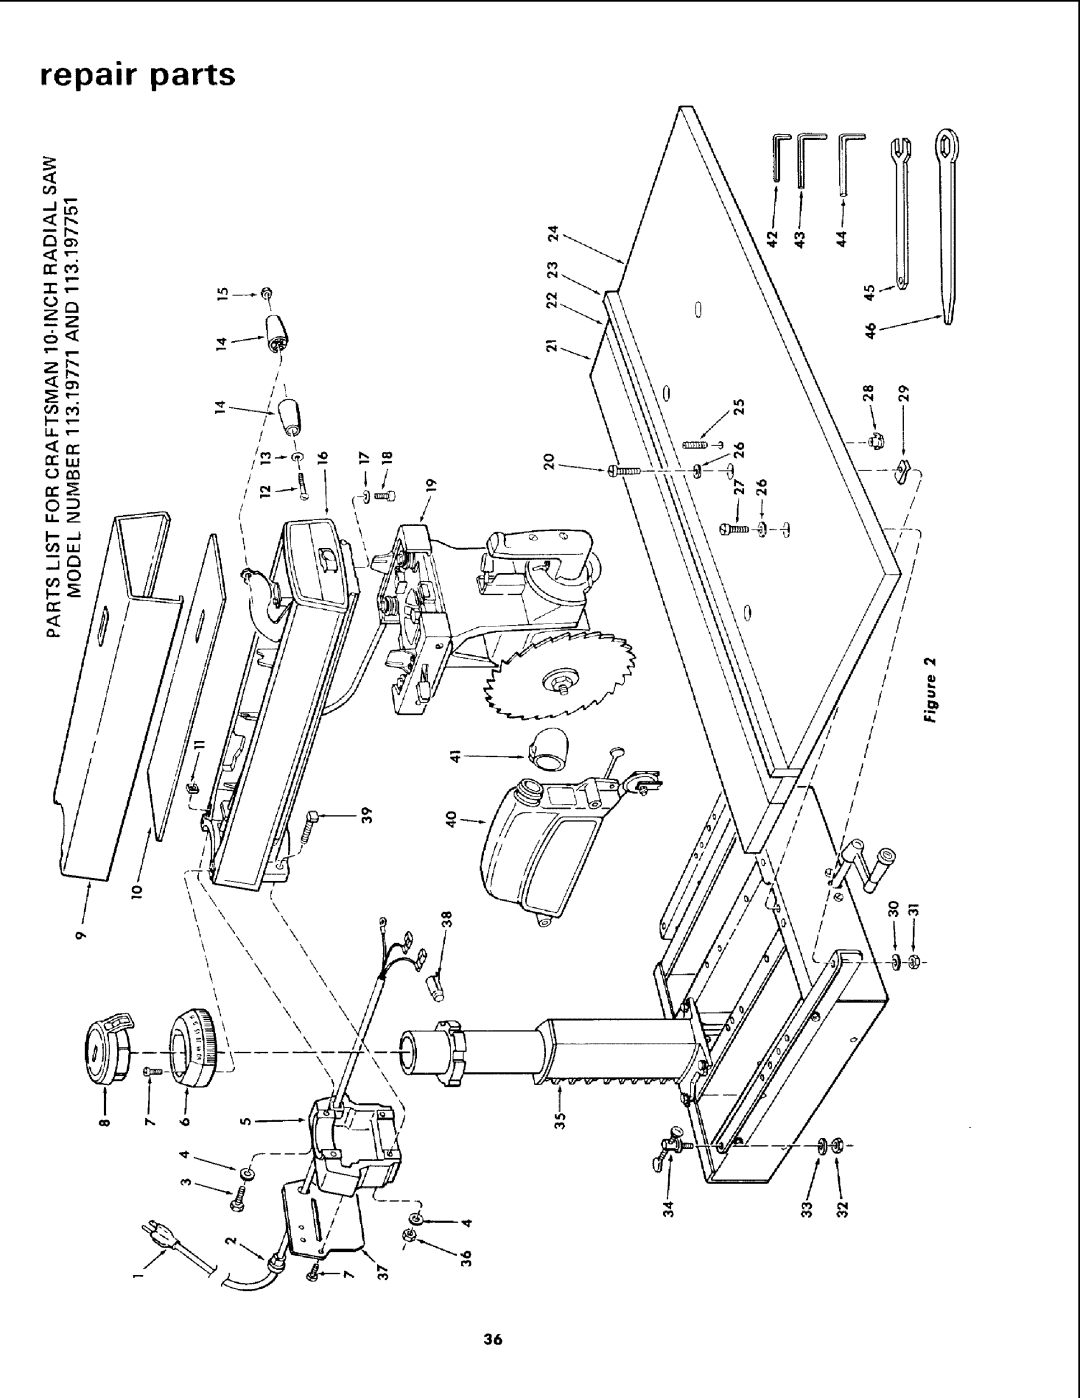
repair parts
,li,
1
I
I
7--_1
J
I
I
I
I
I
I
I
ii
I
/
/ /
/ i
/
/
/
/
_,
\
\
\
_'l
\
X
X
\
\
\
\
\
\
\
\
X
\
/<-+.\\
\\
\
1
I i
,,,It"
36
Page 35
Page 37
Page 36
Image 36
Page 35
Page 37
Contents
Sears
SAW only
Full ONE Year Warranty on Craftsman Radial SAW
Know Your Power Tool
USE Recommended Accessories
Ground ALL Tools
Additional safety instructions
For radial saws
Instal Lation
Minimize Accident Potential
Antikickback With Power
Ripping
Reposition
Ploughing
Power Supply
Motor Specifications
Electrical connections
Saw
Motor Safety Protection
Electrical Connections
Connections should be Made by a
Qualified Electrician
Wire Sizes
Locations and Functions of Controls
Contents
Tools
Containing the following Items
Truss Hd /4-20 Lockwasher, 1/4
Lenkwasher, 5/16 External
Nut Hex Jam 5/16-18 Nat, Hex 1/2-13
STIFFENER1
Attach Elevation Crank
Elevate ARM to ITS Maximum Height
Assembly and alignment
Lock ARM Before Proceeding
Remove Shipping Screws and Discard
Collar, Set aside and out of the way
Alignment Procedure
Step ONE
Attaching and Leveling Table Mounting Support Channels
Arbor Wrench Screw a
Installation of Front Work Table
Adjusting Column Tube in Column Support
Step TWO
OHPtArED O
HEX
Wrench
Squaring Blade to RIP Guide Fence Blade Heel Adjustment
Step Four
Step Five
Squaring SAW Blade to Work Table
Vertical Heel Adjustment
Tooth
Rest
Installingand Adjusting RIP Scale Indicators
Step SIX
Table Spacer Board
Knob
Install Blade Guard
Fence Locations
Table Clamp
Power Switch and Key
Locations and functions
Controls
Unlock Index R,ELEASE
Antikickback
Basic saw operations
This Edge of Board Against Fence for ALL Cutsfence 1ST CUT
Pencil Line for Gauging Required Length
Requirements for Crosscut
Operation No Crosscut
Repetitive Crosscutting
Operations 1 Through
Operation No Miter Crosscut
Operation No Bevel Crosscut
Operation No -- Compound
Crosscut
Requirements When Ripping
Operation No -- OUT-RIPPING
IN-RIPPING
Operations 5
Operation No Bevel Ripping
Dadoing MOLDING/SANDING
Adjustments to compensate for wear
Adjusting Bevel Lock Lever
Yoke Lock Handle Adjustment
To Readjust
Adjusting Carriage Bearings
ARM to Column
Reinstall parts that have been removed
Lock
Wheel
Rod
Trouble-shooting
Source Before Trouble Shooting
Looseness between column tube and column
Bevel Lock Handle Loose
Dirty tracks. Clean Tracks
Dull blade or warped board
Feed rate too fast. Slow Feed Rate Saw blade heels
Saw Blade has heel
Probable Cause Suggested Remedy
Maintenance and lubrication
Recommended Accessories
Maintenance
Lubrication
Repair parts
Parts List for Craftsman 10-INCHRADIAL SAW
Model
Description
\ \ +.\\
× ×
Rig
$, r
Gouj
O0oi
Parts List for Craftsman 10-INCH Radial SAW
Model Number 113.19771
13 14
Rim
17 15
Key Part
Key
12 63269Bearing
SAW on LY
SAW with Legs
113.19771
Inch Radial SAW
Top
Page
Image
Contents