CONTENTS
Guarantee | ................................... |
|
|
| 2 | |
General Safety | Instructions | for | Power Tools | 2 | ||
Additional | Safety | Instructions |
| for Radial Saws | 3 | |
Electrical | Connections |
| 5 | |||
Assembly | and | Alignment |
| 8 | ||
Unpacking |
| and | Preassembly |
| ..................... | 8 |
Alignment | Procedure |
| 12 | |||
Location | and | Functions of | Controls | 20 | ||
Basic | Saw | Operations | 23 | |||
Adjustments |
| to | Compensate | for Wear | 28 | |
Trouble | Shooting | 31 | ||||
Maintenance | and | Lubrication | .................... | 34 | ||
Recommended | Accessories | ...................... | 34 | |||
Repair | Parts | ................................. |
| 35 | ||
assembly and alignment
..... _÷_ |
|
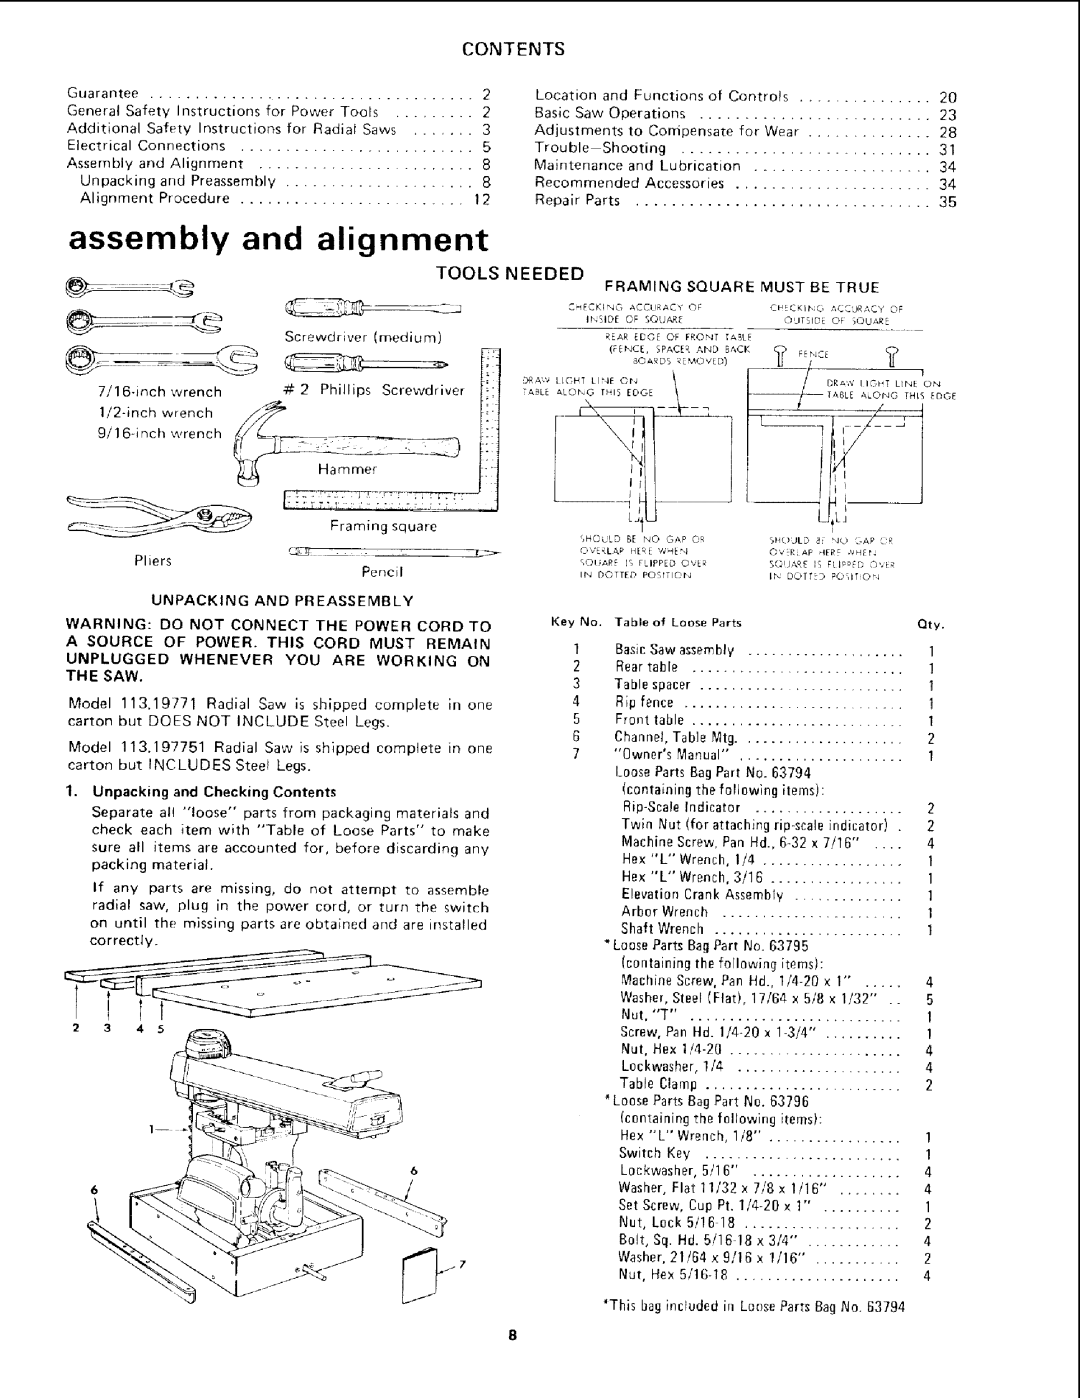
| TOOLS | ||
|
| Screwdriver | (medium) |
| |
#2 | Phillips | Screwdriver | [i: | ||
wrench | /_/_ |
|
| [/ | |
9i16dnch | wrench | _'//___[_ | - _ |
| i: |
Framing square
Pliers
Pencil
UNPACKING AND PREASSEMBLY
WARNING: DO NOT CONNECT THE POWER CORD TO
A SOURCE OF POWER. THIS CORD MUST REMAIN
UNPLUGGED WHENEVER YOU ARE WORKING ON THE SAW.
Model 113.19771 Radial Saw is shipped complete in one
carton but DOES NOT INCLUDE Steel Legs.
Model 113.197751 Radial Saw is shipped complete in one
carton but INCLUDES Steet Legs.
1.Unpacking and Checking Contents
Separate al! "loose" parts from packaging materials and check each item with "Table of Loose Parts" to make
sure all items are accounted for, before discarding any packing material.
If any parts are missing, do not attempt to assemble radial saw, plug in the power cord, or turn the switch
on until the missing parts are obtained arrd are installed correctly.
2 3 4 5
NEEDED FRAMING SQUARE MUST BE TRUE
CHECKING |
| _CC[JRACY | OF |
| CIdECKI_ | , | ACCURACY | OF |
| ||||
| I[_SIDE | OF SQUARE |
|
| OUTSIDE |
| OF | SQUARE |
|
| |||
|
| REAR | EDGE | OF | FRONT | TAB£_ |
|
|
|
|
|
|
|
|
| (FENCE, | SPACE _ ^ND | BACK | C') | __ |
|
|
| cm |
| ||
|
|
|
|
| ' *" |
|
|
|
|
|
| ||
|
|
| BOARDS | R '4DYED) | _" | / |
|
|
| "_ | I | ||
TIGHT | LI_qE | ON |
|
|
|
| / |
| 11_'4 | T LINE | ON | ||
_'L[
•_,LOFJO_i ,THIS | EDGE | __ |
|
|
|
|
|
|
|
| ITAgLEilll | /ALONG | THIS EDGE | |||||
|
| 11i! |
|
|
|
|
|
|
|
|
|
| t |
|
| |||
SHOULD | BE NO | GAP | 0£ |
|
|
|
|
| StIOULD | 4 | NO | '_AP R |
| |||||
OV | LAP | HEre | WHE'q |
|
|
|
|
|
| Ou |
| RLAP | _!FRE | ,VHEr4 |
| |||
RQliARE | [S FLIPPED | OVER |
|
|
|
| B©UAR_ c | iS | FIID_TD OVER |
| ||||||||
IN | DOTTED | POSITION |
|
|
|
|
|
|
| It., | DOTTED |
| POSITION |
| ||||
Key No. | Table | of |
| Loose |
|
| Parts |
|
|
|
|
|
|
| Qty. | |||
1 | Basin Saw assembly |
| .................... |
|
|
|
|
| 1 | |||||||||
2 | Rear table | ........................... |
|
|
|
|
|
|
|
|
|
| 1 | |||||
3 | Table | spacer | ......................... |
|
|
|
|
|
|
|
|
| 1 | |||||
4 | Rip fence |
| ............................ |
|
|
|
|
|
|
|
|
|
| 1 | ||||
5 | Front | table | ........................... |
|
|
|
|
|
|
|
|
|
| 1 | ||||
6 | Channel, |
| Table | Mtg | ..................... |
|
|
|
|
|
| 2 | ||||||
7 | "Owner's | Manual" | . | .................... |
|
|
|
|
| 1 | ||||||||
| Loose Parts Bag Part No. 63794 |
|
|
|
| |||||||||||||
|
| (containing | the | following |
| items): |
|
|
| |||||||||
|
| Indicator |
| ................... |
|
|
|
|
| 2 | ||||||||
| Twin | Nut | (for | attaching | indicator) . | 2 | ||||||||||||
|
| Machine | Screw, Pan | .... | 4 | |||||||||||||
|
| Hex "L" |
| Wrench, | 1/4 |
|
|
|
|
| 1 | |||||||
|
| Hex "L" |
| Wrench, | 3/16 | ................. |
|
|
|
| 1 | |||||||
|
| Elevation | Crank Assembly |
| .............. |
|
| 1 | ||||||||||
| Arbor | Wrench | ....................... |
|
|
|
|
|
|
| 1 | |||||||
| Shaft | Wrench |
| ........................ |
|
|
|
|
|
|
| 1 | ||||||
| *Loose Parts Bag Part No. 63795 |
|
|
|
| |||||||||||||
|
| (containing | the following |
| items): |
|
|
| ||||||||||
| Machine | Screw, Pan Hd., | x 1'" | 4 | ||||||||||||||
| Washer, |
| Steel (Flat), | 17/64 | x 5/8 | x 1/32" .. | 5 | |||||||||||
|
| Nut,"T" |
|
| . .......................... |
|
|
|
|
|
|
|
|
|
| 1 | ||
| Screw, Pan Hd. |
| . ......... | 1 | ||||||||||||||
| Nut, Hex |
|
|
|
|
|
|
| 4 | |||||||||
|
| Loekwasher, |
| 1/4 | ..................... |
|
|
|
|
|
| 4 | ||||||
| Table | Clamp |
| ......................... |
|
|
|
|
|
|
|
| 2 | |||||
| *Loose Parts Bag Part No. 63796 |
|
|
|
| |||||||||||||
| (containing | the | following |
| items): |
|
|
| ||||||||||
| Hex "L"Wrench, |
| 1/8" | . ................ |
|
|
|
| 1 | |||||||||
| Switch | Key |
| ......................... |
|
|
|
|
|
|
|
| 1 | |||||
| L0ekwasher, | 5/16" |
| . .................. |
|
|
|
|
| 4 | ||||||||
| Washer, |
| Flat | l | l/32 | x | l/8 | x | li16" | . | ....... | 4 | ||||||
| Set Screw, | Cup Pt. | x | 1" |
| . ......... | 1 | |||||||||||
| Nut, | Lock | 5/16 | 18 |
|
|
|
|
|
| 2 | |||||||
| Bolt, | Sq. H& |
| 5/16 | 18 x 3/4" . | ........... |
| 4 | ||||||||||
| Washer, 21/64 | × 9/16 | x 1/16" | . | .......... | 2 | ||||||||||||
| Nut, Hex | ..................... |
|
|
|
|
|
| 4 | |||||||||
*This bag included in Loose Parts Bag No. 63794