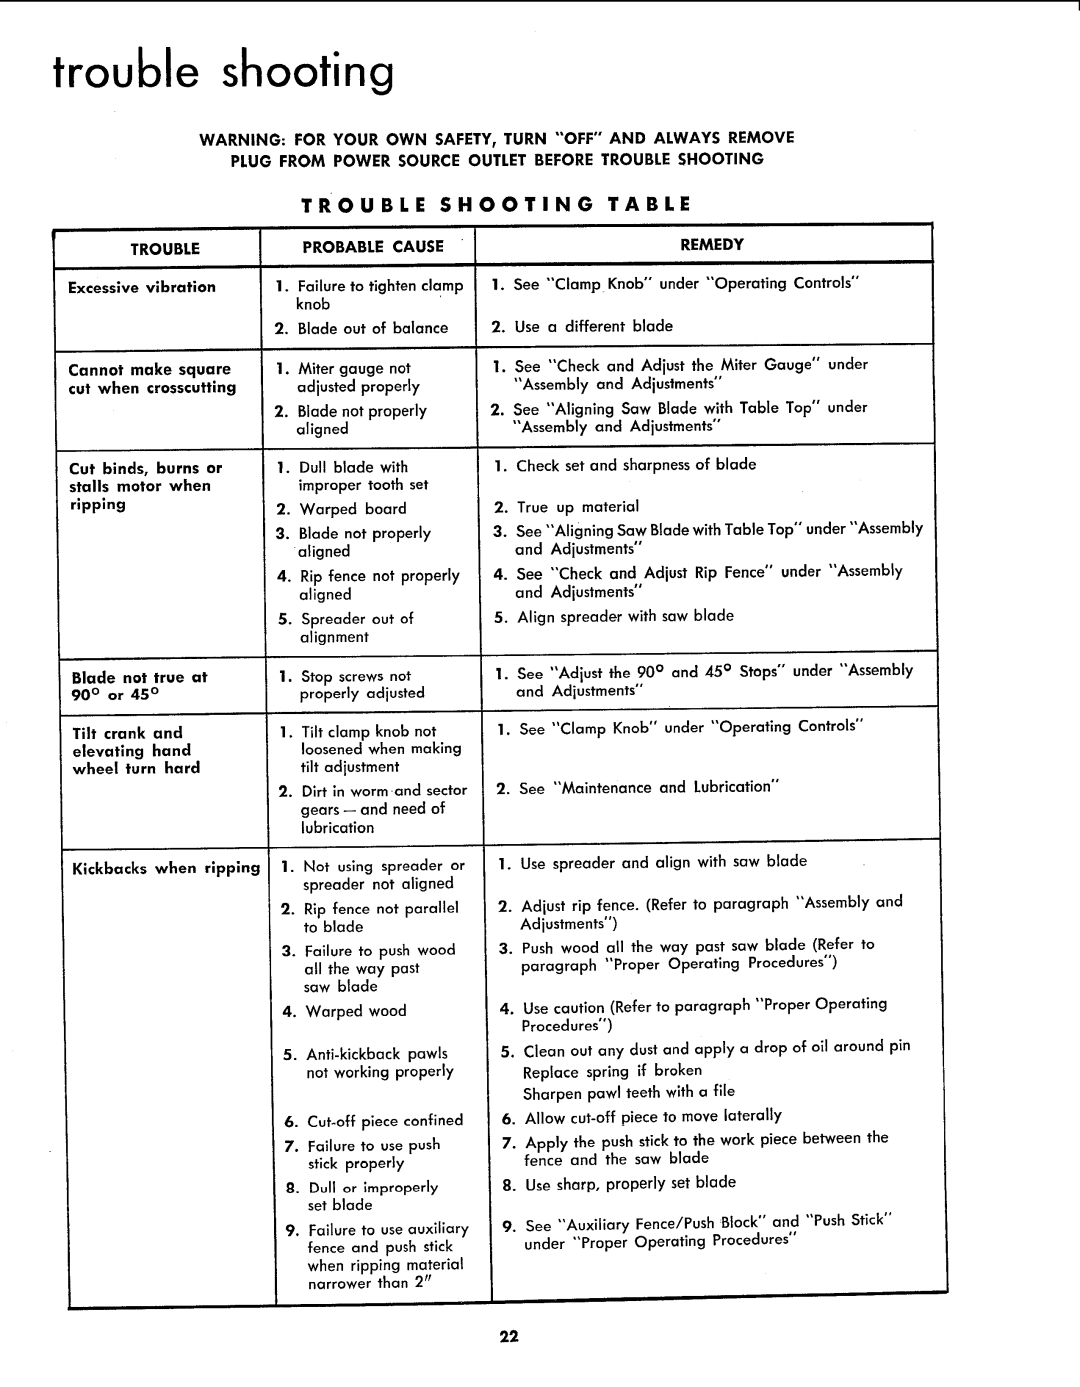
trouble shooting
WARNING: FOR YOUR OWN SAFETY, TURN "'OFF" AND ALWAYS REMOVE
PLUG FROM POWER SOURCE OUTLET BEFORE TROUBLE SHOOTING
TROUBLE SHOOTINGTABLE
| TROUBLE |
| PROBABLE CAUSE |
|
|
|
|
| REMEDY |
| |||
Excessive | vibration | 1. | Failure to tighten clam p | 1. | See | "Clamp |
| Knob" under "'Operating Controls" | |||||
|
|
|
|
| knob |
|
|
|
|
|
|
|
|
|
|
|
| 2. | Blade out of | balance | 2. | Use | a different | blade |
| ||
Cannot make | square | 1. | Miter gauge | not | 1. | See | "Check |
| and Adjust the Miter Gauge" | under | |||
cut | when | crosscutting |
| adjusted properly |
| "Assembly | and | Adjustments" |
| ||||
|
|
|
| 2. | Blade not properly | 2. | See "Aligning | Saw Blade with Table Top" under | |||||
|
|
|
|
| aligned |
|
| "Assembly | and | Adjustments" |
| ||
Cut | binds, | burns or | 1. | Dull blade with | 1. | Check set and | sharpness of blade |
| |||||
stalls motor | when |
| improper tooth set |
|
|
|
|
|
|
| |||
ripping |
|
| 2. | Warped board | 2. | True | up material |
| |||||
|
|
|
| 3. | Blade not properly | 3. | See "Aligning | Saw Blade with Table Top" under "Assembly | |||||
|
|
|
|
| aligned |
|
| and | Adjustments" |
| |||
|
|
|
| 4. | Rip fence not properly | 4. | See | "'Check and Adjust Rip Fence" under | "Assembly | ||||
|
|
|
|
| aligned |
|
| and | Adjustments" |
| |||
|
|
|
| S. | Spreader out of | 5. | Align | spreader with saw blade |
| ||||
|
|
|
|
| alignment |
|
|
|
|
|
|
|
|
Blade not true at 90 ° or 45 °
Tilt crank and
elevating hand wheel turn hard
1.Stop screws not properly adjusted
1.Tilt clamp knob not loosened when making tilt adjustment
2.Dirt in worm and sector
1.See "Adjust the 90 ° and 45 ° Stops" under "Assembly and Adjustments"
1. See "Clamp Knob" under "Operating Controls"
2.See "Maintenance and Lubrication"
lubrication
Kickbacks when ripping 1. Not using spreader or
spreader not aligned
2. Rip fence not parallel to blade
3. Failure to push wood all the way past saw blade
1.Use spreader and align with saw blade
2.Adjust rip fence. (Refer to paragraph "Assembly and Adjustments")
3.Push wood all the way past saw blade (Refer to paragraph "Proper Operating Procedures")
4.Warped wood
5.
6.
7.Failure to use push stick properly
g.Dull or ;rnproperly set blade
9.Failure to use auxiliary fence and push stick when ripping material narrower than 2"
4.Use caution (Refer to paragraph "Proper Operating
Procedures")
S.Clean out any dust and apply a drop of oil around pin Replace spring if broken
Sharpen pawl teeth with a file
6.Allow
7.Apply the push stick to the work piece between the fence and the saw blade
8.Use sharp, properly set blade
9.See "'Auxiliary Fence/Push :Block" and "Push Stick" under "'Proper Operating Procedures"
22