ENGLISH

ESPAÑOLFRANÇAIS

REMOVING FABRIC

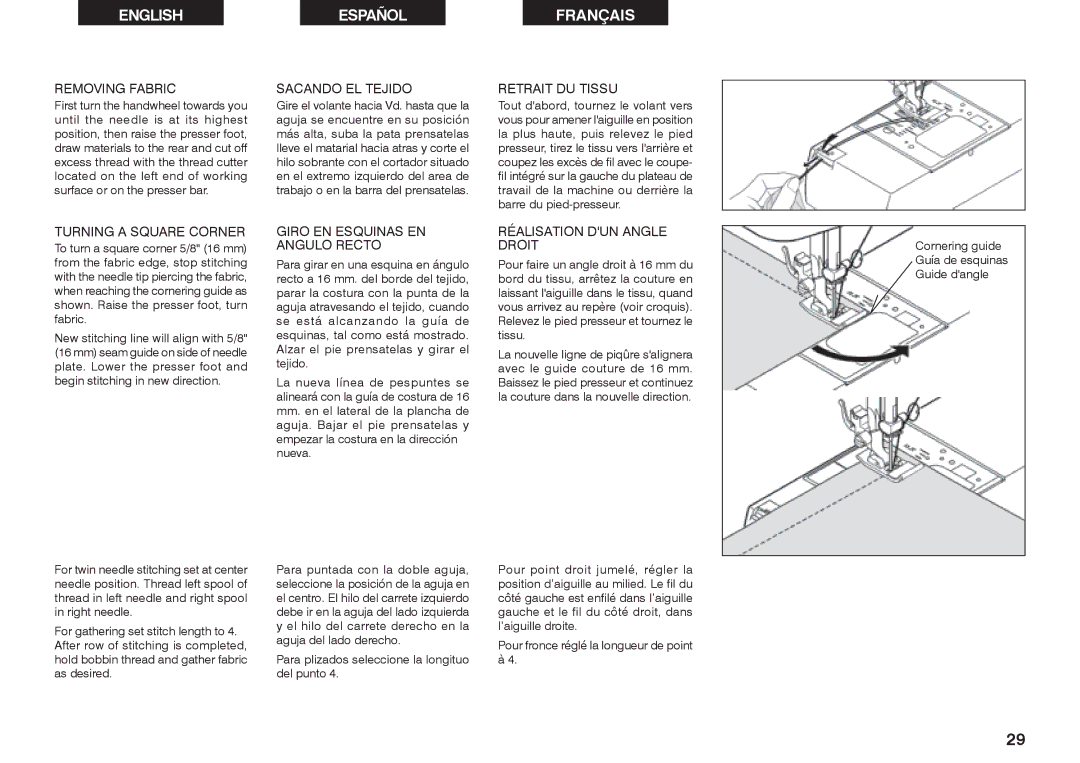
First turn the handwheel towards you until the needle is at its highest position, then raise the presser foot, draw materials to the rear and cut off excess thread with the thread cutter located on the left end of working surface or on the presser bar.

TURNING A SQUARE CORNER

To turn a square corner 5/8" (16 mm) from the fabric edge, stop stitching with the needle tip piercing the fabric, when reaching the cornering guide as shown. Raise the presser foot, turn fabric.

New stitching line will align with 5/8" (16 mm) seam guide on side of needle plate. Lower the presser foot and begin stitching in new direction.

For twin needle stitching set at center needle position. Thread left spool of thread in left needle and right spool in right needle.

For gathering set stitch length to 4. After row of stitching is completed, hold bobbin thread and gather fabric as desired.

SACANDO EL TEJIDO

Gire el volante hacia Vd. hasta que la aguja se encuentre en su posición más alta, suba la pata prensatelas lleve el matarial hacia atras y corte el hilo sobrante con el cortador situado en el extremo izquierdo del area de trabajo o en la barra del prensatelas.

GIRO EN ESQUINAS EN ANGULO RECTO

Para girar en una esquina en ángulo recto a 16 mm. del borde del tejido, parar la costura con la punta de la aguja atravesando el tejido, cuando se está alcanzando la guía de esquinas, tal como está mostrado. Alzar el pie prensatelas y girar el tejido.

La nueva línea de pespuntes se alineará con la guía de costura de 16

mm.en el lateral de la plancha de aguja. Bajar el pie prensatelas y empezar la costura en la dirección nueva.

Para puntada con la doble aguja, seleccione la posición de la aguja en el centro. El hilo del carrete izquierdo debe ir en la aguja del lado izquierda y el hilo del carrete derecho en la aguja del lado derecho.

Para plizados seleccione la longituo del punto 4.

RETRAIT DU TISSU

Tout d'abord, tournez le volant vers vous pour amener l'aiguille en position la plus haute, puis relevez le pied presseur, tirez le tissu vers l'arrière et coupez les excès de fil avec le coupe- fil intégré sur la gauche du plateau de travail de la machine ou derrière la barre du pied-presseur.

RÉALISATION D'UN ANGLE DROIT

Pour faire un angle droit à 16 mm du bord du tissu, arrêtez la couture en laissant l'aiguille dans le tissu, quand vous arrivez au repère (voir croquis). Relevez le pied presseur et tournez le tissu.

La nouvelle ligne de piqûre s'alignera avec le guide couture de 16 mm. Baissez le pied presseur et continuez la couture dans la nouvelle direction.

Pour point droit jumelé, régler la position d’aiguille au milied. Le fil du côté gauche est enfilé dans l’aiguille gauche et le fil du côté droit, dans l’aiguille droite.

Pour fronce réglé la longueur de point à 4.

Cornering guide Guía de esquinas Guide d'angle

29

Page 30
Image 30
Singer 2639 Removing Fabric, Turning a Square Corner, Sacando EL Tejido, Giro EN Esquinas EN Angulo Recto

2639 specifications

The Singer 2639 is a versatile sewing machine designed to cater to the needs of both beginners and experienced sewists. Combining ease of use with advanced features, this model stands out in the realm of home sewing, making it a popular choice for various sewing projects.

One of the key features of the Singer 2639 is its selection of built-in stitches. With a total of 97 stitch options, including essential, decorative, and stretch stitches, users can choose the perfect stitch for their projects, whether they are quilting, crafting, or doing basic repairs. This variety allows for creativity and flexibility, accommodating the needs of different sewing tasks.

Another significant aspect of the Singer 2639 is its automatic needle threader. This technology simplifies the sewing process by allowing users to thread the needle with just a push of a lever, eliminating the frustration often associated with manual threading. Coupled with the drop-in bobbin system, which makes it easy to insert and remove the bobbin, the machine ensures a smooth and uninterrupted sewing experience.

The Singer 2639 also features adjustable stitch length and width, enabling users to customize their stitches according to the fabric and project requirements. This adaptability makes it suitable for various materials, from lightweight fabrics to heavier denim or canvas. Furthermore, the machine is equipped with a powerful motor that provides strong stitching capabilities, ensuring that even tough materials are handled with ease.

The free arm design of the Singer 2639 enhances its usability, making it ideal for sewing cylindrical items like sleeves and legs of pants. This feature, combined with the included accessories such as various presser feet and a variety of needle types, allows sewists to tackle intricate designs and unconventional shapes effectively.

User-friendly and lightweight, the Singer 2639 is portable, making it easy to transport for sewing classes or workshops. Its straightforward control panel and clear instructions make it accessible for beginners, while the range of features keeps more seasoned sewers engaged.

In summary, the Singer 2639 combines a wealth of features, advanced technologies, and a user-friendly design, making it a fantastic choice for sewists of all levels. Its versatility, power, and ease of use truly set it apart as a reliable companion for every sewing enthusiast. Whether embarking on simple repairs or complex projects, the Singer 2639 proves to be an invaluable tool in the world of sewing.