42 Milling Machine
Updates
Customer Service
Scope of Manual
Manual Feedback
Table of Contents
Parts
Features
About These Machines
Foreword
Capabilities
Front View Identification
Identification-front view Model SB1024 shown
Model SB1024 Belt Housing Headstock Identification
Model SB1024 belt housing and headstock identification
Model SB1025/SB1026 Belt Housing Headstock Identification
Model SB1024 42 Variable Speed Milling Machine Power Feed
Machine Specifications
Table Information
Model SB1025 42 Milling Machine Power Feed
80, 140, 220, 325 RPM
Model SB1026 42 Milling Machine Power Feed
High Range of Spindle Speeds
Basic Machine Safety
Understanding Risks of Machinery
F E T Y
Additional Milling Machine Safety
Preparation Overview
Things Youll Need
Unpacking
Inventory
Cleaning & Protecting
Before cleaning, gather the following
Basic steps for removing rust preventative
Location
Lifting & Moving
To lift and move the mill
Leveling & Mounting
Bolting to Concrete Floors
Leveling
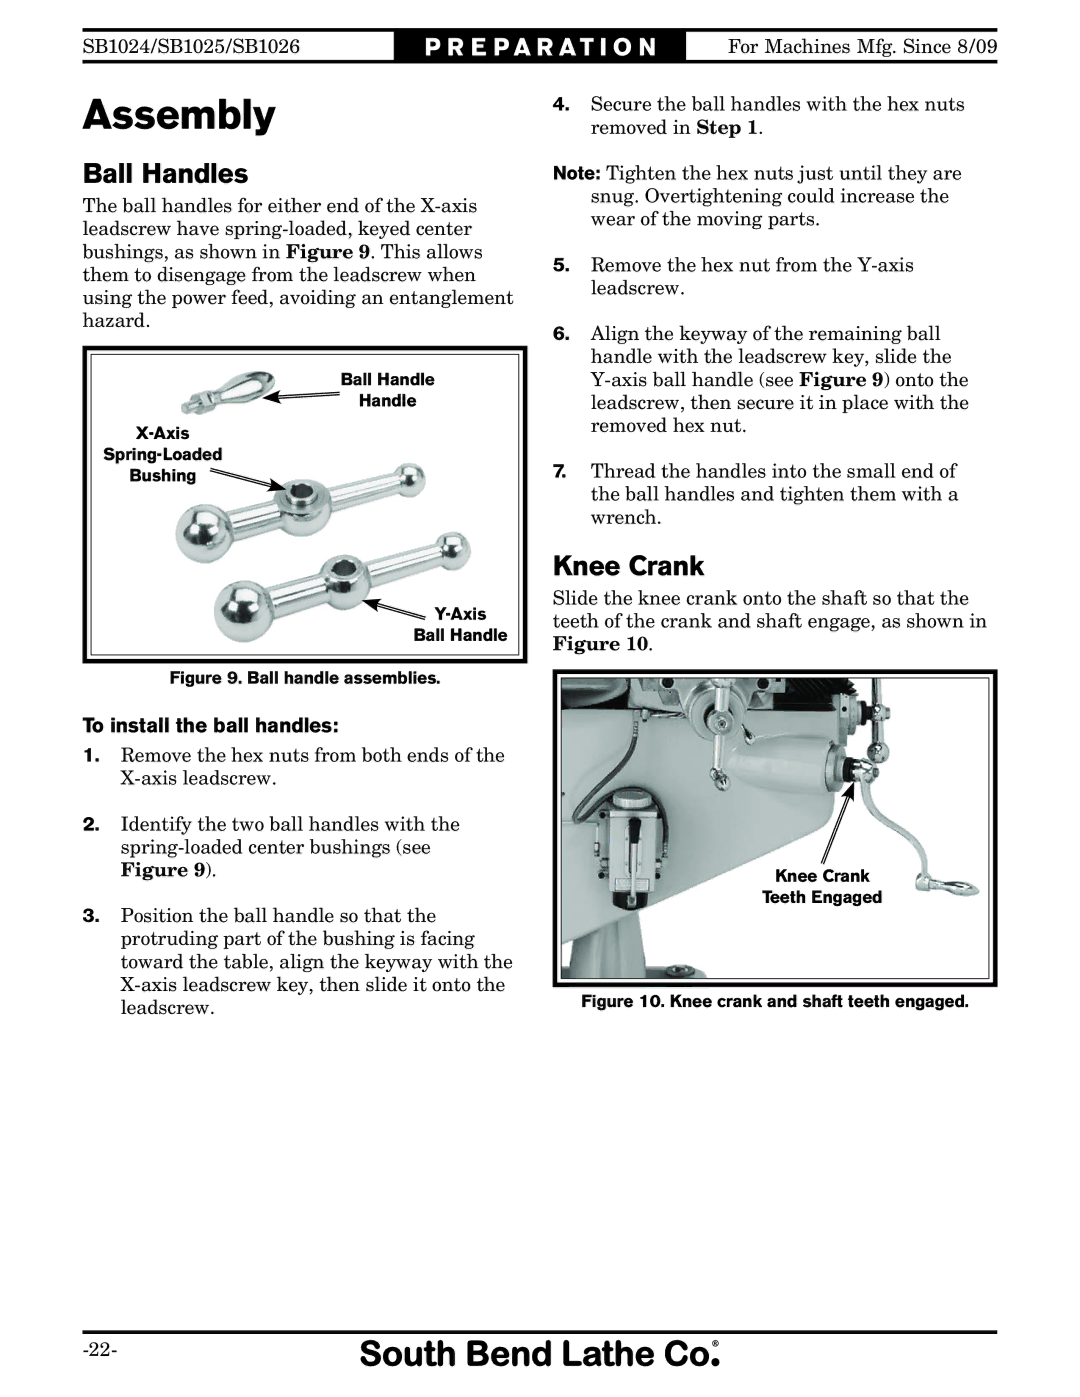
Assembly
To install the ball handles
Ball Handles
Knee Crank
Front way cover installed
Way Covers
Power Connection
SB1025 220V 3-Phase
SB1024
SB1026
Initial Lubrication
Test Run
To test run the machine
To test the X-axis power feed unit and table limit switch
Inspections Adjustments
To perform the spindle break-in procedure
Spindle Break-In
Operation Overview
A typical milling operation, the operator does the following
Control Panel
Table Movement
Graduated Index Rings
Table Locks
Axis Power Feed
To operate the X-axis power feed
Head Movement
Tilting Head
Rotating Head
Tramming Spindle
To tram the spindle to the table
Tools Needed Qty
Place the parallel block directly under
Ram Movement
Moving Ram Back-and-Forth
Rotating Ram
Setting Spindle Speed
Setting Spindle Speed Range
Determining Spindle Speed
Setting SB1024 Spindle Speed Range
Model SB1024 Spindle Speed Ranges
Setting SB1025/SB1026 Spindle Speed Range
Model SB1025 Spindle Speed Ranges
Meshing Spindle & Spindle Clutch
Setting Spindle Speed
Setting SB1024 Spindle Speed
Setting SB1025/SB1026 Spindle Speed
F2/R2
Using the Coarse Downfeed Handle
Downfeed Controls
Manual Disengaged Position Auto-Downfeed Engaged Position
Using the Fine Downfeed Handwheel
Fine Downfeed Controls
Using the Auto-Downfeed System
To use the auto-downfeed system
Spindle Brake
= 0.006 in./rev = 0.0015 in./rev = 0.003 in./rev
Loading/Unloading Tooling
Loading Tooling
Unloading Tooling
Maintenance Schedule
Before Beginning Operations
Ongoing
Daily, After Operations
Month/Year
Lubrication
Cleaning
Lubrication
Unpainted & Machined Surfaces
Quill
Table Ways One-Shot Oiler
Speed Range Bearing Sleeve SB1024 Only
Headstock Gearing
Power Feed Gears
To lubricate the power feed gears
Ram Ways
Head & Ram Rack & Pinion Gear
Power feed ball handle removed Drive Gear Bevel Gear
Cleaning Coolant Reservoir
Cleaning
To clean out the coolant reservoir
Hazards
Machine Storage
Lubrication section beginning on
Adjusting Gibs
Disconnect Mill from Power Before Adjusting the Gibs
Adjusting Leadscrew Backlash
Longitudinal Leadscrew Backlash
Cross Leadscrew Backlash
Ball handle, rings, and key removed from Cross leadscrew
Symptom Possible Cause Possible Solution
TR O U B L E S H O OTI N G
Electrical Safety Instructions
Wiring Overview
Wiring Diagram Color KEY
SB1024/SB1026 Electrical Box
Box, See
SB1024/SB1026 Electrical Components
Control Panel Viewed From Behind See Figure
SB1024/SB1026 Electrical Component Pictures
Motor junction box
SB1025 Electrical Box
SB1025 Electrical Components
SB1025 Electrical Component Pictures
SB1025 Motor junction box
Headstock
Headstock Parts List
Description
Reverse Trip Ball Lever
Quill
SB1024 Gearbox
SB1024 Gearbox Parts List
Description
SB1025/SB1026 Gearbox
SB1025/SB1026 Gearbox Parts List
SB1024 Belt Housing
SB1024 Belt Housing Parts List
SB1025/SB1026 Belt Housing
SB1025/SB1026 Belt Housing Parts List
CAM Ring Screw M6-1 X
Ram
Ram Parts List
668
Column, Knee, & Saddle Parts List
Saddle GIB
709
Table Parts List
Leadscrew NUT Bracket
One-Shot Oiler
C D E F G H
SB1024/SB1026 Electrical Box & Control Panel
Electrical Box
SB1025 Electrical Box & Control Panel
Control Panel
Accessories
SB1024 Head Machine Labels
SB1024 Main Machine Labels
220V 1PH Label
SB1025/SB1026 Machine Labels
Page
R R a N T Y
Southbendlathe.com