Setup Guide for Printing Functions
Page
Preface
Grant of License
Software License Agreement
Disclaimer of Warranty
Facsimile functions
Before Reading This Manual
Lineup of our manuals
Basic functions
Scanning functions
TopAccess
Trademarks
How to read this manual Symbols in this manual
Contents
TopAccess Device TAB
Setting up Print Service Settings Printing Function
Setting up Copier Settings
Setting up Fax Settings
Setting up Printer Settings
Appendix
Overview
Overview
Overview
Contents
Menu
Web browser
Use environments of TopAccess
Network
Various Screens Basic Operations on Each Screen
Basic Operations on Screens Equipment
Various Screens
Ready screen Copy mode main screen
Mode main screens
Digit entry screen
Error message screen
Menu selection screen
User Functions button and screen transition
To select mode main screen
To return to main screen for each mode
Basic Operations on Each Screen
Button Function
To select each menu
Example of menu selection
Cancel JOB
Button /Digital key Function
To key in digits
Page
PCL font list / PS font list
To Cancel Print Jobs To Print PCL/PS Font List
Press or to select YES, and then press the Enter button
To Cancel Print Jobs
PCL font list / PS font list
To Print PCL/PS Font List
Page
To Print Lists
Printing Lists Equipment
Press or to select LISTS, and then press the Enter button
Configuration
To Print Lists
Press the User Functions button
NIC status
Page
Configuring Networks Equipment
To use TopAccess
Network Configuration from Equipment
Ethernet Configuration
Ethernet Configuration
Network menu screen
Press the Cancel button
Press the Enter button
Once to return the screen to
Configuring TCP/IP using only Dhcp
TCP/IP Configuration
Configuring TCP/IP using Dhcp or Auto IP function
03.TCP/IP
Enter button
Tial SETUP, and then press
User functions mode main screen Appears
Press To select INI
Default Gateway XXX.XXX.XXX.XXX
Complete
Press or to select ENABLE, and then press the Enter button
IPX/SPX Configuration
Frame Type 1.AUTO Sence 2.IEEE802.2 3.IEEE802.3
Press or to select the desired frame type
Apple Talk 1.ENABLE 2.DISABLE
AppleTalk Configuration
Apple Talk
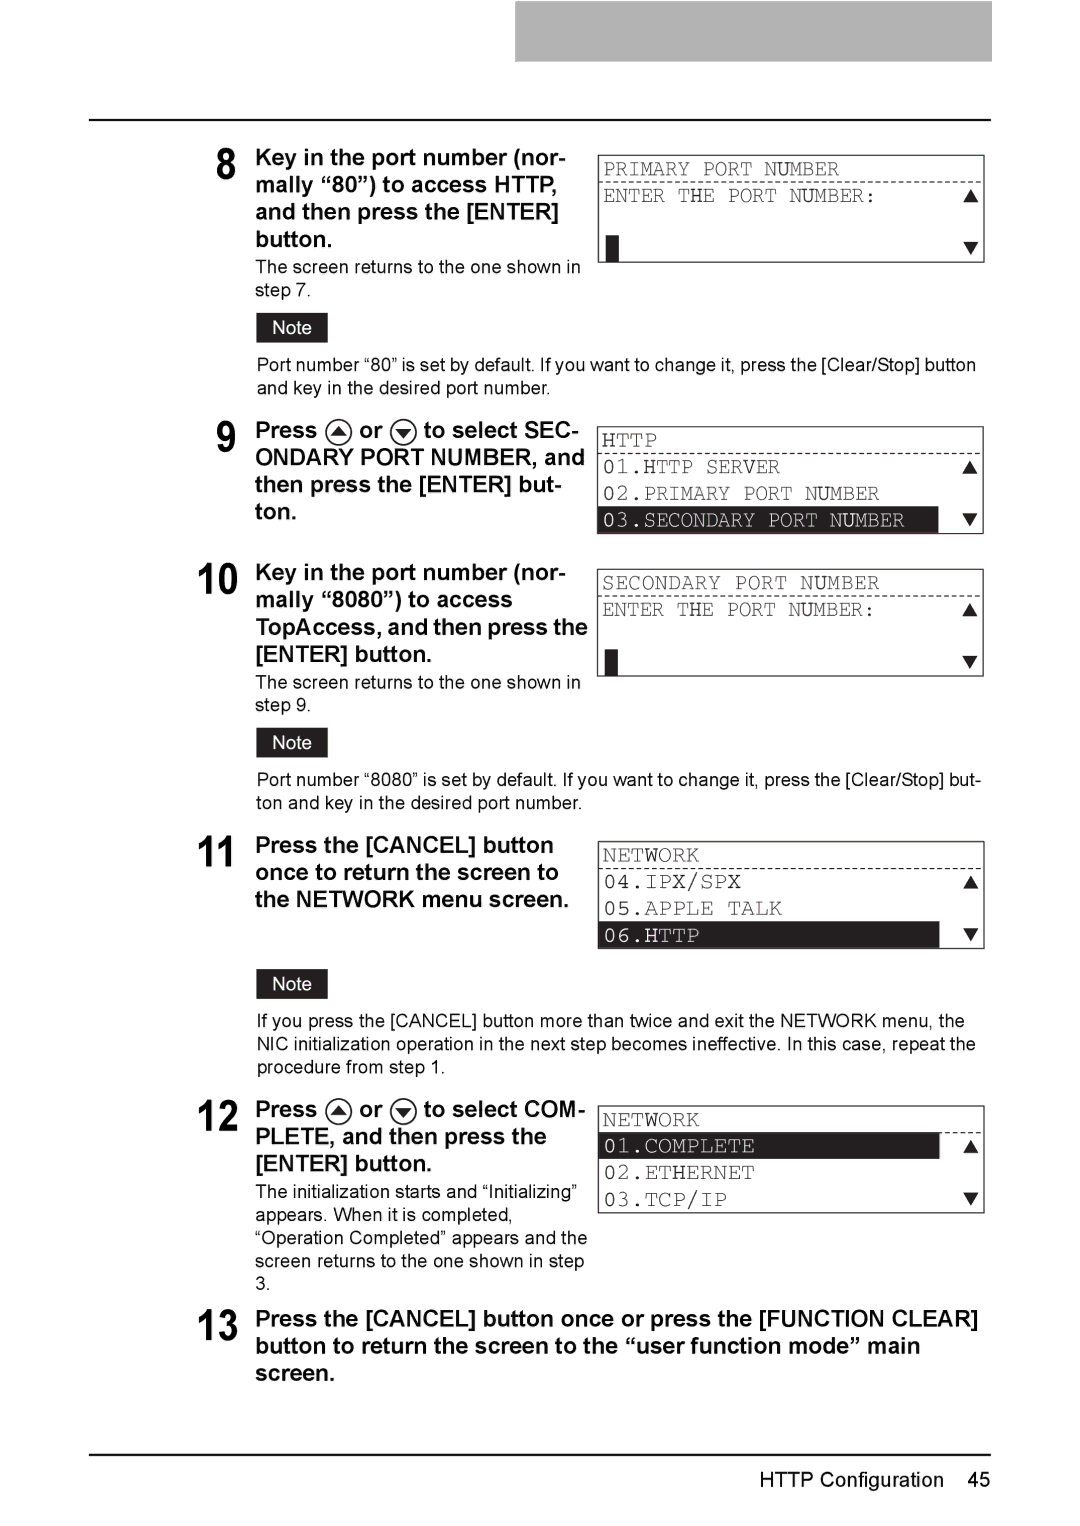
Press or to select HTTP, and then press the Enter button
Http Configuration
Http
Page
Accessing TopAccess from Your Computer
TopAccess Overview
End user mode
TopAccess Overview
Administrator mode
TopAccess top page for end users is displayed
Accessing TopAccess from Your Computer
Accessing TopAccess
Click each tab to display each main
Click the menu name to display the desired
Top link
TopAccess screen structure
Menu bar
Submenu bar
Accessing TopAccess from Your Computer
TopAccess Device Tab
TopAccess Device TAB
Paper
TopAccess Device Tab
Refresh icon
Device Information
Alerts
Error display
Device status indicators
Options
Page
Managing Mailboxes
Managing Address Book
Adding or editing a contact
Managing Address Book
Managing contacts in the address book
Enter following items to specify the recipient information
Click Fax Setting
Managing Address Book
Click the link that you want to delete in the contacts list
Contact Properties page, click Save to add new contact
Deleting a contact
Adding or editing a group
Managing groups in the address book
Click Delete
Check the Fax boxes of users to add the Fax recipients
Enter following items to specify the group properties
Deleting a group
Click OK
Forward Mailbox
Managing Mailboxes
Confidential Mailbox
Bulletin Board mailbox
Enter the password for the mailbox and click OK Click Edit
Setting up an Open Mailbox
Select agents and click Select Agent
Box Number
MailBox setting
Password
Selecting the recipients from the address book
Destination setting Mailbox
Selecting the groups from the address book
Relay End Terminal Report page is displayed
Relay end terminal report
Click Relay End Terminal Report
Want to send the transmission result list
Deleting an Open Mailbox
Enter the password for the mailbox and click OK
Selected mailbox is deleted
Page
Viewing Counters
TopAccess Counter TAB
Print Counter
Viewing Counters
Displaying the total counter
You can check the total counter in this
Department menu page is displayed
Displaying the department counter
Click the Counters tab and the Department menu
Department Code field and click Enter
Page
111
Setting up Printer Settings 105
Displaying Version Information 115
General submenu page, set the device settings as required
Setting up Device Settings
Click the Setup menu and General submenu
Click OK to apply the changes
Setting up the device information
Setting up the Web general setting
Setting up the energy save
Setting up the time and date
Click the Setup menu and Network submenu
Setting up Network Settings Printing Function
Click Save
Setting up the TCP/IP
Setting up the AppleTalk
Setting up the IPX/SPX
Link-Local Host Name
Setting up the Bonjour
Enable Bonjour
Service Name
Secondary DNS Server Address
Setting up the DNS session
Enable DNS
Primary DNS Server Address
Host Name
Setting up the Ddns session
Enable Ddns
Setting up the NetWare session
Secondary Port Number
Setting up the Http network service
Enable Http Server
Primary Port Number
Read Community
Setting up the Snmp network service
Enable Snmp
Enable Authentication Trap
IPX Trap Address
Enable Alerts Trap
IP Trap Address
IP Trap Community
Copier submenu page, set the copier settings as required
Setting up Copier Settings
Click the Setup menu and Copier submenu
Exposure
Setting up the copier settings
Original Mode
Sorter Mode Priority
Fax submenu page, set the fax settings as required
Setting up Fax Settings
Click the Setup menu and Fax submenu
Click Save
Fax Number
Setting up the Fax settings
Ringer Volume
Terminal ID
Resolution
Monitor Volume
Alarm Volume
Reception Mode
21Separator
19When Memory Full
18Send after Scan
20Account Code
31Relay End Report
28Polling Report
29Relay Originator
30Relay Station Report
Printer submenu page, set the Printer settings as required
Setting up Printer Settings
Click the Setup menu and Printer submenu
Print Startup
Setting up the general setting
Wide A4 Mode for PCL
LT--A4/LD--A3
Setting up the default Raw job setting
Paper Source
Setting up the Raw job setting
Enter following items as required
Selected queue is deleted
Required
Setting up Print Service Settings Printing Function
Click the Setup menu and Print Service submenu
Port Number
Setting up the Raw TCP print
Enable Raw TCP
Enable Raw bi-directional
Setting up the IPP print
Setting up the LPD print
Setting up the NetWare print
Displaying Version Information
Click the Setup menu and Version submenu
Page
TopAccess Administration TAB page Maintenance Menu
Restoring data from the backup files
About the Maintenance Functions
Install Language
Select the desired language in the Select drop down box
Switching Languages
Click the Maintenance menu and Install Language submenu
Insert the Client Utilities CD-ROM into a client PC
Click Upload
Backing up Data
Click the Maintenance menu and Backup submenu
Click Create New File for the data that you want to backup
Right-click the File Name link and select Save Target As
Click Refresh on the right side
Click Save
Click Browse in the data section that you want to restore
Restoring Data from Backup File
Click the Maintenance menu and Restore submenu
Select a backup file and click Open
Check the box of Address Book and click Restore
Name
Importing Address Book Data
Click Browse... in the Address Book area
Click the Maintenance menu and Import submenu
Click Import
Click Create New File in the Address Book area
Click the Maintenance menu and the Export submenu
Exporting Address Book Data
Save As dialog box is displayed
Click Browse... in the Department Code area
Access the TopAccess in the administrator mode
Importing Department Code Data
Click the Refresh on the right side
Click Create New File in the Department Code Export area
Exporting Department Code Data
Save As dialog box is displayed
Page
Managing Department Codes For Administrators 138
Managing Department Codes on TopAccess for Administrators
Managing Department Codes For Administrators
TopAccess Error Messages 140
Troubleshooting
Device status indicator list
TopAccess Error Messages
TopAccess Message Corrective Action
Error message list
Page
List Print Format 144
Appendix
List Print Format
Configuration Page Example
Xxxxxxxxxxxx
NIC Status Page Example
PS Font List Example
PCL Font List Example
Page
Index
144
105
Index
GA-1190 OME060181B0
GA-1190