Computer System HyperTools | Tevion | |
|
|
|
5.4.3 Transferring a Video Tape Cassette Recording to DVD
Some video cassette tape recordings may be worth preserving on a more durable medium, such as DVD. This can be done by connecting the VCR directly to the DVR via the connections available on the front of the unit, and transferring the contents of the video cassette to DVD.
1.Connect the VCR output terminals on the back of the VCR to the “Video IN/Audio IN” sockets (Red/Yellow/White) on the front of the DVR using a
2.Insert the video tape cassette into VCR and determine the start time (or counter) and stop time (or counter) of the program you wish to transfer. Calculate and write down the actual length of the program in minutes.
3.Rewind the tape, and position it about 10 seconds before the program starts.
4.On TRC press the ![]() Power button to turn on the TV (if not already on).
Power button to turn on the TV (if not already on).
5.On TRC press the ![]() button until
button until ![]()
![]() 2 is shown.
2 is shown.
6.On DRC press the STANDBY/ON button to turn on the DVR and wait until “Hello” display on front panel has been replaced by “No disc” message shown on screen.
7.On DRC press OPEN/CLOSE button to open the tray.
8.Insert a blank recordable DVD in tray.
9.On DRC press OPEN/CLOSE button again to close the tray and wait for disk to load. A small “Loading” icon will show in the bottom right corner, eventually to be replaced by a blue “Ready” icon. Once this has been achieved you can proceed with Step 10.
10.On DRC press TIMER button to enter Timer Recording menu.
11.On DRC move to first empty row.
12.On DRC press SELECT button to enter Timer Recording Setup menu.
13.On DRC press Right Arrow button and select Source “Front CVBS”.
14.On DRC press SELECT button and then Down Arrow button.
15.On DRC press Right Arrow button and select Recording To “DVD”
16.On DRC press SELECT button and then Down Arrow button
17.On DRC press Right Arrow button and select Quality, e.g. “HQ” for 1 hour of recording
18.On DRC press SELECT button and then Down Arrow button twice to select recording to start at a convenient time (for example in 10 minutes time).
19.On DRC press SELECT button and then Down Arrow button to select recording to end at a time to allow for the entire program to be recorded (according to the length of the program as determined in Step 2).
20.On DRC press SELECT button and then Down Arrow button twice.
21.On DRC press OK button to actually schedule the recording to occur.
22.On DRC press TIMER button to exit Timer Recording Setup menu.
23.Watch the TV screen. As the time for recording approaches you will see:
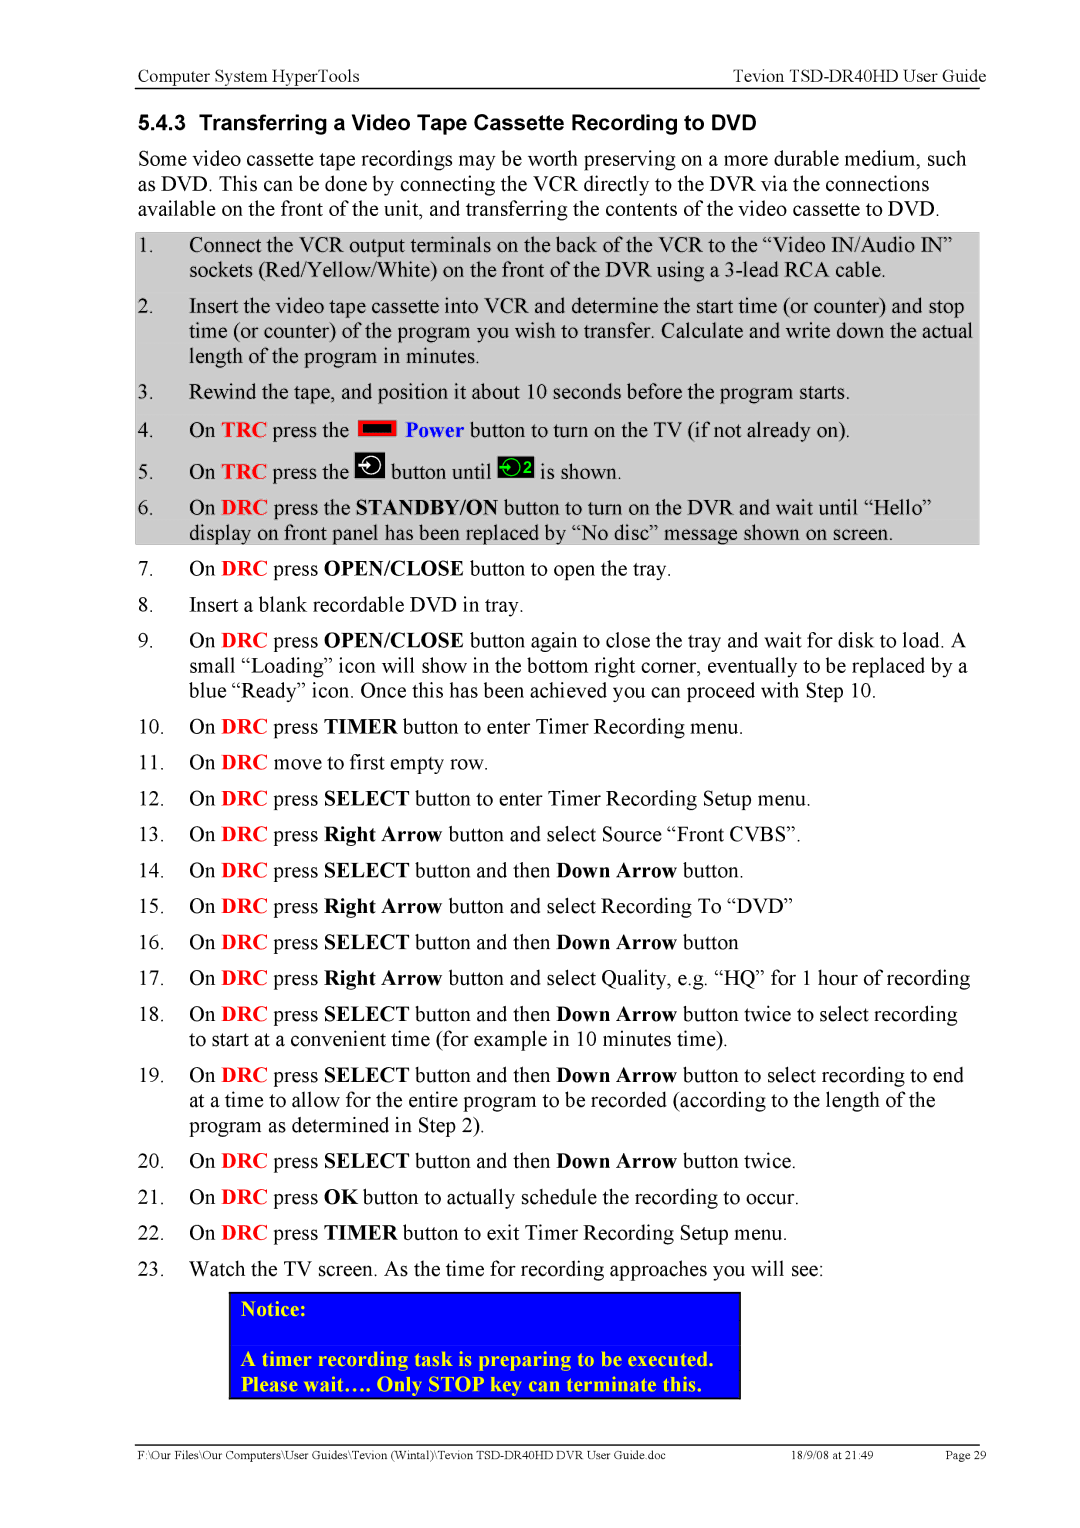
Notice:
A timer recording task is preparing to be executed.
Please wait…. Only STOP key can terminate this.
F:\Our Files\Our Computers\User Guides\Tevion (Wintal)\Tevion | 18/9/08 at 21:49 | Page 29 |