Page
Earphone Warning
Precautions
Precautions
Power Related Issues
Table of Contents
Table of Contents
Programming Your Scanner
Table of Contents
129
128
132
135
Scanning Legally
FCC Wants You To Know
FCC Wants You To Know
Page
Introduction
Introduction
Frequency MHz Lower Edge Upper Edge Modulation Step kHz
General
Feature Highlights
Introduction
Page
Search
Weather
Auto Store
Memory Storage Limits
Priority
PC Control and Cloning
Search Lockout Limits
Using the Scroll Control
About This Manual
Frequencies Temporary L/O Permanent L/O Skipped Review
Entering Text Within a Menu Option
How the Scanner’s Controls Are Represented in This Manual
Menu Program System F Select the system F
Page
Page
Understanding the Scanner’s Memory
Understanding Scanning and the BCD996T
Understanding Quick Keys
Understanding Scanning and the BCD996T
What is Searching?
What is Scanning?
What is CTCSS/DCS?
Simplex Operation
Conventional Scanning
Repeater Operation
What is Trunk Tracking?
Types of Trunking Systems
Trunked Scanning
Motorola Trunking
Edacs Trunking
LTR Trunking
Setup/Operation
Startup Configuration
Configuration
Multi-Site Trunking
Call Motorola/EDACS
Where To Get More Information
Information On The Internet
BCD996T
Included With Your Scanner
Setting Up Your Scanner
Setting Up Your Scanner
Base Station
BCD996T
Vehicle Installation
Setting Up an Audio Recording Device or Computer Recording
Mounting Using the Bracket
Mounting Using the DIN-E Sleeve
DIN-E
Removing the Scanner from the DIN-E Sleeve
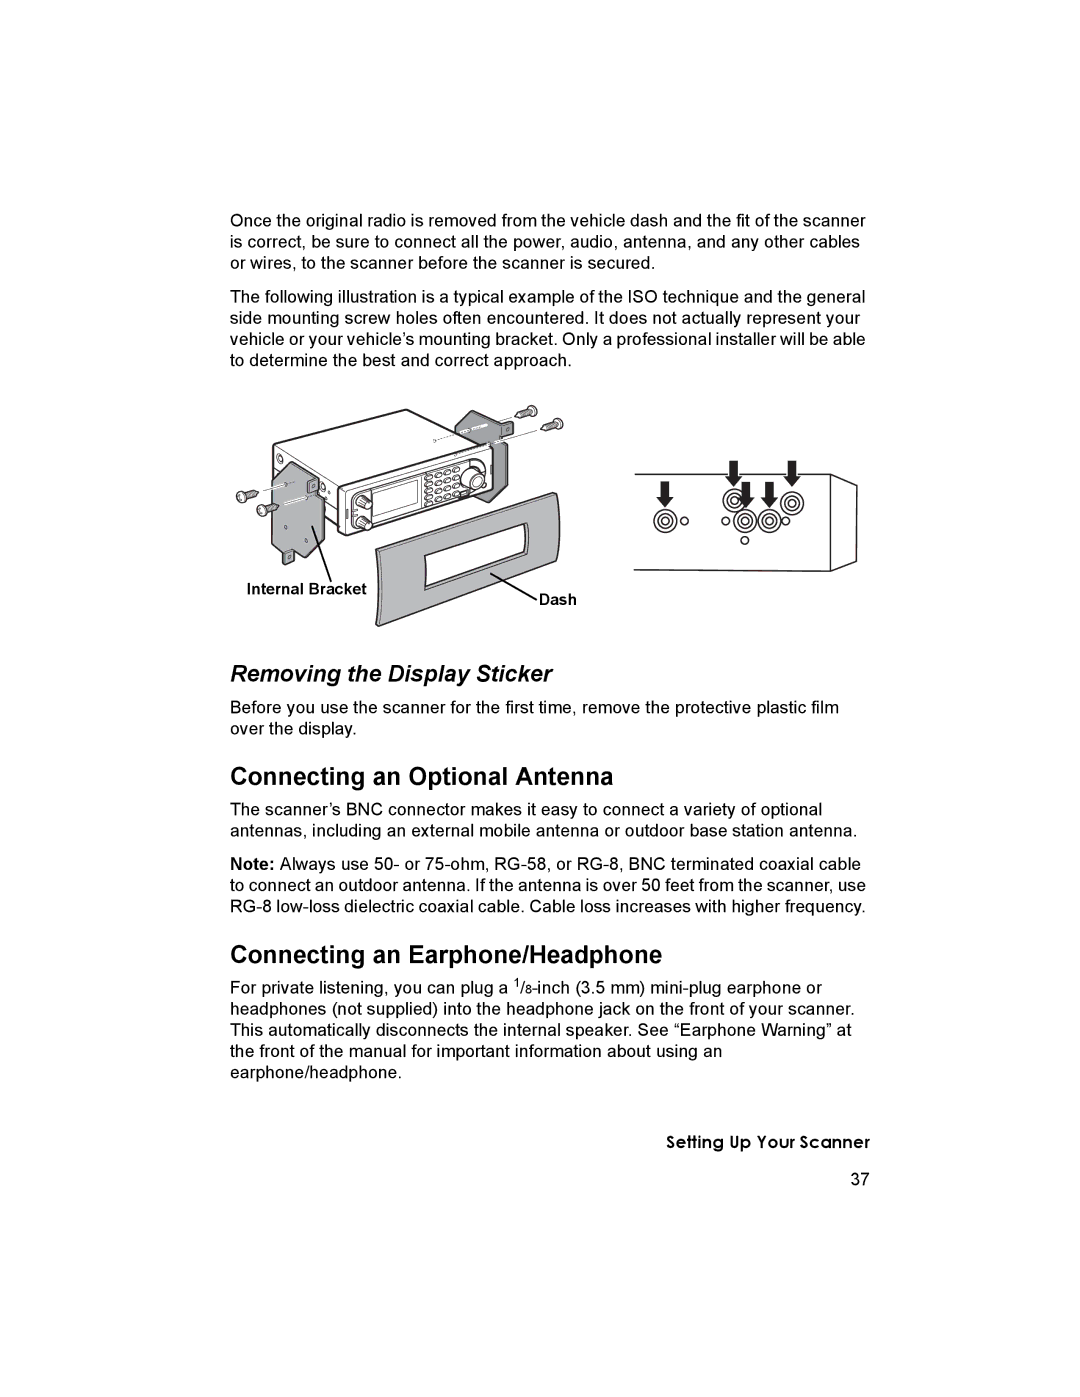
Mounting Using ISO Technique
Connecting an Earphone/Headphone
Connecting an Optional Antenna
Removing the Display Sticker
Connecting an Extension Speaker
Controls, Keys, and Functions
Controls, Keys, and Functions
Control
Control/Key Label Mode Action Result Power/VOL
GPS + F
Control/Key Label Mode Action Result
+ .No
Eyes
㪚㪪㪠㩷㪦㫇㪼㫉
Look At The Display
Operation
Turning On the Scanner and Setting the Squelch
Startup Key Operation
Menu Search for… F Edit Custom F
Scanning Systems
Search with Scan F Set Startup Key F
Selecting Systems to Scan
Preprogrammed System Tips
Selecting System Channel Groups
Locking/Unlocking Systems
ID Scan/ID Search Mode
Locking/Unlocking Channels
Holding On a Channel
Holding On a System
Quickly Storing an ID During ID Search
Quick-Storing Channels or Talk Group ID’s Tgid
Trunking Activity Indicators
Toggling the Display Mode
Conventional System
Optimizing P25 Performance
Trunked System
Optimizing P25 Performance
Menu Item Let’s You… For Detail, See…
Using the Menu
Setting and Using the Backlight
Programming General Settings
Setting the Dimmer
Menu Settings F Set Backlight F Set Dimmer F
Setting the Audio AGC
Adjusting the Key Beep
Setting the Backlight Color
Adjusting the Display Contrast
Setting the Display Orientation
Setting the GPS Format
Setting the Position Format
Setting the Time Format
Setting the Serial Port Speed
Setting the Time Zone
Setting the Distance Units
Initializing the Scanner’s Memory
Displaying Scanner Information
Viewing Memory Used
Viewing the Firmware Version and Electronic Serial Number
Wired Cloning
Connecting Your Scanner to a Personal Computer
Volume/Squelch with PC Control
Restore Preprogram List? Yes=E/No=
Programming General Settings
General Notes
Programming Your Scanner
System Options
System Settings
Programming Your Scanner
Edcs ID
Site Setting
Site Settings
Channel Setting
Channel Settings
Programming Conventional Systems
Programming Trunked Radio Systems
Programming System Settings
Editing the System Name
Menu Program System F New System F
Programming System Options
Specifying the Correct System Type
Editing the System Quick Key
Setting the System Lockout
Setting the Startup Key
Edit Sys Option F Set Lockout F
Setting ID Scan/ID Search
Setting the System Hold Time
Setting Channel Delay Time
Setting Data Skip
Setting the Fleet Map Type I Only
Setting Location Information
Edit Sys Option Set LocationInfo
Edit Sys Option Edit Fleet Map
Setting End Code Operation
Setting the Status Bit
Setting I-Call Operation
Setting the Edacs ID Format
Setting the Emergency Alert Option
Edit Sys Option Emergency Alert
Set Level F
Reviewing ID Search Lockouts
Setting the System Record Option
Clearing All Locked Out ID’s
Edit Sys Option Adjust P25 Level
Adjust the P25 Decode Threshold
Editing Sites
Editing Channel Groups
Programming Sites
Setting the Site Name
Copying Systems
Deleting Systems
Edit Name
Setting the Site Quick Key
Set Quick Key F
Setting Site Frequencies
Setting the Site Startup Key
Set Frequencies F
Setting Site Attenuation
Setting Site Modulation
Setting Site Lockout
Set Modulation F
Editing the Band Plan VHF and UHF only
Setting Site Hold Time
Edit Site F
Set Lockout
Setting Control-Channel Only Mode Except for P25
Setting P25 Band Plans P25 Only
Adjust P25 Level
Setting Site Location Information
Programming Channel Groups
Setting Up a Channel Group
Editing a Channel Group Name
Deleting Sites
Editing Channels
Setting the Group Quick Key
Locking Out Channel Groups
Edit Group F
Deleting Channel Groups
Programming Channels
Creating a Channel
Editing the Channel Name Alpha Tag
Editing the Talk Group ID
Editing Frequencies
Edit Frequency
Selecting CTCSS/DCS Tones
Setting the Audio Type
Edit
Set Audio Type Select from All, Digital Only, Analog Only F
Quick CTCSS/DCS Save
Setting Channel Modulation Method
Set Audio Type F Analog Only F
Ctcss or DCS F
Setting Channel Priority
Setting Channel Attenuation
Set Attenuator
Set Priority
Set Record
Setting Channel Alert
Set Alert
Copying a Channel
Setting Lockout
Deleting a Channel
Edit Group Edit Channel
Select a channel
Searching and Storing
Service Search
Custom Search
Quick Search
Menu Search for ... F Custom Search ... F
Quick Search? Yes=E / No= Press .No then To Custom Search F
Quick Search? Yes=E / No= Press .No then To Edit Custom F
Editing a Custom Search Range
Search With Scan
Menu Search for ... F Edit Service F
Editing a Service Search
Quick Search? Yes=E / No= Press .No then To Edit Service F
Method One
Set Attenuator
Set Delay Time
Assigning a Search Range to a Search Key
Search for Set Search Key F
Auto Search and Store
Saving a Found Channel Quick Save
Selecting a System to use for Storing
Conventional Search and Store
Trunked Search and Store
Setting Close Call Options
Using the Close Call Feature
Using the Close Call Feature
Menu Close Call F
10/15/30/45/60 sec
Close Call Hits with Scan
Close Call Hits
Close Call F
Managing Locked-Out Frequencies
Search and Close Call Options
Search and Close Call Options
Store
Reviewing Locked-Out Frequencies
Unlocking All Frequencies
Searching for Subaudible Tones
Screening Out Broadcast Sources
Finding Repeater Output Frequencies
Setting the Modulation Type
Setting the Maximum Auto Store Value
Repeater Find F On or Off F
Menu Srch/CloCall Opt F Max Auto Store F
Setting Data Skip
Setting Attenuation
Menu Srch/CloCall Opt F Set Attenuator F
Menu Srch/CloCall Opt F Set Data Skip F
Setting the Search Frequency Step
Setting the Delay Time
Setting Record
Menu Srch/CloCall Opt F Adjust P25 Level F
Adjust P25 Level
Priority Scan
Off, On, or Plus On F
Set Priority F
Using Weather Alert Same
Using Weather Alert Same
Searching For a Weather Broadcast
Menu WX Operation F Weather Scan F
Programming a Same Group
Turning Weather Alert On/Off
Menu WX Operation F Weather Alert F
WX Operation Program Same F
Setting WX Alert Priority
Menu WX Operation F WX Alt Priority F
Setting Up Tone-Out
Setting Tone-Out Standby
Menu Tone-Out for... F Tone-Out Setup F
Fire Tone-Out
Fire Tone-Out
Frequency MHz Modulation Attenuator Tone a Hz Tone B Hz
Tone-Out Multi-Channel Monitoring
Connecting Your Scanner to a GPS Device
Using the BCD996T with a GPS
Using the BCD996T with a GPS
Device Compatibility
Figure a
Location-Based GPS Scanning
Another Example of Multiple Site Creation
Non-Radio Location Based GPS Features
Menu Program Location F
Setting the Options
Menu Option
Road
For POI Only
For Dangerous Xing, and Dangerous Road Only
An Example of a POI Alert
Deleting a Location
Delete Location Confirm Delete? Yes=E / No=. F
GPS Display Mode
GPS Review Location Mode
127
Cleaning
Care and Maintenance
General Use
Location
Troubleshooting
Troubleshooting
Problem Possible Cause Suggestion
SCAN/SEARCH to scan
Press SCAN/SEARCH
131
Range MHz Step kHz Mode
Specifications
133
Specifications
+14F to +140F
Reference
Preset Fleet Maps
Reference
136
Type I Programming Information
User Defined Fleet Maps
Size Code Restrictions
Preprogrammed Systems and Lockout Options
Preprogrammed Systems and Lockout Options
State, or City Area Quick Key
Preprogrammed Systems with Quick Keys
DCS Codes
Ctcss Frequencies
Preprogrammed Systems with Quick Keys
142
Index
Index
Ctcss
LTR
Weather
One-Year Limited Warranty
One-Year Limited Warranty
Page
Memo
150
151
Outside Back Cover