Typical Installation
Hairpin Cotter
(Hole Closest to
Door Bracket)
Upper Arm
| 5/16” x |
Door Bracket | |
Nylon Shoulder | Lower Arm |
Bushing | |
Door Bracket |
|
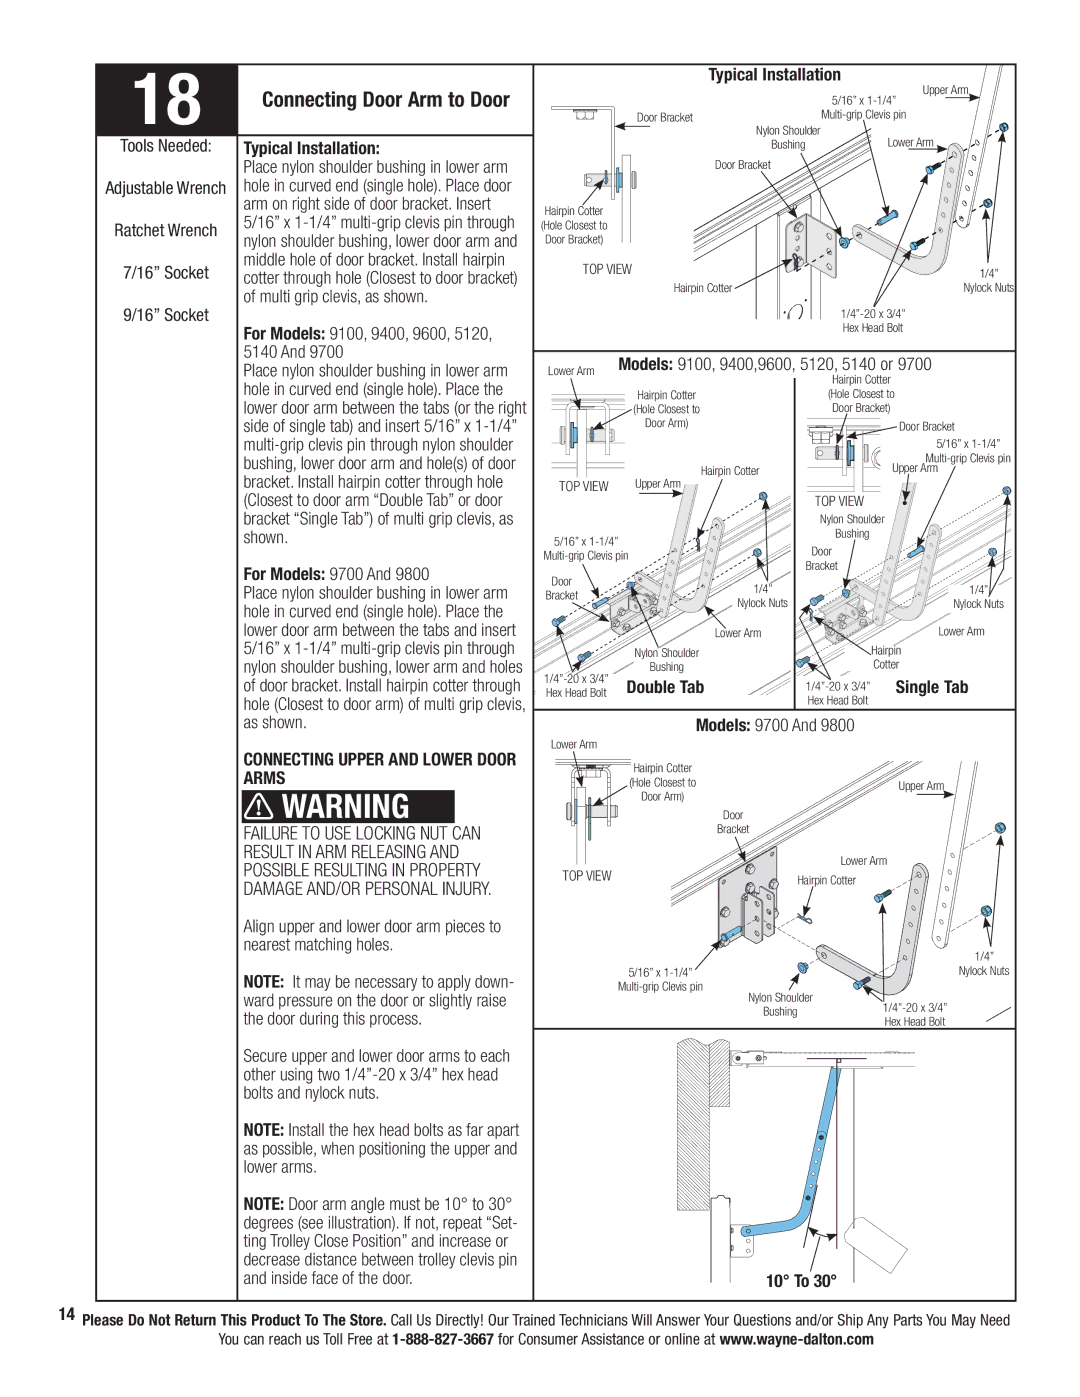
18 | Connecting Door Arm to Door | ||
Tools Needed: | Typical Installation: | ||
| Place nylon shoulder bushing in lower arm | ||
Adjustable Wrench | hole in curved end (single hole). Place door | ||
| arm on right side of door bracket. Insert | ||
Ratchet Wrench | 5/16” x | ||
nylon shoulder bushing, lower door arm and | |||
| |||
7/16” Socket | middle hole of door bracket. Install hairpin | ||
cotter through hole (Closest to door bracket) | |||
9/16” Socket | of multi grip clevis, as shown. | ||
For Models: 9100, 9400, 9600, 5120, | |||
| |||
| 5140 And 9700 | ||
| Place nylon shoulder bushing in lower arm | ||
| hole in curved end (single hole). Place the | ||
| lower door arm between the tabs (or the right | ||
| side of single tab) and insert 5/16” x | ||
| |||
| bushing, lower door arm and hole(s) of door | ||
| bracket. Install hairpin cotter through hole | ||
| (Closest to door arm “Double Tab” or door | ||
| bracket “Single Tab”) of multi grip clevis, as | ||
| shown. | ||
| For Models: 9700 And 9800 | ||
| Place nylon shoulder bushing in lower arm | ||
| hole in curved end (single hole). Place the | ||
| lower door arm between the tabs and insert | ||
| 5/16” x | ||
| nylon shoulder bushing, lower arm and holes | ||
| of door bracket. Install hairpin cotter through | ||
| hole (Closest to door arm) of multi grip clevis, | ||
| as shown. | ||
| CONNECTING UPPER AND LOWER DOOR | ||
| ARMS | ||
| WARNING | CAN | |
| FAILURE TO USE LOCKING NUT | ||
| RESULT IN ARM RELEASING AND | ||
| POSSIBLE RESULTING IN PROPERTY | ||
| DAMAGE AND/OR PERSONAL INJURY. | ||
| Align upper and lower door arm pieces to | ||
| nearest matching holes. | ||
| NOTE: It may be necessary to apply down- | ||
| ward pressure on the door or slightly raise | ||
| the door during this process. | ||
| Secure upper and lower door arms to each | ||
| other using two | ||
| bolts and nylock nuts. | ||
| NOTE: Install the hex head bolts as far apart | ||
| as possible, when positioning the upper and | ||
| lower arms. | ||
| NOTE: Door arm angle must be 10° to 30° | ||
| degrees (see illustration). If not, repeat “Set- | ||
| ting Trolley Close Position” and increase or | ||
| decrease distance between trolley clevis pin | ||
| and inside face of the door. | ||
TOP VIEW | 1/4” |
| |
Hairpin Cotter | Nylock Nuts |
| |
| Hex Head Bolt |
Lower Arm | Models: 9100, 9400,9600, 5120, 5140 or 9700 | |||
| Hairpin Cotter | |||
|
| |||
| Hairpin Cotter | (Hole Closest to | ||
| (Hole Closest to | Door Bracket) | ||
| Door Arm) |
| Door Bracket | |
|
|
| 5/16” x | |
|
|
| ||
| Hairpin Cotter |
| Upper Arm | |
TOP VIEW | Upper Arm | TOP VIEW |
| |
|
|
| ||
|
| Nylon Shoulder | ||
5/16” x | Bushing |
| ||
Door |
| |||
| ||||
Bracket |
| |||
|
|
| ||
Door | 1/4” |
| 1/4” | |
Bracket |
| |||
Nylock Nuts |
| Nylock Nuts | ||
|
| |||
| Lower Arm |
| Lower Arm | |
| Nylon Shoulder |
| Hairpin | |
Bushing |
| Cotter | ||
Double Tab | Single Tab | |||
Hex Head Bolt | ||||
|
| Hex Head Bolt |
| |
| Models: 9700 And 9800 |
| ||
Lower Arm |
|
|
| |
| Hairpin Cotter |
|
| |
| (Hole Closest to |
| Upper Arm | |
| Door Arm) |
| ||
|
|
| ||
| Door |
|
| |
| Bracket |
|
| |
|
| Lower Arm | ||
TOP VIEW |
| Hairpin Cotter |
| |
|
|
| 1/4” | |
| 5/16” x |
| Nylock Nuts | |
|
|
| ||
| Nylon Shoulder | |||
| Bushing | |||
| Hex Head Bolt | |||
|
|
| ||
10° To 30°
14Please Do Not Return This Product To The Store. Call Us Directly! Our Trained Technicians Will Answer Your Questions and/or Ship Any Parts You May Need
You can reach us Toll Free at