IMounting Door Bracket To A(9100, 9400, 9600, 5120 & 5140 Series Door)
Tools Needed: | IMPORTANT: WHEN CONNECTING A | |
| TROLLEY TYPE GARAGE DOOR OPENER | |
Power Drill | TO THE ABOVE LISTED DOORS, A WAYNE- | |
DALTON OPENER/TROLLEY BRACKET | ||
| ||
| MUST BE SECURELY ATTACHED TO THE | |
7/16” Socket | TOP SECTION OF THE DOOR, ALONG WITH | |
Driver | ANY | |
| THE INSTALLATION OF THE OPENER MUST | |
Vice Clamps | BE ACCORDING TO MANUFACTURER’S | |
INSTRUCTIONS AND FORCE SETTINGS | ||
| ||
| MUST BE ADJUSTED PROPERLY. | |
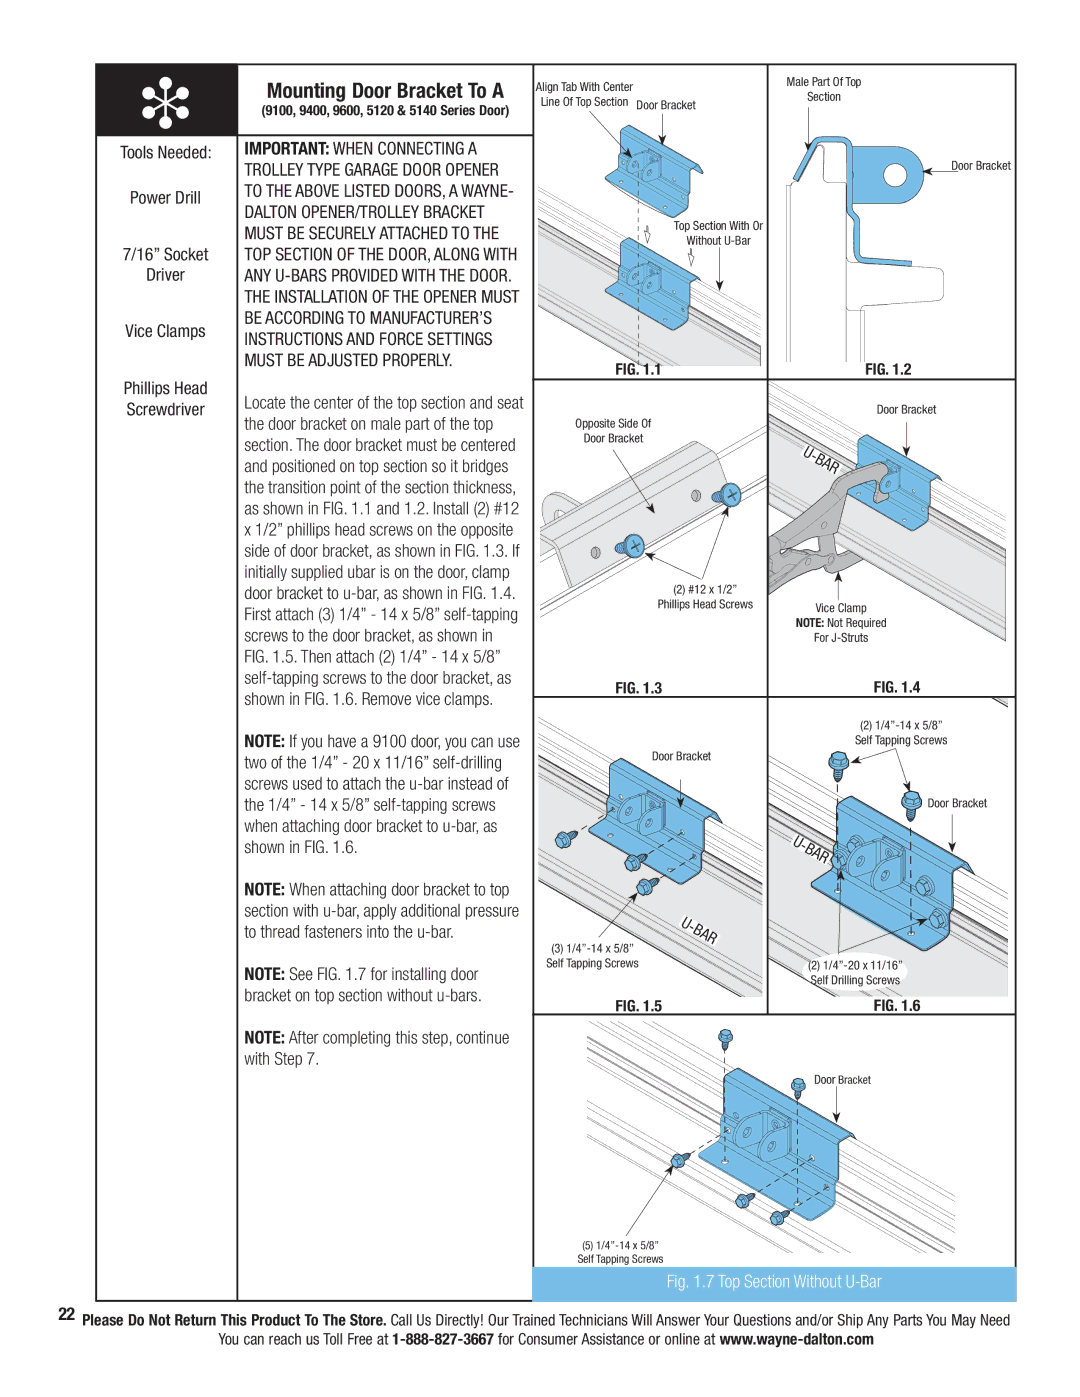
Phillips Head | Locate the center of the top section and seat | |
Screwdriver | ||
the door bracket on male part of the top | ||
| ||
| section. The door bracket must be centered | |
| and positioned on top section so it bridges | |
| the transition point of the section thickness, | |
| as shown in FIG. 1.1 and 1.2. Install (2) #12 | |
| x 1/2” phillips head screws on the opposite | |
| side of door bracket, as shown in FIG. 1.3. If | |
| initially supplied ubar is on the door, clamp | |
| door bracket to | |
| First attach (3) 1/4” - 14 x 5/8” | |
| screws to the door bracket, as shown in | |
| FIG. 1.5. Then attach (2) 1/4” - 14 x 5/8” | |
| ||
| shown in FIG. 1.6. Remove vice clamps. | |
| NOTE: If you have a 9100 door, you can use | |
| two of the 1/4” - 20 x 11/16” | |
| screws used to attach the | |
| the 1/4” - 14 x 5/8” | |
| when attaching door bracket to | |
| shown in FIG. 1.6. | |
| NOTE: When attaching door bracket to top | |
| section with | |
| to thread fasteners into the | |
| NOTE: See FIG. 1.7 for installing door | |
| bracket on top section without | |
| NOTE: After completing this step, continue | |
| with Step 7. |
Align Tab With Center |
| Male Part Of Top | ||
| Section | |||
Line Of Top Section |
| |||
Door Bracket |
|
| ||
| ||||
|
|
|
|
|
|
|
|
|
|
Door Bracket
Top Section With Or
Without
FIG. 1.1 | FIG. 1.2 |
Door Bracket
Opposite Side Of
Door Bracket
U-BAR
(2) #12 x 1/2” |
|
Phillips Head Screws | Vice Clamp |
| |
| NOTE: Not Required |
| For |
FIG. 1.3 | FIG. 1.4 |
| (2) |
| Self Tapping Screws |
Door Bracket |
|
Door Bracket
| U |
| - |
| BAR |
| U |
| - |
(3) | BAR |
| |
Self Tapping Screws | (2) |
| Self Drilling Screws |
FIG. 1.5 | FIG. 1.6 |
| Door Bracket |
(5)
Fig. 1.7 Top Section Without U-Bar
22Please Do Not Return This Product To The Store. Call Us Directly! Our Trained Technicians Will Answer Your Questions and/or Ship Any Parts You May Need
You can reach us Toll Free at