Page
Riskof Electricshock Do Notopen
Explanation of Graphical Symbols
Voltage Selector
@MAIN
Using iPod TM
Other
At the end of this manual
Automatic speaker setup features
Built-in 7-channel power amplifier
Input/Output terminals
Output terminals
Color
Bluetooth TM
IPod TM
A D Y
@ Front panel display
@ Multich Input jacks
@ XM jack
Antenna
Speakers
@ Sleep indicator
@ ZONE2 indicator
@ Mute indicator
@ Volume indicator
Cursors / l g l l l t Selectmenuitemsorchange
7En
Tuner keys
Connect your components
Turn on the power
Hdmi
Cable Audio
Preparation
Front left and right speakers FL and FR
Channel speaker layout
Channel speaker layout Center speaker C
Surround left and right speakers SL and SR
Channel with Zone2 speakers
Presence left and right speakers PL and PR
Presence speakers
11 En
Tl,llll Ii,II,Ii
Front speakers Right Left
Banana plug
Audio jacks
Video/audio jacks
Video jacks
To connect an Hdmi video monitor
Outputting TV sounds from this unit
To connect component video monitor
To connect composite video monitor
Input jack
Audio and video player / Set-top box
¶/lllll/ll
Input source
Connecting an external amplifier
Connecting a multi-format player or an external decoder
Audio player
About audio/video output terminals
Remote Control out
Transmitting/receiving remote control signals
Control
USB memory device or USB portable audio player
Press @MAIN Zone ON/OFF or
Power again to turn off this unit standby mode
Iqllllillff
Press and hold Insert
Connect the supplied
Allow small children to enter the room during the procedure
To the @OPTIMIZER MIC jack on the front
Panel
Press Enter to confirm the settings
Speaker Config
Natural
Flat
Retry
Terminates the measurement and Auto Setup
To return to the top result display, press Enter again
To select Retry or Exit and then press
Keys Input source Sound field program
Selecting a Scene
Hdmi l Straight
22 En
Press Nmute on the remote control to mute the audio output
Press on Screen on the remote control
Registering input source/sound field Program
Components linked to scene selections
Press Cursor a / to select Signal Info Then press Enter
Plug your headphones in the @PHONES jack on Front panel
Option menu for the selected input source is Displayed
To exit the Option menu, press Option
Selecting a sound field program with the remote control
For movie/TV program sources Movie
Selecting a sound field program on the front panel
For stereo reproduction Stereo
Foraudio Music sourcesMUSIC
Neural Sur
For multichannel stereo Repr0ductionSTEREO
A. model only
27 En
To cancel straight decode mode, press
To enable straight decode mode, press
Straight appears on the front panel display
28 En
Preset
Calling a preset station Preset tuning
Registering stations by manual station Preset
Select a preset number
Tune in to the desired station
When only one audio program is provided
When multiple audio programs are provided
Behavior of the display
Ii,i, i ,, r
Front panel display
Following information is displayed on the GUI screen
32 En
Sirius XM Radio Legal
Listening to Satellite Radio
33 En
Sold separately
Category Search mode
All Channel Search mode
Repeatedly to search for a channel within all channels
Category 1 / I to select the channel category
Calling a preset channel Preset Search mode
Repeatedly to change the preset channel number
Clearing preset channels
Channel number, channel name
Antenna reception level, channel number
36 En
37 En
SiriusConnect tuner
SiriusConnect Tuner and the antenna Sold separately
Channel number Channel name
Category Search mode The first channel in the category
Display, press @TUNING/CH /E or
Category / C to select the channel category
While CAT is displayed on the front panel
For details, see Sirius Satellite Radio operations
Mode
Option menu for Sirius is displayed
39 En
Repeat steps 6 through 8 to lock all the desired channels
Channels
Di.iPP!o g!.!.!rq
Composer name, channel number
Display example !!!.d.e
41 En
Controlling iPod in menu browse mode
Controlling iPod in simple remote mode
Key Function
Subsequentmenu Menu up Menu down Previousmenu
Play information display
Menu items of Videos
Shuffle/repeat playback
Repeat
Searching appears and the pairing operation starts
Option menu for Bluetooth is displayed
Start playback of the Bluetooth component
44 En
To return to the previous menu, press
Sh uffle/repeat playback
Press Enter to start play back
Option menu for USB is displayed
Press Sleep repeatedly to set the amount of time
Enable the Hdmi control function on each Device
Turn on all devices connected to this unit With Hdmi
For details, refer to the manual supplied with your device
Source
Volume Trim
Signal Info
Decoder Mode
Audio Mode
Auto Preset
Connect / Disconnect
Pairing
Video Out
Press Cursor/ / V to select Video Out and then press Enter
Cursor Again To execute Initialization 1to cancel it
Press Cursor V to select Setup and then press Enter
To turn off the GUI screen, press ION
Cinema DSP basic parameters DSP Level
51 En
Parameters for certain sound field Programs
Parameters for adjusting reverberant sound
Parameter for Movie sound field programs
Parameters for 7ch Stereo
Parameter for Straight Enhancer and 7ch Effect Level
Dimension
Decoder parameters
Parameter for PLIIx Music and Plii Music Panorama
54 En
Menu/Submenu Function
OUT
Auto Setup
Press Cursor 7to select Setup and then press Jenter
Manual Setup
Speaker Configuration
LFE / Bass Out
Extra Speaker Assignment
Parameter
Front Speaker
Bass Crossover Frequency
Subwoofer Phase
Speaker Level
Speaker Distance
Lipsync
Resolution
Hdmi Auto kipsync
Hdmi Control
Volume
Zone2 Initial Volume
Zone2 Max Volume
Selecting a name to be displayed from templates
Entering an original name
Using an external amplifier
Using the internal amplifier of this unit
Important safety notice
61 En
To control Zone2 by using the remote control
Switching to the Zone2 operation mode
Cursor, ENTER, Return
Default remote control code settings
External component operation keys
TV control keys
Setting a remote control ID
Press @MAIN Zone ON/OFF to set this unit to standby
Press on Screen
65 En
Enter the desired remote control ID code
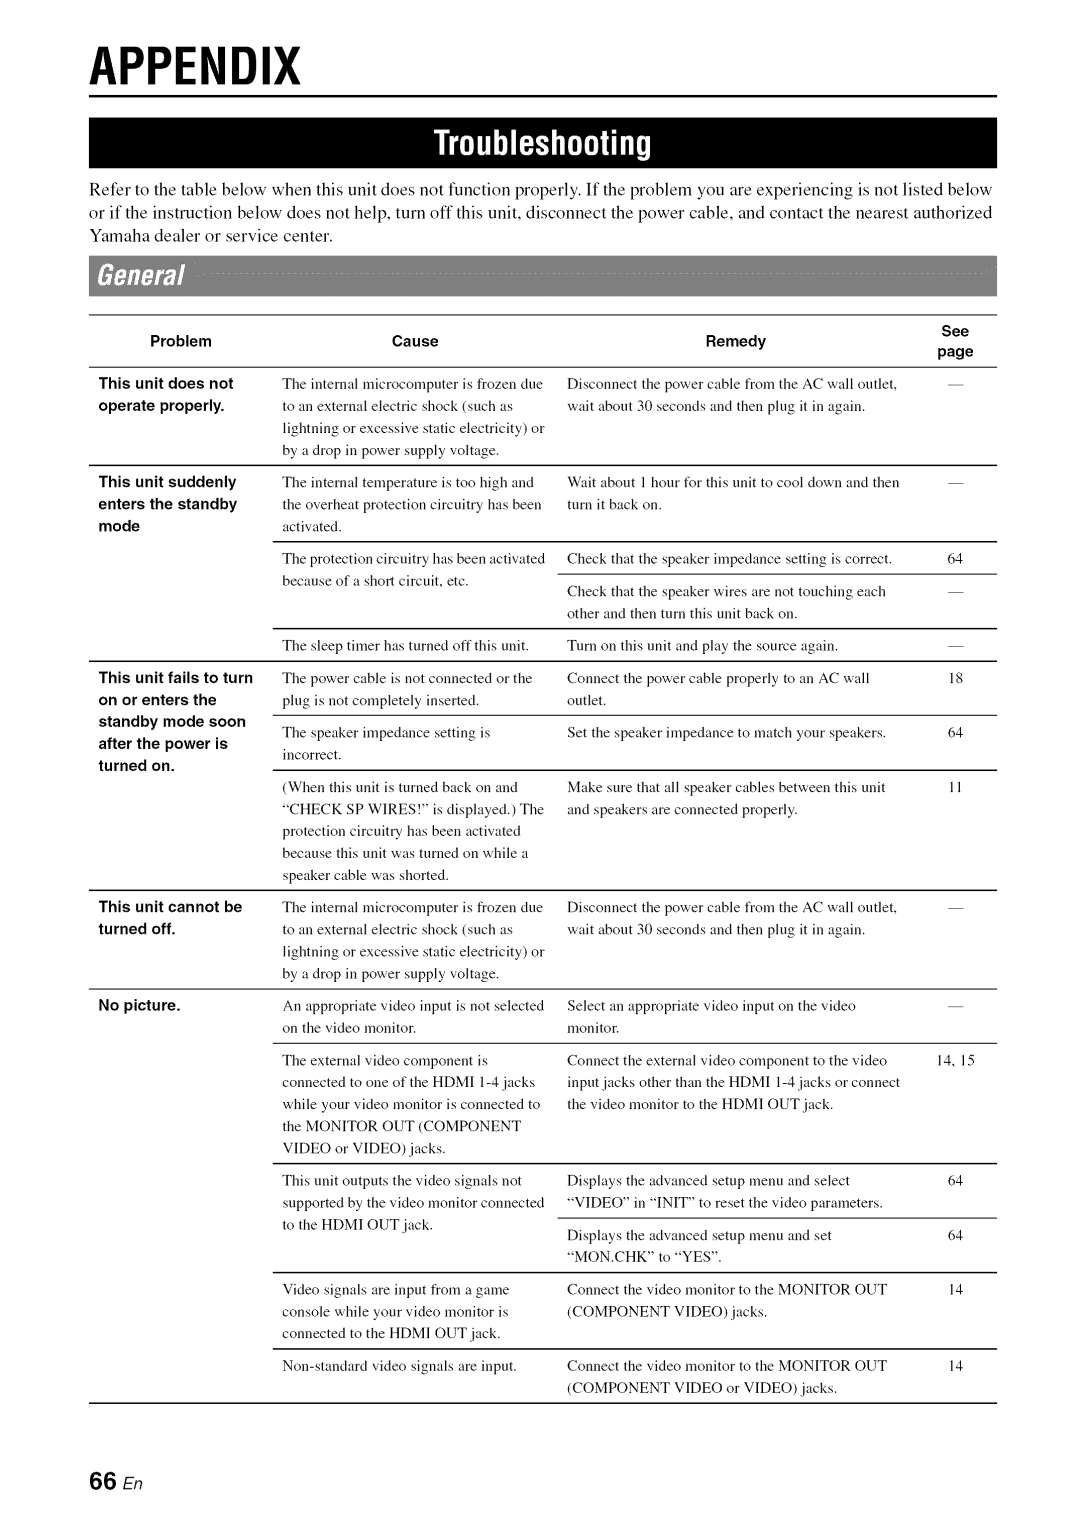
This unit fails to turn
66 En
See
Remedy
67 En
ProblemCause
Disturbed
Remedy See
68 En
Back speakers
Format
Noise/hum noise is
69 En
ProblemCause
70 En
Check XM Tuner
71 En
Loading
72 En
Invalid
Not Available
Loading
Status message
Unknown iPod
73 En
Status message Discon nected Unable to play Searching
74 En
Recognized.HDDs
75 En
During Auto Setup
8NO Signal
After Auto Setup
Error
76 En
Composite video signal
Component video signal
Audio and video synchronization lip sync
Bi-amplification connection
DTS 96/24
DTS-HD High Resolution Audio
DTS Digital Surround
DTS Express
79 En
Color
Early reflections
Elements of a sound field
Reverberations
Virtual Cinema DSP
Video signals
Hdmi signal compatibility Audio signals
Audio signal types Signal formats Compatible Media
81 En
82 En
83 En
Numerics
84 En
@MAIN Zone ON/OFF or
85 En
3268
Tovox
0104
01190,0096
Lngelen
LnFocus
Lngersol
Initial
Onceas
NEI
SEG
SSS
Black
Ell
Vcfi
1076
Lnnn Hit
Lnnnvatinn
Instant Replay
Minowa
Brandt
Mintek
Mitsubishi
Blu-ray Disc
DVD Recorder
Cable
Boca
Sattelite
Tuner
CD Recoder
Lape
Oyamaha
@YAMAHA
Remote control
Option menu for Audio I or AUDIO2 is displayed
Rotate the Input selector or press
Press Cursor a / g to select Video Out and then press Enter
I=2 E!+ +
About Vorbis library
Information about software