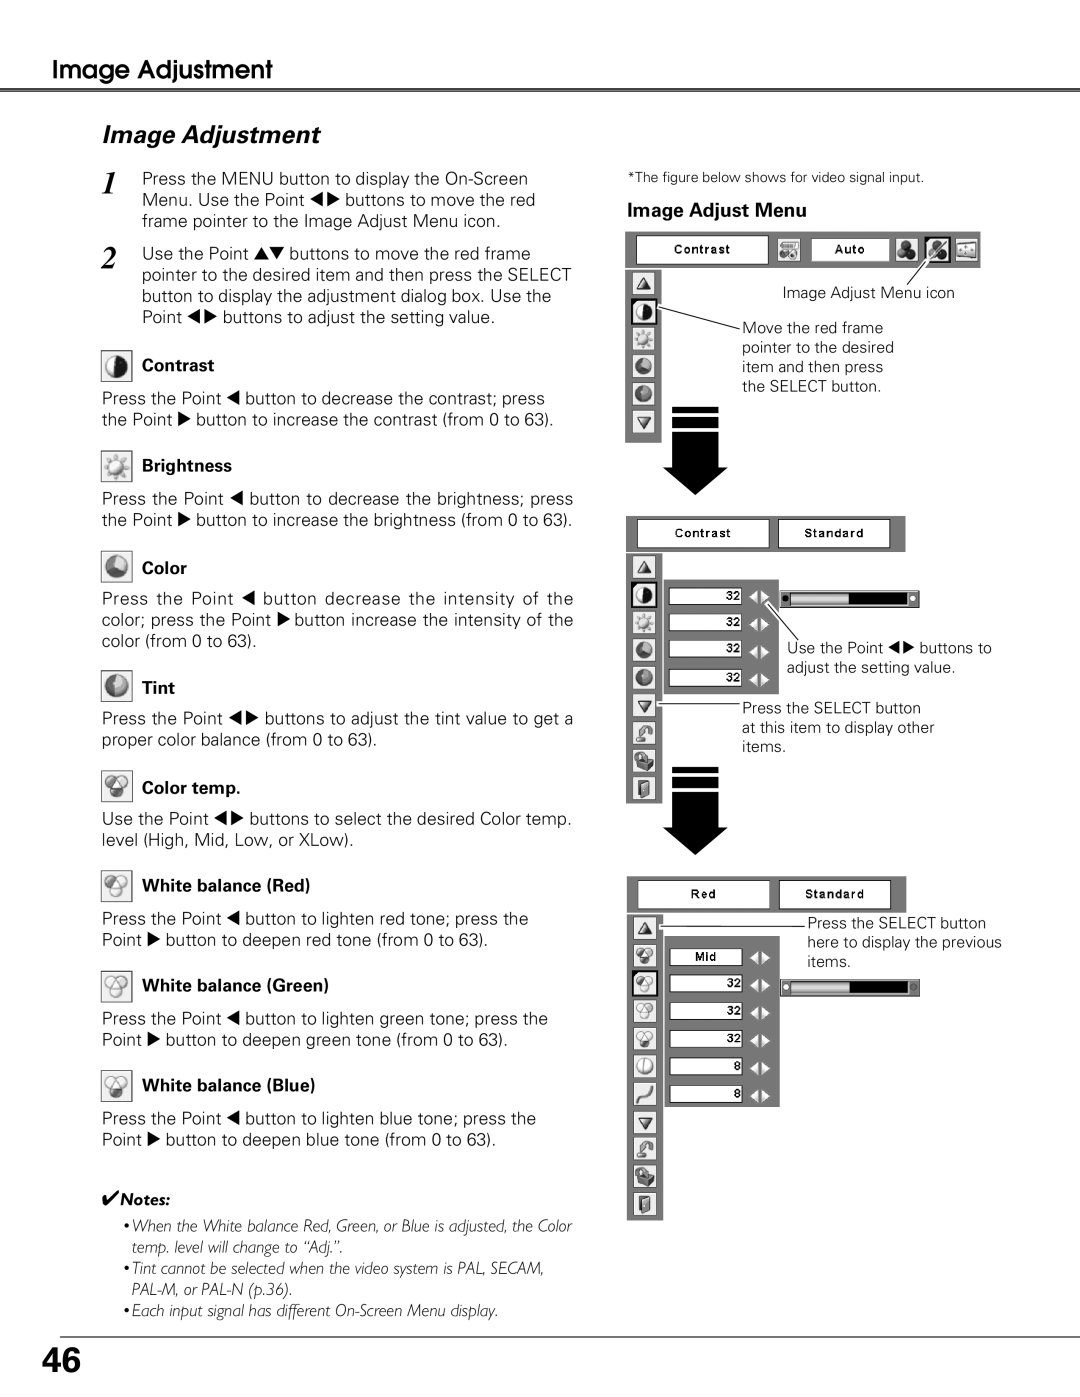
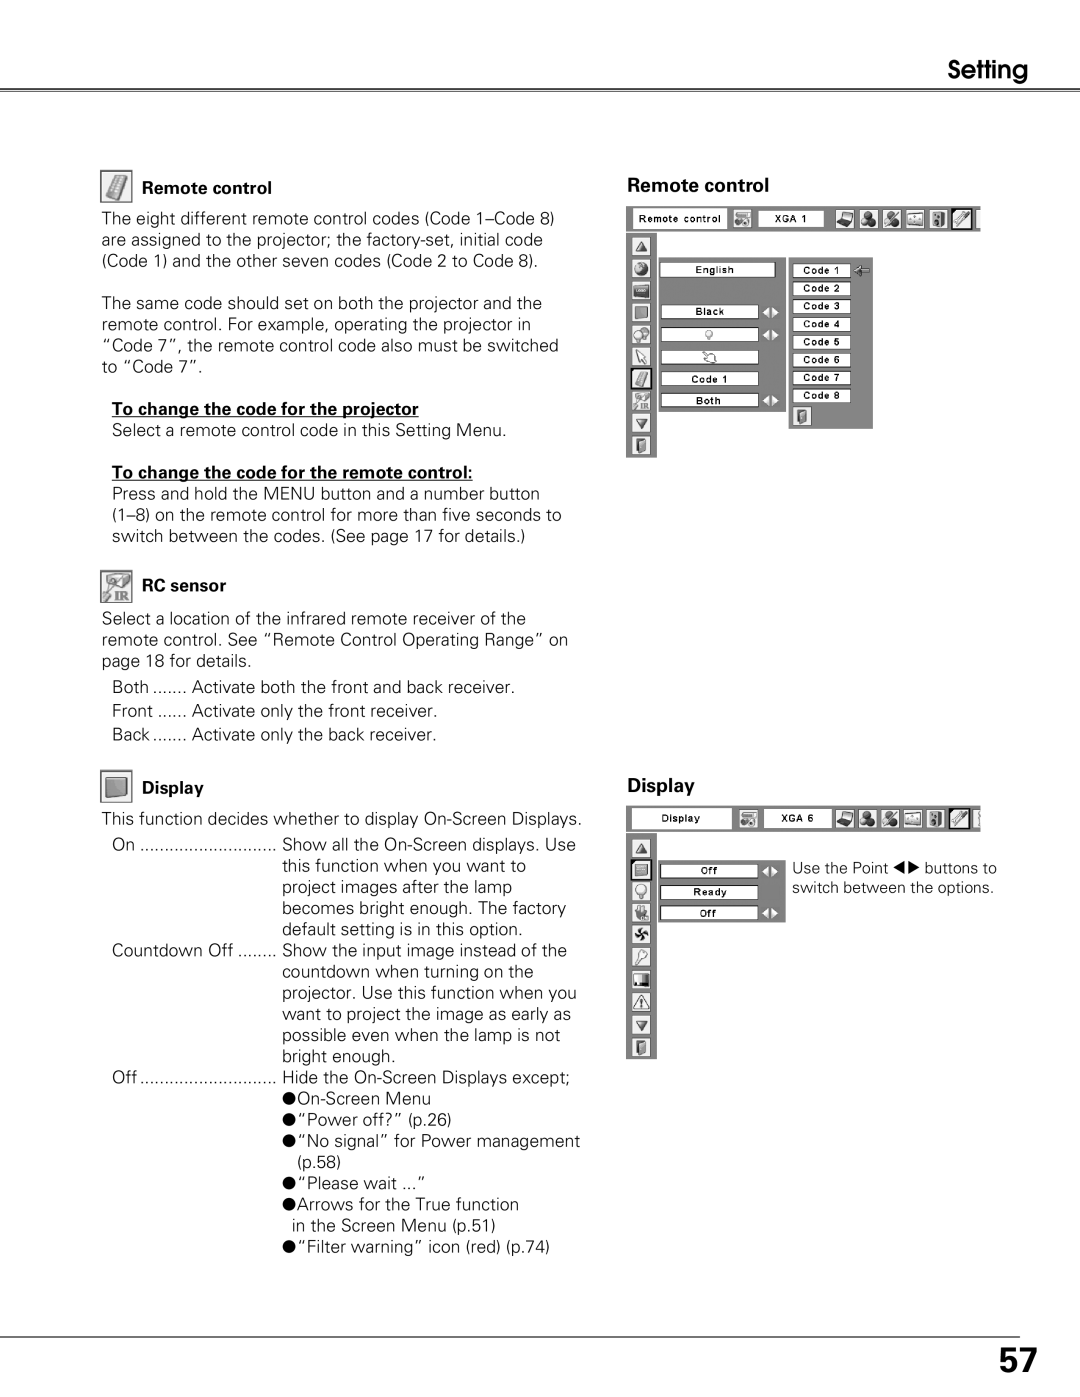
Sanyo PLC-XT20L*, PLC-XT25K, PLC-XT20K owner manual Power management, On start

Page 58

Setting

Power management

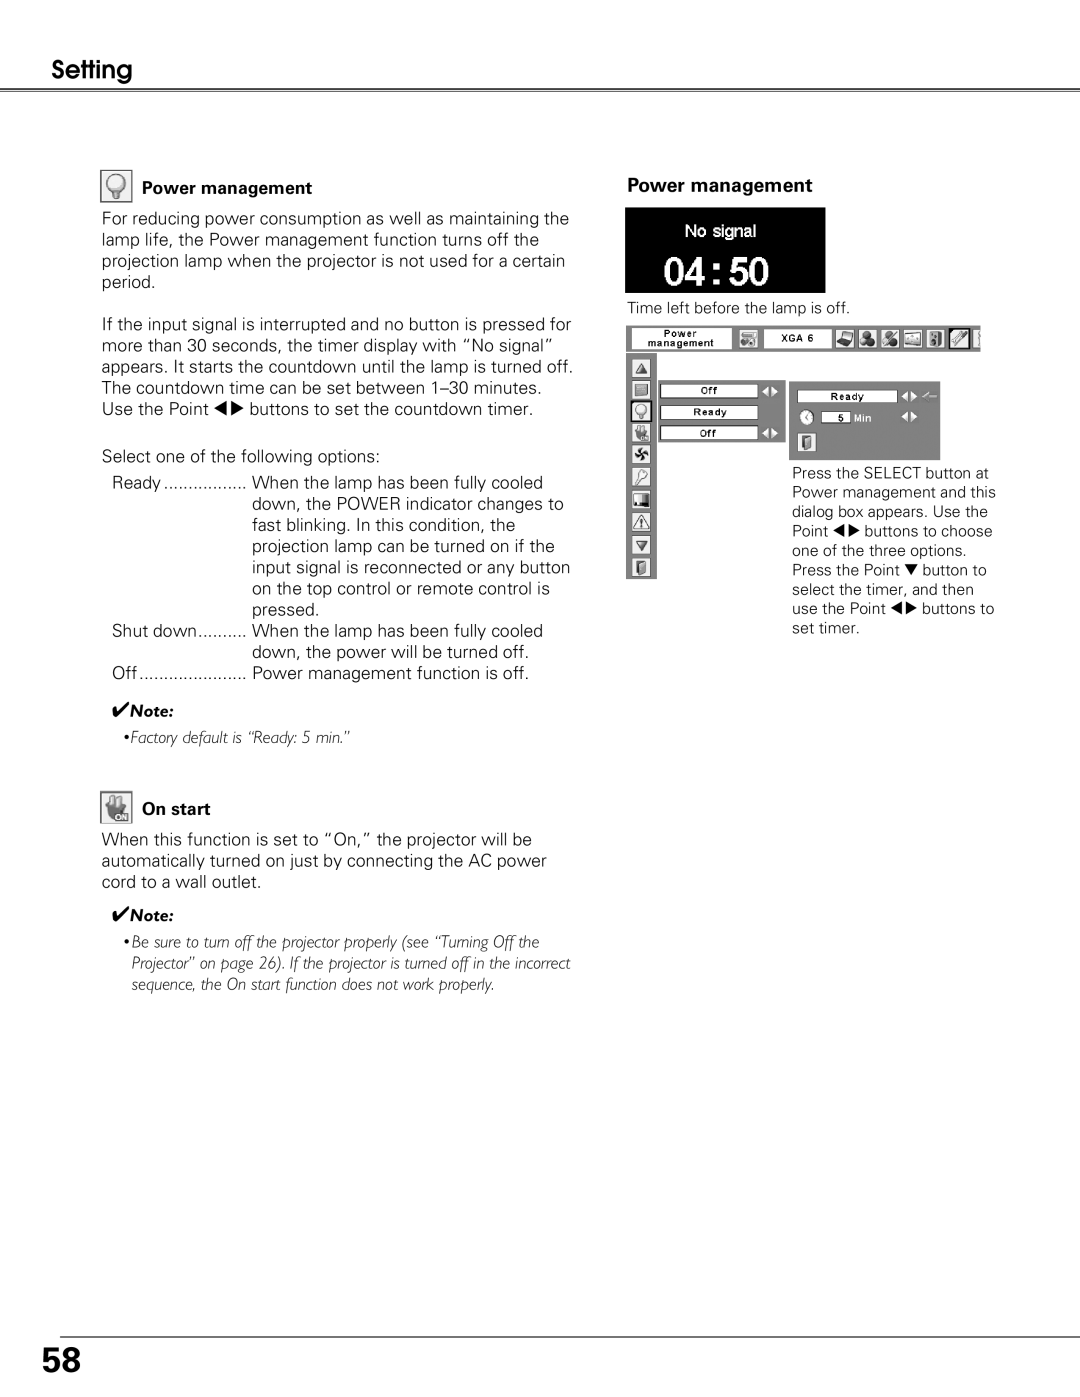
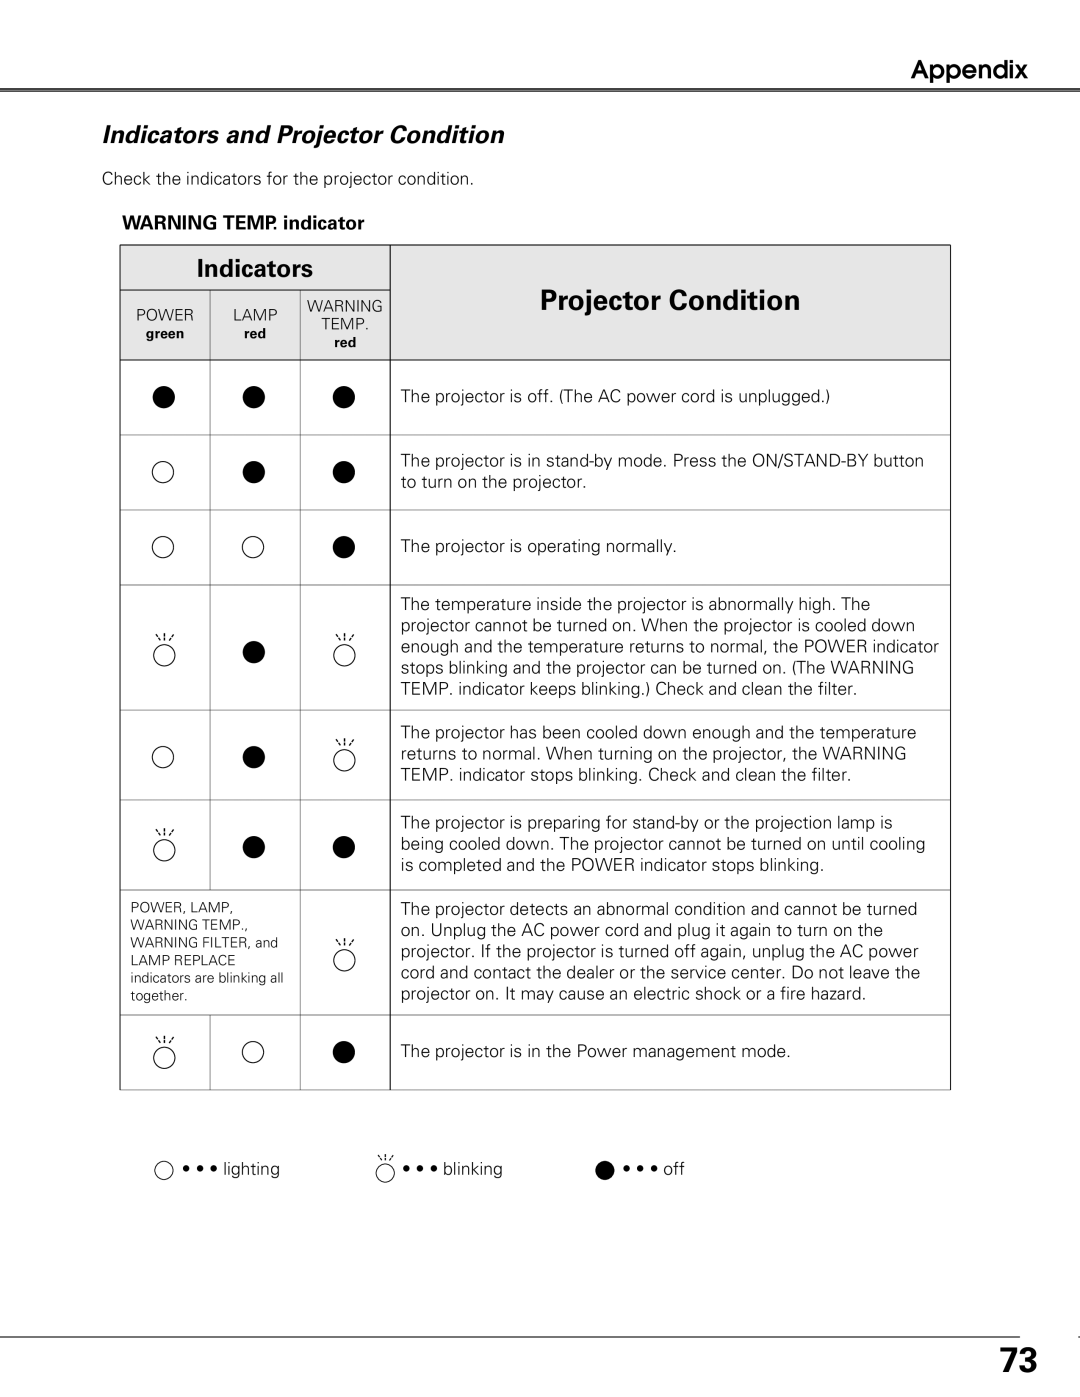
For reducing power consumption as well as maintaining the lamp life, the Power management function turns off the projection lamp when the projector is not used for a certain period.

If the input signal is interrupted and no button is pressed for more than 30 seconds, the timer display with “No signal” appears. It starts the countdown until the lamp is turned off. The countdown time can be set between 1–30 minutes. Use the Point 78 buttons to set the countdown timer.

Select one of the following options:

Ready

When the lamp has been fully cooled


down, the POWER indicator changes to


fast blinking. In this condition, the


projection lamp can be turned on if the


input signal is reconnected or any button


on the top control or remote control is


pressed.

Shut down

When the lamp has been fully cooled


down, the power will be turned off.

Off

Power management function is off.

Note:

•Factory default is “Ready: 5 min.”

On start

When this function is set to “On,” the projector will be automatically turned on just by connecting the AC power cord to a wall outlet.

Note:

•Be sure to turn off the projector properly (see “Turning Off the Projector” on page 26). If the projector is turned off in the incorrect sequence, the On start function does not work properly.

Power management

Time left before the lamp is off.

Press the SELECT button at Power management and this dialog box appears. Use the Point 78 buttons to choose one of the three options. Press the Point d button to select the timer, and then use the Point 78 buttons to set timer.

58

Image 58
Contents Multimedia Projector Features and Design Compact Design Power ManagementTable of Contents To the Owner Risk of Electric Shock Do not OpenSafety Instructions Air Circulation Top ControlInstalling the Projector in Proper Directions Positioning PrecautionsMoving the Projector Transporting the ProjectorAC Power Cord for the United Kingdom AC Power Cord for the United States and CanadaCompliance Part Names and Functions Front Back BottomRear Terminal Reset button 4INFRARED Remote Receiver BackTop Control Remote Control 3MENU button 4P-TIMER button9RESET/ON/ALL-OFF switch 5D.ZOOM buttonPointer Function Laser Pointer FunctionSpotlight Pointer Wireless Mouse Operation Remote Control CodeRemote Control Receivers and Operating Range Remote Control Battery InstallationAdjustable Feet Removing the lens InstallationLens Installation Attaching the lens to the projectorPositioning the Projector for PLC-XT25/XT25K/XT21/XT20/XT20K Moving the LensConnecting the AC Power Cord Projector side AC outlet sideConnecting to a Computer Digital and Analog RGB Cables used for connectionConnecting to Video Equipment Video, S-Video Connecting to Video Equipment Component and RGB Scart Selected Input Source and Lamp Control Basic OperationTurning On the Projector PIN Code Input Dialog BoxTurning Off the Projector Remote Control How to Operate the On-Screen MenuOn-Screen Menu Menu Bar Lens Operation Operating with Projector ControlInformation Direct Operation Sound AdjustmentMenu Operation Operating with Remote Control No Show button Timer buttonKeystone button Input Selection Input Remote Control OperationRemote Control button operation Top Control OperationRGB PC analog RGB Scart RGB PC digital Input Source SelectionInput Menu Video ComponentComponent Video System SelectionVideo or S-Video AV System Menu Video or S-VideoComputer Adjustment Helpful HintsSelecting Computer System Manually Computer System SelectionPC System Menu To store adjustment parameters Auto PC AdjustmentPC Adjust Menu Auto PC AdjManual PC Adjustment To clear the adjusted data To store the adjusted dataMemo Image Mode Selection Image Mode Selection Image MenuImage Adjustment Image Adjustment Image Adjust MenuNoise reduction SharpnessGamma ProgressiveTo reset the adjusted data, select Reset and press Screen Adjustment Screen Menu Screen AdjustmentKeystone Screen Size Adjustment Computer Signals Screen Size Adjustment Video, Component Signals Setting Setting Menu Language SettingPointer Logo select Logo Logo and Logo PIN code lock settingsLogo Capture CaptureChange the Logo PIN code Change the Logo PIN code lock settingEnter a Logo PIN code Logo PIN code lockRemote control Display Power management Power managementOn start Fan control Key lockEnter a PIN code Change the PIN code lock settingPIN code lock Test pattern Change the PIN codeLamp counter Filter counter Factory defaultFactory default Filter counterMaintenance and Filter Cleaning RecommendationPage Reset the lamp counter Lamp ReplacementReplacement Lamp Type No. POA-LMP105 Service Parts No 330 Model No. of your projectorResetting the Lamp Counter Lamp counterProjector is shut down and all five indicators are blinking Then check the matters belowCleaning the Projection Lens Cleaning the Projector CabinetTroubleshooting AppendixAppendix Input Menu TreeInformation Input PC Adjust Screen SettingIndicators and Projector Condition Projector ConditionLamp Replace indicator Or replace the filter see belowCompatible Computer Specifications ON-SCREEN Resolution31.47 59.94 Technical Specifications Accessories Optional PartsPJ Link Notice Terminal Analog RGB Mini D-sub 15 pin Configurations of TerminalsUSB Connector Series B Terminal Mini DIN 8-PINPIN Code Number Memo Logo PIN Code Lock NoDimensions MZ7A-B