BenQ MS521 user manual Replacing the lamp

Page 63

Replacing the lamp

Hg - Lamp contains mercury. Manage in accordance with local disposal laws. See www.lamprecycle.org.

If lamp replacement is performed while the projector is suspended upside-down from the ceiling, make sure that no one is underneath the lamp socket to avoid any possible injury or damage to the human eyes caused by fractured lamp.

To reduce the risk of electrical shock, always turn the projector off and disconnect the power cord before changing the lamp.

To reduce the risk of severe burns, allow the projector to cool for at least 45 minutes before replacing the lamp.

To reduce the risk of injuries to fingers and damage to internal components, use caution when removing lamp glass that has shattered into sharp pieces.

To reduce the risk of injuries to fingers and/or compromising image quality by touching the lens, do not touch the empty lamp compartment when the lamp is removed.

This lamp contains mercury. Consult your local hazardous waste regulations to dispose of this lamp in a proper manner.

To assure optimal performance from the projector, it is recommended that you purchase a BenQ projector lamp for lamp replacement.

Ensure good ventilation when handling broken lamps. We recommend that you use respirators, safety glasses, goggles or face shield and wear protective clothing such as gloves.

1.Turn the power off and disconnect the projector from the power outlet. If the lamp is hot, avoid burns by waiting for approximately 45 minutes until the lamp has cooled.

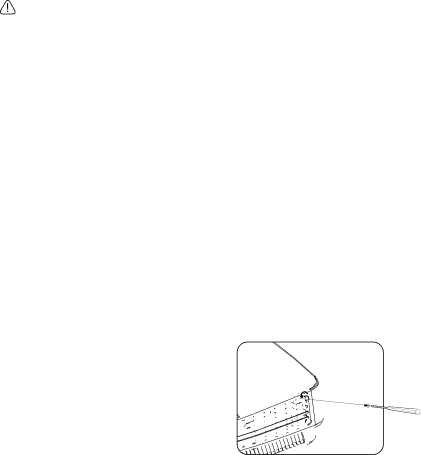
2.Loosen the screw on the lamp cover.

Maintenance 63

Image 63
Contents User Man ual Table of contents Refer servicing to qualified service personnel Areas where the mains voltageYour projector through a power Uninterruptible power supplySafety Instructions Do not block the ventilation holes Safety Instructions Projector features Shipping contents Rear/lower side Projector exterior viewControls and functions Ceiling mounting the projector Remote control Mute Volume +Setting SourceReplacing the remote control battery Choosing a location Front TableFront Ceiling Projection dimensions Obtaining a preferred projected image sizeMS521/MX522/MS511H 762 646 404 MW523/TW523Connection To connect the projector to a notebook or desktop computer Connecting a computer or monitorConnecting a computer Connecting a monitorConnecting Video source devices To connect the projector to a Hdmi source device Connecting a Hdmi source deviceTo connect the projector to a Component Video source device Connecting a Component Video source deviceTo connect the projector to an S-Video/Video source device Connecting an S-Video/composite source deviceStarting up the projector OperationAdjusting the projected image Adjusting the projection angleAuto-adjusting the image Use build-in test pattern Fine-tuning the image size and clarityCorrecting keystone Using the menus Securing the projector Using a security cable lockUtilizing the password function Setting a passwordIf you forget the password Entering the password recall procedureChanging the password Disabling the password function Changing Color Space Switching input signalSelecting the aspect ratio Magnifying and searching for detailsAbout the aspect ratio Optimizing the image Selecting a picture modeSetting the User 1/User 2 mode Go to the Picture Picture Mode menuFine-tuning the image quality in user modes Using Wall ColorPress MODE/ENTER and the 3D Color Management page displays Setting a preferred color temperatureAbout color temperatures 3D Color ManagementMagenta Cyan Setting the presentation timer Selection DescriptionTop-Left Bottom-Left Top-Right Bottom-Right To cancel the timer, perform the following steps How to use the Timer On key?Remote paging operations Freezing the image Hiding the imageOperating in a high altitude environment Adjusting the soundAdjusting the sound level To activate the High Altitude ModeUse Teaching Template Personalizing the projector menu display Select the lamp saver modeUntil the System Setup Advanced menu is highlighted Lamp Mode DescriptionShutting down the projector Menu operation Menu systemMain menu Sub-menu Options Picture System Setup Basic Advanced SetupDescription of each menu Template TeachingMode Picture ModePicture menu ReferenceSetting Temperature ColorTemperature Fine Tuning 3D Color Reset PicturePresentation TimerInstallation SettingsLock Basic menuOperation Panel KeyLamp System Setup Advanced menuHigh Altitude AudioStandby Reset AllClosed CaptionStatus Information menuCurrent SystemStoring the projector Cleaning the lensCleaning the projector case Care of the projectorGetting to know the lamp hour Setting Lamp mode eco function as Economic or SmartEco modeSetting Auto Power Off Lamp informationPage Status Message Timing of replacing the lampReplacing the lamp Page Resetting the lamp timer Indicators Green Green Flashing Flashing Off No picture Remote control does not workPassword is incorrect Projector does not turn onSpecifications Dimensions Ceiling mount installation301.6 219.2 111.3 Timing chart Resolution Mode Vertical Horizontal Pixel Frequency KHz MHzSupported timing for PC input Supported timing for Hdmi Hdcp input HDMI/DVI Supported timing for Video and S-Video input Supported timing for Component-YPbPr inputSupported 3D signal for Hdmi Hdcp input Video timingPC timing SXGA85 Supported 3D signal for D-SUB inputSupported 3D signal for Video and S-Video input Disclaimer Limited warrantyPatents CopyrightFCC statement for the United States only Warranty and Copyright information For UK only CE DOC KONFORMITÄTSERKLÄRUNG Konformitetsdeklaration Uyum Beyani Deklaracija O Usklaĉenosti Overensstemmelseserklæring Vaatimustenmukaisuusvakuutus Weee directive Directiva Weee Ⱦɢɪɟɤɬɢɜɚ Weee Dyrektywa Weee Directiva REE Weee direktiva ȄįȘȖȓĮ Weee For Korea WLAN/BT module Warranty and Copyright information Weee UAE Singapore