Acroprint ES1000 user manual Overtime Calculation, Daily Regular Hours

Page 43

Overtime Calculation

Basically, all worked hours are accumulated as regular hours.

By setting maximum length of regular hours per day or week, you can fix how to divide worked hours into regular hours and overtime.

Semi-monthly and Monthly pay period overtime calculations are based on daily overtime only. To assure accurate calculations for these pay periods, please select daily regular hours

limit as desired, and select " " as the limit for weekly regular hours. This will "disable" the weekly OT function so that the clock will calculate properly.

[Daily Regular Hours]

Example: Daily regular hours: 8 hours/day, Break time: start =12:00 & 60 min./day


Daily


Total


IN

OUT

RH


OT

RH


OT


Mo 9:00A

Mo 6:00P

8:00


8:00


Tu 9:00A

Tu 3:00P

8:00


2:00

16:00

2:00


You must set limit of regular hours per day (e.g. 8 hours per day).

All worked hours, which exceed the limit, will be accumulated as overtime. In this case, "regular hours" and "overtime" will be accumulated separately.

Push the [SETTING START/END] button before you start setting. At that moment,

"" is indicated on a display and you go into setting mode.

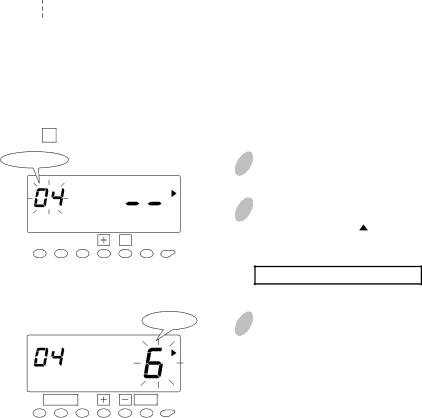
Set the " 04 Limit of regular hours per day".

Program No.

SCHEDULE

FUNCTION


SET


Hour

SCHEDULE

1 Push the [FUNCTION] button for 2 seconds.

2 Once a number on the display starts flashing, position the " " mark next to the "SCHEDULE" mark by pressing the [FUNCTION] button.

A flashing number can be changed.

3 Push the [+] or [-] button and select "04". Once you push the [SET] button, flashing of the display will change to the "Hour".

FUNCTION

SET

37

Image 43
Contents Page ALL Rights Reserved Acroprint Time Recorder Signs PrecautionsPage Table of Contents Printing Hours Summary Introduction and Features of the ES1000 Unpacking the ES1000 Getting StartedOverview Installing the Ribbon Cassette Precautions to take when replacing the ribbon Wall Mounting the ES1000 Where to Install the ES1000Overview of Operation Schedule Time Zone Rule What You Can Do With the ES1000Regular Hours and Overtime Start and End Time for Irregular Red PrintingExample Pay Period Weekly, Total regular hours 40 hours/week Round and Grace Time for Start and End Time Preparation for Setting SettingsOver View of Function Buttons AM/PM Setting the Hour Display FormatSetting the Time Setting the Date Monthly Setting Pay Period and Pay Period Ending DateWeekly Bi-Weekly Semi-Monthly Setting the Day Advance Time Hours AM/PM Selecting the Print FormatTransfer Enabling Override and Transfer FunctionsType Selecting Rounding RulesFunction SET Schedule Setting Calculation Rules Free Zone or Open Shift easy and most popular Setting the ScheduleSet the 16 Threshold hours for auto break deduction Set the 18 Threshold hours of overtime calculation Set the 17 Duration of break timeSet the 19 Limit hours for the OUT punch Program number Day of the week Set the 02 Start time for irregular printing black red Ribbon Color ChangeSet the 10 Start time of Break #1 Set the 03 End time for irregular printing red black Set the 12 Start time of Break #2 Set the 11 Duration in minutes, Break #1Set the 13 Duration in minutes, Break #2 Set the 17 Duration of break time Daily Regular Hours Overtime CalculationFunction SET Total Regular Hours per Week Date Hour Combination of Daily Regular Hours and Total Regular Hours Round and Grace Time for Start/End Time ST/ET Set the 07 Duration of grace time start & end shift times Set the 08 Red printing for grace time period Set the program No Setting the Weekly Program for External Time SignalPush the + or button to set 00. Then, push the SET button Changing the Weekly Program Confirming the Weekly ProgramDeleting the Weekly Program Setting D. S.T Setting the Auto Daylight Saving ChangeS.T. execution time Set the starting date Set the ending date Deleting the Daylight Saving Time Settings Setting the Language Change the first two digits Setting the PasswordChange the last two digits How to Change Settings When the Password Is Set Canceling the Password Date Colon For Closed Cards Printing Hours SummaryPrinting List of Active Card Numbers Printing List of Program Settings Override Printing Additional FeaturesEmployees Operation Card TransferSupervisors Operation All Cards Resetting Card ResettingResetting Installing the Optional Battery Backup Also make sure to secure wires with the wire clamp Connecting External Signal ControlPage Error No. appears TroubleshootingCR2450THC SpecificationsQ0170-6120-1 06-0331-000 Rev. a