Sony DSR-200 operating instructions Searching the recorded picture, Mode

Page 70

Searching the recorded picture

When you use a cassette memory-mounted DVCAM cassette ( logo*) which can store the recorded date and time, etc., you can search the recorded picture with the date or time using the Remote Commander (Cassette memory search). You can also search the photo-recorded pictures only, or the recorded picture in the backward and forward direction from the present position without cassette memory.

* is a trademark.

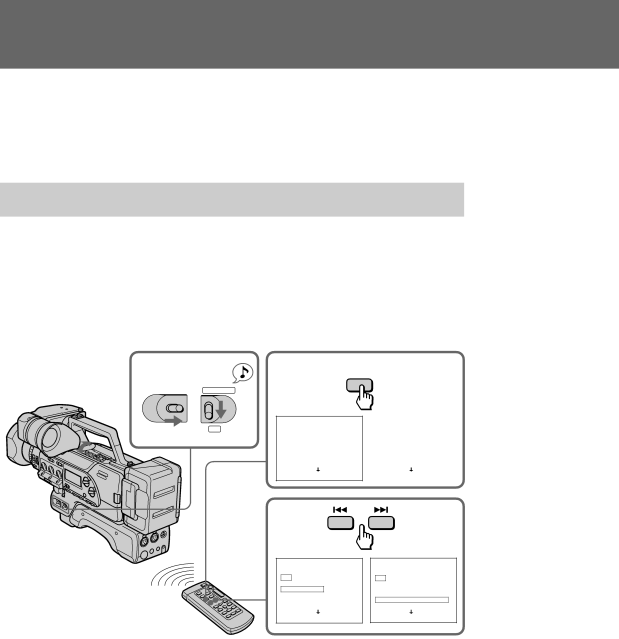
Searching the recorded picture with the date or time – Cassette memory search

(1) Set the POWER switch to ON, then set CAMCORDER/VTR to VTR.

(2) Open the cover, press MENU to display the menu in the viewfinder.

(3) Set CM SEARCH to ON in the menu system.

(4) Press MENU to erase the menu display.

(5) Press SEARCH MODE on the Remote Commander to select date search (search with the date) or photo search (search the photo recorded-pictures only).

(6) On the Remote Commander, press +to search forward or =to search backward.

1

POWERCAMCORDER

5

SEARCH

MODE

OFF ON

VTR

DATE SEARCH

1OCT/ 24/96

2NOV/ 3/96

3NOV/ 23/96

4DEC/ 24/96

5DEC/ 25/96

6JAN/ 1/97

6

DATE SEARCH

1OCT/ 24/96

2NOV/ 3/96

3NOV/ 23/96

4DEC/ 24/96

5DEC/ 25/96

6JAN/ 1/97

PHOTO SEARCH


1

OCT/ 24/96

8:52 PM

2

NOV/ 3/96

10:29 AM

3

NOV/ 23/96

8:12 AM

4

DEC/ 24/96

4:15 PM

5

DEC/ 25/96

9:43 PM

6

JAN/ 1/97

12:05 PM


PHOTO SEARCH


1

OCT/ 24/96

8:52 PM

2

NOV/ 3/96

10:29 AM

3

NOV/ 23/96

8:12 AM

4

DEC/ 24/96

4:15 PM

5

DEC/ 25/96

9:43 PM

6

JAN/ 1/97

12:05 PM

Notes on cassette memory search

You can search up to 24 days for date search and 179 pictures for photo search when you use the 16k-bit cassette memory.

Make sure that the lithium battery is installed if using cassette memory.

70

DSR-200 U/C 3-858-622-22(1). E

Image 70
Contents Digital Camcorder For the customers in the U.S.A For the customers in CanadaTable of contents Precautions on digital camcorder care Using this manualPrecaution on copyright Before you beginCR2025 Lithium Battery 1 p Checking supplied accessoriesWireless Remote Commander 1 p.11 4A/V connecting cable 1 pIdentifying the parts @¢ Contr knob p @ª Microphone holder attaching point @£ Tally lamp p@ Grip Identifying the parts ¼AUDIO Mode switch p » ¼Á ª£ ¢ ¤Audio DUB button p *£ Video controls p Headphones jack p ¤l Lanc jackTally lamp/Rear Remote Commander sensor p ¢MONITOR Level dial pRemote Commander To use the Remote Commander To prepare the Remote CommanderTo avoid damage from possible battery leakage About the ID of the Remote Commander MenuRemote control direction Remote Commander SensorsManual focusing indicator p ViewfinderDisplay window Attaching the shoulder strapAttaching digital camcorder to the tripod adaptor Attaching optional accessoriesTo remove the digital camcorder from the tripod Attaching optional accessories Attaching the external microphone with XLR connectorTo remove the battery pack b Attaching the battery adaptorTo remove the battery adaptor a Checking the remaining battery indicator cGetting started Attaching the viewfinderTo remove the viewfinder Charging the battery pack Charging and installing the battery packCharging time Battery life Charging and installing the battery packTo remove the battery pack Installing the battery pack Inserting a cassette To eject the cassette To prevent accidental erasureCamera recording Basic operationsTo finish recording b When ND on flashes in the viewfinderTo stop recording momentarily a To focus the viewfinder lens cTo monitor the sound while recording Camera recordingTo change the directionality of the built-in microphone To record through an external microphoneTo select Fs 48k a or Fs 32k b recording mode When you shoot a subject using a telephoto zoom Using the zoom featureZooming speed Variable speed zooming Hints for better shooting Hints for better shooting Release LockTo stop playback Checking the recorded pictureTo begin re-recording Connections for playback If you connect directly to a monitorIf your monitor or VCR is a monaural type If your monitor is already connected to a VCRIf your monitor or VCR has a BNC jack To connect to a TV without Video/Audio input jacksUsing the Remote Commander Playing back a tapeVarious playback modes Using the house current Using alternative power sourcesAdvanced operations Charging the attached battery pack To remove the adaptorChanging the mode settings VTRItems for Camcorder mode only Selecting the mode setting of each itemItems for both Camcorder and VTR modes When Digital Mode is set to Overlap Changing the mode settingsItems for VTR mode only About Frame REC and INT REC settingTo cancel the fade-in/fade-out function When fading in aWhen fading out b Fade-in and fade-outTo cancel the overlap function Overlapping two picturesPhoto recording To use the remote commander to take a photoTo use a flash Interval recording To cancel interval recordingTo stop interval recording To cancel cut recording Cut recordingSelecting automatic or manual mode To focus manuallySettings for each item When to adjust aperture, shutter speed, and gain manuallyShooting dark environments adjust gain manually Relation of aperture, shutter speed and gainFocusing manually When to use manual focusFocusing manually Shooting with auto focusing momentarilyTo return to autofocus mode Focusing manuallyTo record a very distant subject To return to automatic aperture mode Adjusting the apertureAbout the depth of focus field Adjusting the shutter speed To return to automatic shutter speed modeSlow Shtr To select the Best Shutter Speed Adjusting the shutter speedSubject Shutter speed To return to automatic gain mode Adjusting the gainTo use the AGC Limit function Adjusting the gain To adjust the G gain Preset menu item· one-push white balance mode Adjusting the white balanceSelecting the appropriate mode 3200K indoor modeAdjusting white balance manually Adjusting the white balanceTo return to automatic white balance mode Shooting when the lighting condition changes When ND on flashes in the viewfinder Using the ND filterWhen ND OFF flashes in the viewfinder Using the zebra pattern LINE/MIC switches setting and recording sound Adjusting the recording soundSelecting and setting audio mode Built-in microphoneAdjusting the recording level automatically Checking the recording levelTo attenuate the recording level Adjusting the recording soundTo reduce wind noise of the built-in microphone Releasing the Steady Shot function To activate the Steady Shot function againMaking a custom preset Adjusts Adjustment valueTo restore the standard settings To turn off custom presetTo turn on custom preset again To check the custom preset settingsSearching the recorded picture ModeTo stop searching If your tape has blank portions between picturesWhen bars ------ appear Displaying recording dataTo connect the VCR without DV in jack Editing onto another tapeBefore editing Recorder with DVStarting editing Editing onto another tapeTo stop editing To use additional audio line in a Audio dubbingMaking connections To use an additional microphoneRecording To adjust the volumeAudio dubbing To stop recordingChanging the lithium battery in the digital camcorder Additional informationChanging the lithium battery in the digital camcorder Changing the lithium batteryTo check the preset date and time Resetting the date and timeTo correct the date and time setting Year changes as followsDvcam and DV cassettes Compatibility of Dvcam and DV formatsDifferences between Dvcam and DV formats Compatibility on playbackCompatibility on editing using DV connectors Limitations on editingCopyright signal Usable cassettesPreparing the battery pack Tips for using the battery packWhen to replace the battery pack Tips for using the battery pack Moisture condensation Maintenance information and precautionsHow to prevent moisture condensation Inside the digital camcorderMaintenance information and precautions Video head cleaningDigital camcorder operation PrecautionsRemoving dust from inside the viewfinder On Handling TapesCharging AC power adaptorDigital camcorder care OthersPower sources Using your digital camcorder abroadDifference in color systems Digital camcorder PowerTrouble check OperationWind Picture Trouble checkOthers Symptom Corrective Actions AC power adaptorWhen the Charge lamp flashes When the Charge lamp does not flash againSpecifications LensTape has run out Battery is weak or deadTape is near the end Some other trouble has occurredY, Z K, L