HOW TO USE CUSTOM PROGRAMS
1 Insert the key fully into the console.
See HOW TO TURN ON THE POWER on page 10.
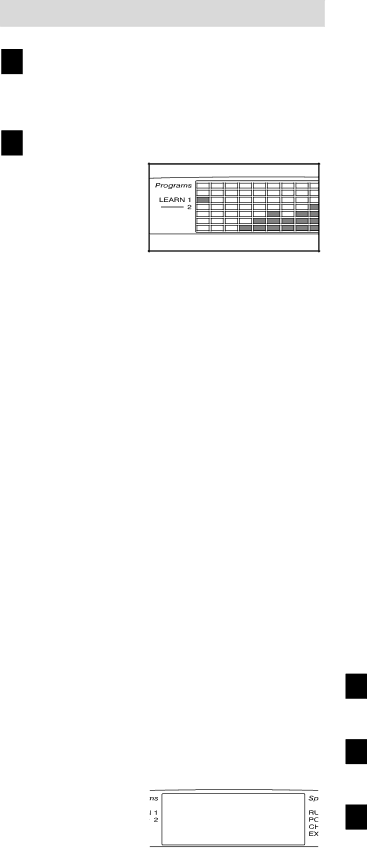
2 Select one of the custom programs.
When the key is |
|
inserted, the |
|
manual mode will |
|
be selected. To |
|
select a custom |
|
program, press |
|
the Select |
|
Program button r | epeatedly until the Learn 1 or |
Learn 2 indicator lights. |
|
| For about six seconds after a program is selected, |
|
|
|
|
|
|
|
|
|
| ||||||||||||||
| the Incline/Distance display will flash the maxi- |
|
|
|
|
|
|
|
|
|
| ||||||||||||||
| mum incline setting for the program, and the |
|
|
|
|
|
|
|
|
|
| ||||||||||||||
| Speed display will flash the maximum speed set- |
|
|
|
|
|
|
|
|
|
| ||||||||||||||
| ting for the program. The Time/Pace display will |
|
|
|
|
|
|
|
|
|
| ||||||||||||||
| show how long the program will last. The program |
|
|
|
|
|
|
|
|
|
| ||||||||||||||
| display will show the first five speed settings for |
|
|
|
|
|
|
|
|
|
| ||||||||||||||
| the program. | Note: If only three columns of in- |
|
|
|
|
|
|
|
|
|
| |||||||||||||
| dicators are lit in the program display, refer to |
|
|
|
|
|
|
|
|
|
| ||||||||||||||
| HOW TO CREATE A CUSTOM PROGRAM on |
|
|
|
|
|
|
|
|
|
| ||||||||||||||
| page 14. |
|
|
|
|
|
|
|
|
|
|
|
|
|
|
|
|
|
|
|
|
|
|
|
|
| Press the Start button or the Speed + button to |
|
|
|
|
|
|
|
|
|
| ||||||||||||||
3 |
|
|
|
|
|
|
|
|
|
| |||||||||||||||
start the program. |
|
|
|
|
|
|
|
|
|
|
|
|
|
|
|
|
|
|
|
|
|
|
|
| |
|
|
|
|
|
|
|
|
|
|
|
|
|
|
|
|
|
|
|
|
|
|
|
|
| |
| A moment after the button is pressed, the tread- |
|
|
|
|
|
|
|
|
|
| ||||||||||||||
| mill will automatically adjust to the first speed and |
|
|
|
|
|
|
|
|
|
| ||||||||||||||
| incline settings for the program. Hold the handrails |
|
|
|
|
|
|
|
|
|
| ||||||||||||||
| and begin walking. |
|
|
|
|
|
|
|
|
|
|
|
|
|
|
|
|
|
|
|
|
|
|
|
|
| Each program is divided into several |
|
|
|
|
|
|
|
|
|
| ||||||||||||||
| segments. One speed setting and one incline set- |
|
|
|
|
|
|
|
|
|
| ||||||||||||||
| ting are programmed for each segment. The |
|
|
|
|
|
|
|
|
|
| ||||||||||||||
| speed setting for the first segment will be shown in |
|
|
|
|
|
|
|
|
|
| ||||||||||||||
| the flashing Current Segment column of the pro- |
|
|
|
|
|
|
|
|
|
| ||||||||||||||
| gram display. (The incline settings are not shown |
|
|
|
|
|
|
|
|
|
| ||||||||||||||
| in the program |
|
|
|
|
|
|
|
|
|
|
|
|
|
|
|
|
|
|
|
|
|
|
|
|
| display.) The |
|
|
|
|
|
|
|
|
|
|
|
|
|
|
|
|
|
|
|
|
|
|
|
|
|
|
|
|
|
|
|
|
|
|
|
|
|
|
|
|
|
|
|
|
|
|
|
|
| |
|
|
| Current Segment |
|
|
|
|
|
|
|
|
|
| ||||||||||||
| speed settings |
|
|
|
|
|
|
|
|
|
|
|
| ||||||||||||
| for the next |
|
|
|
|
|
|
|
|
|
|
|
|
|
|
|
|
|
|
|
|
|
|
|
|
| seven segments |
|
|
|
|
|
|
|
|
|
|
|
|
|
|
|
|
|
|
|
|
|
|
|
|
|
|
|
|
|
|
|
|
|
|
|
|
|
|
|
|
|
|
|
|
|
|
|
|
| |
| will be shown in |
|
|
|
|
|
|
|
|
|
|
|
|
|
|
|
|
|
|
|
|
|
|
|
|
|
|
|
|
|
|
|
|
|
|
|
|
|
|
|
|
|
|
|
|
|
|
|
|
| |
|
|
|
|
|
|
|
|
|
|
|
|
|
|
|
|
|
|
|
|
|
|
|
|
| |
|
|
|
|
|
|
|
|
|
|
|
|
|
|
|
|
|
|
|
|
|
|
|
|
| |
|
|
|
|
|
|
|
|
|
|
|
|
|
|
|
|
|
|
|
|
|
|
|
|
| |
|
|
|
|
|
|
|
|
|
|
|
|
|
|
|
|
|
|
|
|
|
|
|
|
| |
| the columns to |
|
|
|
|
|
|
|
|
|
|
|
|
|
|
|
|
|
|
|
|
|
|
|
|
|
|
|
|
|
|
|
|
|
|
|
|
|
|
|
|
|
|
|
|
|
|
|
|
| |
|
|
|
|
|
|
|
|
|
|
|
|
|
|
|
|
|
|
|
|
|
|
|
|
| |
|
|
|
|
|
|
|
|
|
|
|
|
|
|
|
|
|
|
|
|
|
|
|
|
| |
| the right. |
|
|
|
|
|
|
|
|
|
|
|
|
|
|
|
|
|
|
|
|
|
|
|
|
|
|
|
|
|
|
|
|
|
|
|
|
|
|
|
|
|
|
|
|
|
|
|
|
| |
When only three seconds remain in the first seg- ment of the program, both the Current Segment column and the column to the right will flash and a tone will sound. In addition, if the speed and/or incline of the treadmill is about to change, the Speed/Pace display and/or the Incline/Distance display will flash to alert you, and three tones will
sound. When the first segment is completed, | all | ||
speed settings will move one column to the left | . | ||
The speed setting for the second segment will |
| ||
then be shown in the flashing Current Segment |
| ||
column and the treadmill will automatically adjust |
| ||
to the speed and incline settings for the second |
| ||
segment. |
|
|
|
The program will continue until the speed setting |
| ||
for the last segment is shown in the Current |
| ||
Segment column and no time remains in the |
| ||
Time/Pace display. The walking belt will then slow |
| ||
to a stop. |
|
|
|
If desired, you can redefine the program while |
| ||
using it. | To change the speed or incline setting |
| |
for the current segment, | simply | press the Speed | |
or Incline buttons. When the current segment is com- |
| ||
pleted, the new setting will be saved in memory. | To | ||
increase the length of the program, |
| first wait until | |
the program is completed. Then, press the Start but- |
| ||
ton and program speed and incline settings for as |
| ||
many additional segments as desired. W |
| hen you | |
have added as many segments as desired, press |
| ||
the Stop button twice. | To decrease the length of | ||
the program, | press the Stop button twice at any |
| |
time before the program is completed.
To stop the program temporarily, press the Stop button. All displays will pause and the Time/Pace display will begin to flash. To restart the program, press the Start button or the Speed + button. To end the program, press the Stop button, remove
the key, and then reinsert the key.
4 Follow your progress with the displays.
See step 5 on page 11.
5 Measure your heart rate, if desired.
See step 6 on page 11.
6 When the program has ended, remove the key.
See step 6 on page 13.
15