HP 7520 manual Case D Fax with a distinctive ring service on the same line

Page 84

Additional fax setup

Chapter 12

If you are using either a PBX or an ISDN converter/terminal adaptor, connect the printer to the port that is designated for fax and phone use. Also, make sure that the terminal adapter is set to the correct switch type for your country/region, if possible.

NOTE: Some ISDN systems allow you to configure the ports for specific phone equipment. For example, you might have assigned one port for telephone and Group 3 fax and another port for multiple purposes. If you have problems when connected to the fax/phone port of your ISDN converter, try using the port designated for multiple purposes; it might be labeled "multi-combi" or something similar.

If you are using a PBX phone system, set the call waiting tone to "off."

NOTE: Many digital PBX systems include a call-waiting tone that is set to "on" by default. The call waiting tone interferes with any fax transmission, and you cannot send or receive faxes with the printer. Refer to the documentation that came with your PBX phone system for instructions on how to turn off the call-waiting tone.

If you are using a PBX phone system, dial the number for an outside line before dialing the fax number.
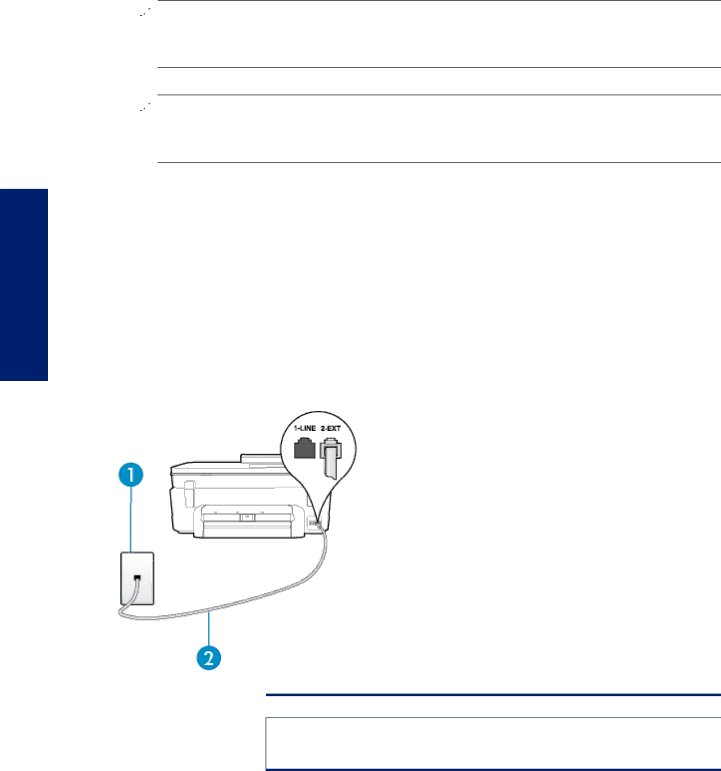
Make sure you use the supplied cord to connect from the telephone wall jack to the printer. If you do not, you might not be able to fax successfully. This special phone cord is different from the phone cords you might already have in your home or office. If the supplied phone cord is too short, you can purchase a coupler from your local electronics store and extend it.

You might need to connect the supplied phone cord to the adapter provided for your country/region.

If you encounter problems setting up the printer with optional equipment, contact your local service provider or vendor for further assistance.

Case D: Fax with a distinctive ring service on the same line

If you subscribe to a distinctive ring service (through your telephone company) that allows you to have multiple phone numbers on one phone line, each with a different ring pattern, set up the printer as described in this section.

Back view of the printer

1

2

Telephone wall jack

Use the phone cord supplied in the box with the printer to connect to the 1-LINE port.

You might need to connect the supplied phone cord to the adapter provided for your country/ region.

82 Additional fax setup

Image 84
Contents HP Photosmart 7520 Series Page Contents Additional fax setup HP Photosmart 7520 Series Help Chapter Get to Know the HP Photosmart Printer partsFront view of the printer Top and rear views of the printerControl panel features Tips for getting to know the printer Get to Know the HP Photosmart How do I? How do I? Print Print photos from a memory cardPrint photo on full-size paper Load paperTouch View & Print Select Print Media Load mediaLoad 10 x 15 cm 4 x 6 inch paper a. Raise photo tray lid Load A4 or 8.5 x 11 inch paper Load envelopesRecommended papers for photo printing Paper DescriptionRecommended papers for printing and copying Tips for print successPrint tips Tips for print success Chapter Copy and scan Scan to a computer, memory device, or emailTo scan to a computer, memory device, or email Copy text or mixed documents Sided copy a. Load paperTouch Print Settings Tips for copy and scan successCopy and scan Use Web Services How to get started with ePrintPrint with HP ePrint Your printer is protectedTips for using Web Services Tips for printing apps and using ePrintUse HP Print Apps Visit the HP ePrintCenter websiteFax Send a faxSend a standard fax To send a standard fax from the printer control panelSend a standard fax from the computer Send a fax manually from a phoneTouch Black or Color WindowsSend a fax using monitor dialing Send a fax from memoryTo send a fax manually from an extension phone Send a fax in Error Correction Mode Schedule a fax to send laterSet up backup fax To change the ECM setting from the control panelReceive a fax Receive a fax manuallyTo set Backup Fax Reception from the printer control panel Reprint received faxes from memoryForward faxes to another number To reprint faxes in memory from the printer control panelSet the paper size for received faxes Set automatic reduction for incoming faxesBlock unwanted fax numbers To add a number to the junk fax list Touch Junk Fax BlockerTouch Add Numbers To remove numbers from the list of junk fax numbersSet up speed-dial entries To set up Fax to PC WindowsTo set up Fax to Mac Mac OS To modify settings from the HP software WindowsChange fax settings Set up and change speed-dial entriesDelete speed-dial entries Print a list of speed-dial entriesConfigure the fax header Set the answer mode Auto answerSet the number of rings before answering Change the answer ring pattern for distinctive ringSet the dial type Set the redial optionsFax and digital phone services Set the fax sound volumeSet the fax speed Fax over Internet Protocol Use reportsPrint fax confirmation reports Print fax error reports Print and view the fax logClear the fax log Print the details of the last fax transaction Print a Caller ID ReportView the Call History Clean cartridges automatically Work with cartridgesCheck the estimated ink levels Align printerReplace the cartridges To align printer from the printer displayTo align printer from the printer software On WindowsReplace the cartridges Cartridge warranty information Order ink suppliesTips for working with ink Work with cartridges WiFi Protected Setup WPS ConnectivityAdd the HP Photosmart to a network Change from a USB connection to a wireless network Wireless with a router infrastructure networkTo connect the product with the Wireless Setup Wizard To change from a USB connection to a wireless networkChange network settings Wireless DirectTips for setting up and using a networked printer Connect a new printerAdvanced printer management tools for networked printers To open the embedded Web serverAbout cookies Advanced printer management tools for networked printers Connectivity Solve a problem Clearing paper jam from the two-sided printing accessoryTo clear a paper jam from the two-sided printing accessory Get more helpClearing paper jam from the Automatic Document Feeder To clear a paper jam from the automatic document feederSolve print problem Solve copy and scan problemClear carriage jam Solve networking problem HP support by phonePhone support period Placing a call After the phone support periodAdditional warranty options Cartridge supply upgrade Check cartridge access doorPrepare printer Printhead failureInk cartridge problem To solve ink cartridge problemTo clean cartridge contacts Printer failureSetup cartridges Older generation cartridges To disable the usage information function Technical informationCartridge chip information Specifications Print specifications Copy specificationsInk cartridge yield Scan specifications Environmental product stewardship programMaterial safety data sheets Eco-TipsPaper use PlasticsAuto Power-Off Set the Energy Save ModePower consumption To enable or disable Auto Power-OffChemical Substances Technical information EU battery directive Regulatory noticesRegulatory model identification number FCC statementVcci Class B compliance statement for users in Japan Technical information Products with wireless LAN devices Regulatory telecommunication noticesFrance Technical information Australia wired fax statement Regulatory wireless statements Exposure to radio frequency radiationTechnical information Technical information Additional fax setup Set up faxing parallel phone systemsCountries/regions with a parallel-type phone system Select the correct fax setup for your home or office DSL PBX Case B Set up the printer with DSL To set up the printer with a separate fax lineCase a Separate fax line no voice calls received Back view of the printerTo set up the printer with DSL Case D Fax with a distinctive ring service on the same line To set up the printer with a distinctive ring service Case E Shared voice/fax lineTo set up the printer with a shared voice/fax line Case F Shared voice/fax line with voice mailSet up the printer with a computer dial-up modem To set up the printer with voice mailSet up the printer with a computer DSL/ADSL modem To set up the printer with a computer dial-up modemTo set up the printer with a computer DSL/ADSL modem Case H Shared voice/fax line with computer modemTelephone Shared voice/fax with computer DSL/ADSL modem Case I Shared voice/fax line with answering machine Additional fax setup Additional fax setup Additional fax setup To set up the printer with a computer DSL/ADSL modem Example of a parallel splitter Serial-type fax setup Test fax setup To test fax setup via the printer control panelAdditional fax setup Symbols/Numerics Index100
Related manuals
Manual 102 pages 16.1 Kb Manual 2 pages 63.75 Kb Manual 18 pages 9.02 Kb Manual 102 pages 39.78 Kb