Generac Power Systems 5251, 5252, 5254, 5255, 5253 ‹ 3.1.1 Auto Position, ‹ 3.1.3 Manual Position

Page 17

Section 3 — Operation

4.Connect a frequency meter across the generators AC output leads.

5.Turn the primary adjust screw to obtain a fre- quency reading of 61.5 Hertz. Turn the secondary adjust screw to obtain a frequency of 62.5 Hz.

6.When frequency is correct at no load, check the AC voltage reading. If voltage is incorrect, the volt- age regulator may require adjustment (See the Voltage Regulator Adjustment section).

‹2.7.2 13 KW AND 16 KW UNITS

Air-cooled Generators

NOTE:

The access panel on top of the control panel must be removed to adjust the voltage regulator.

NOTE:

The voltage regulator is housed above the gen- erator's control panel. The regulator maintains a voltage in direct proportion to frequency at a 2-to-

1ratio. For example, at 62 Hertz, line-to-neutral voltage will be 124 volts.

NOTE:

All V-twin units DO NOT require an engine gover- nor adjustment due to their design.

3.1USING THE AUTO/OFF/MANUAL SWITCH (FIGURE 3.1)

‹2.7.3 ADDITIONAL CORROSION PROTECTION

Periodically spray all engine linkage parts and brack- ets with corrosion inhibiting spray such as WD-40 or a comparable product.

‹3.1.1 “AUTO” POSITION

Selecting this switch position activates fully automatic system operation. It also allows the unit to automati- cally start and exercise the engine every seven days with the setting of the exercise timer (see the Setting the Exercise Timer section).

2.8VOLTAGE REGULATOR ADJUSTMENT

‹2.8.1 7KW UNITS

With the frequency between 62-63 Hertz at no-load, slowly turn the slotted potentiometer (Figure 2.3) until line voltage reads 248-252 volts.

‹2.8.2 10, 13, AND 16KW UNITS

With the frequency between 58-59 Hertz at no-load, slowly turn the slotted potentiometer (Figure 2.3) until line voltage reads 232-236 volts.

Figure 2.3 – Voltage Adjustment Potentiometer

Turn to

adjust voltage.

‹3.1.2 “OFF” POSITION

This switch position shuts down the engine. This position also prevents automatic operation.

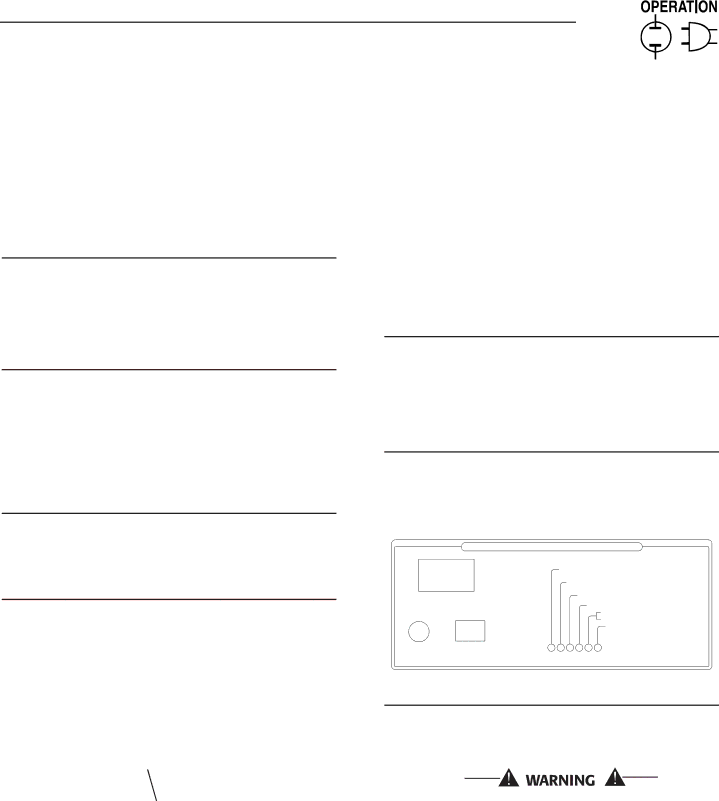
Figure 3.1 – Generator Control Panel

CONTROL AND INFORMATION CENTER

SYSTEM SET

LOW BATTERY

LOW OIL

AUTO. OFF MAN.

HIGH TEMP

SYSTEM FUSEOVER SPEED

NO RPM SENSE IF FLASHING OVER CRANK

15A

SET

FLASHING GREEN LED=

NO UTILITY SENSE

ASSY: 0F8418/0F8419

EXERCISE

5 FLASHING RED LEDS=

TIME

EXERCISER NOT SET


‹3.1.3 “MANUAL” POSITION

Set the switch to MANUAL to crank and start the engine. Transfer to standby power will not occur unless there is a utility failure.

With the switch set to AUTO, the engine may crank and start at any time without warning. Such automatic starting normally occurs when utility power source voltage drops below a pre- set level or during the normal exercise cycle. To prevent possible injury that might be caused by such sudden starts, always set the switch to OFF and remove the fuses before working on or around the generator or transfer switch. Then, place a “DO NOT OPERATE” tag on the genera- tor panel and on the transfer switch.

15

Image 17
Contents Listed Authorized Dealer Location IntroductionMaintenance Post Installation Start-up AdjustmentsTroubleshooting Introduction Inside Front Cover Warning  ‹ Standards Index  Electrical Hazards Breaker for Bedrooms UNPACKING/INSPECTIONProtection Systems 7kW, Single Cylinder GH-410 Engine Generator‹ 1.5.2 Engine Specifications‹ 1.5.1 Generator Fuel Requirements Recommendations System SET LEDFuel Consumption ‹ 1.8.1 BTU Flow Requirements Natural GAS‹ 1.9.2 10, 13 and 16KW, V-TWIN Engines Reconfiguring the Fuel System‹ 1.9.1 7 KW, 410CC Engine ‹ 1.10.1 Generator LocationBattery Installation Battery Requirements‹ 1.10.2 Transfer Switch 10.2.1 7, 10, 13, and 16 kW Units if equipped10 Battery Cable Connections BatteryElectrical Checks Check Transfer Switch OperationBefore Initial START-UP 7KW Natural GAS only Generator Tests Under LoadChecking Automatic Operation ‹ 2.7.1 7 KW Units Engine Governor Adjustment‹ 3.1.3 Manual Position ‹ 3.1.1 Auto PositionSequence of Automatic Operation Automatic Transfer OperationManual Transfer Operation ‹ 3.1.4 Choke Operation‹ 3.4.2 Transfer Back to Utility Power Source Setting the Exercise Timer‹ 3.6.2 High Temperature Switch ‹ 3.6.1 LOW OIL Pressure Switch‹ 3.6.3 Overcrank Approximate Crank Cycle TimesChecking the Engine OIL Level ‹ 3.6.6 LOW BatteryFuses ‹ 3.6.5 RPM Sensor Failure‹ 4.3.2 Engine OIL Recommendations Changing the Engine OIL‹ 4.3.1 OIL Change Intervals ‹ 4.4.2 10KW Generators Spark Plugs‹ 4.4.1 7, 13, and 16KW Generators Valve Clearance Battery Maintenance11 Cooling Vent Locations Cooling System‹ 4.11.2 Return to Service OUT of Service Procedure‹ 4.11.1 Removal from Service Corrosion ProtectionBe performed by the nearest Authorized Dealer Service ScheduleProblem Cause Correction Troubleshooting GuideAir-cooled Generators Air-cooled Generators Air-cooled Generators Mounting Dimensions Electrical Data Engine Wiring Customer Connection Battery Charger Engine Alternator Engine Wiring Stator Electronic Voltage Regulator Manual Auto Scsm Neutral Electrical Data Electrical Data Sheet Metal PAINT/MATERIAL Code Legend Part NO. QTY. Description Air-cooled Generators Control Panel Drawing No F9695-C QTY Description Exploded Views and Parts Lists BOX Load Center Exploded Views and Parts Lists Description QTY Exploded Views and Parts Lists Washer Flat M8 5/16 Exploded Views and Parts Lists Crankcase Exploded Views and Parts Lists Intake Adapter Exploded Views and Parts Lists PIN, Piston D20 Exploded Views and Parts Lists SCREW, Taptite M6-1.0X8 Yellow Chrome Air-cooled Generators 7kW, GN-410 Engine Drawing No F9422-B ADAPTOR, Engine Exploded Views and Parts Lists ADATOR, Engine 7KW CASTING, Twin Regulator Housing 7KW Exploded Views and Parts Lists Brkt Regulator Mounting PURCHASER’S/OWNER’S Warranty Responsibilities Your Warranty Rights and ObligationsMANUFACTURER’S Emission Control System Warranty Coverage Emission Related Parts Include the Following Emission Control System WarrantyGenerac Power Systems Standard Limited Warranty for