‹&RS\ULJKW$JLOHQW7HFKQRORJLHV,QF $OO5LJKWV5HVHUYHG
3DUW1XPEHU $SULO RUDUUDQW\LQIRUPDWLRQUHIHUWRWKHEDFNRIWKHPDQXDO
Service Guide
$JLOHQW$DQG$ &3RZHU6XSSOLHV
Convenient bench-top features
Flexible system features
Agilent E3633A and E3634A DC Power Supplies
The Front Panel at a Glance
For Agilent E3633A Model **For Agilent E3634A Model
Front-Panel Voltage and Current Limit Settings
Display Annunciators
Use the front-panel I/OConfig key to
The Rear Panel at a Glance
In This Book
Page
Contents
Contents
Chapter 4 Theory of Operation
Contents Chapter 3 Calibration Procedures Continued
Contents Chapter 5 Service
Chapter 7 Backdating Chapter 8 Schematics
Chapter 6 Replaceable Parts
Contents
Specifications
Specifications
Chapter 1 Specifications
Performance Specifications
Performance Specifications
Table 1-1. Performance Specifications
Chapter 1 Specifications Performance Specifications
Chapter 1 Specifications Supplemental Characteristics
Supplemental Characteristics
Remote Sensing Capability
Temperature Coefficient, ±% of output + offset
SCPI Standard Commands for Programmable Instruments
20 to 70 C for storage environment
Chapter 1 Specifications Supplemental Characteristics
Quick Start
Local
Quick Start
Chapter 2 Quick Start To Prepare the Power Supply for Use
To Prepare the Power Supply for Use
3 Connect the power cord and turn on the power supply
4 Enable the outputs
100 or 115 Vac, 6.3 AT fuse 230 Vac, 3.15 AT fuse
Chapter 2 Quick Start To Check the Rated Voltages of the Power Supply
To Check the Rated Voltages of the Power Supply
1 Turn on the power supply
2 Enable the outputs
Output On/Off Display Limit Voltage Current
To Check the Rated Currents of the Power Supply
page 123 in chapter 5 of the User’s Guide
To Use the Power Supply in Constant Voltage Mode
1 Voltage
Current Display Limit Output On/Off
Display Limit
To Use the Power Supply in Constant Current Mode
Check that the Limit annunciator still flashes. Set the knob for current control. The second digit of the ammeter will be flashing. Change the flashing digit using the resolution selection keys and adjust the knob to the desired output current
To Store and Recall the Instrument State
1 Set up the power supply for the desired operating state
STORE
Chapter 2 Quick Start To Store and Recall the Instrument State
DONE
RECALL
Memory location “1” will be displayed in the recall mode
To Program Overvoltage Protection
Setting the OVP Level and Enable the OVP Circuit
LEVEL 22.0V E3633A LEVEL 55.0V E3634A
OVP ON
Clearing the Overvoltage Condition
Checking OVP Operation
CHANGED
OVP CLEAR
Adjust OVP trip level
To Program Overcurrent Protection
Setting the OCP Level and Enable the OCP Circuit
LEVEL 22.0 A E3633A LEVEL 7.5 A E3634A
OCP ON
Checking OCP Operation
Clearing the Overcurrent Condition
OCP CLEAR
Adjust OCP trip level
To Rack Mount the Power Supply
To Rack Mount the Power Supply
To remove the rubber bumper, stretch a corner and then slide it off
To rack mount a single instrument, order adapter kit
To Rack Mount the Power Supply
Chapter 2 Quick Start To Rack Mount the Power Supply
Calibration Procedures
Calibration Procedures
Calibration Interval
Agilent Technologies Calibration Services
Chapter 3 Calibration Procedures Automating Calibration Procedures
Automating Calibration Procedures
Test Considerations
C a u t i o n
Chapter 3 Calibration Procedures Recommended Test Equipment
Recommended Test Equipment
Table 3-1. Recommended Test Equipment
Performance Verification Tests
Self-Test
Performance Verification Tests
Setup for Most Tests
Measurement Techniques
Electronic Load
General Measurement Techniques
Current-Monitoring Resistor
Programming
Constant Voltage Test Setup
Constant Voltage CV Verifications
Voltage Programming and Readback Accuracy
CV Load Effect Load Regulation
CV Source effect Line Regulation
CV PARD Ripple and Noise
Load Transient Response Time
Constant Current Test Setup
Constant Current CC Verifications
Current Programming and Readback Accuracy
CC Load Effect Load Regulation
CC PARD Ripple and Noise
CC Source Effect Line Regulation
Common Mode Current Noise
Chapter 3 Calibration Procedures Common Mode Current Noise
CV Performance Test Record
Performance Test Record for Agilent E3633A and E3634A
CC Performance Test Record
Performance Test Record for Agilent E3633A and E3634A
Chapter 3 Calibration Procedures Calibration Security Code
See the procedure on page
Calibration Security Code
SECURED
To Unsecure the Power Supply for Calibration
000000 CODE
003633 CODE E3633A 003634 CODE E3634A
UNSECURED
To Unsecure the Power Supply Without the Security Code
Calibration Count
Chapter 3 Calibration Procedures Calibration Count
Calibration Message
CALSECSTAT OFFON,code
General Calibration/Adjustment Procedure
Front Panel Voltage and Current Calibration
CAL SETUP
30 LEFT
V LO 0.5000
V MI 10.000 V E3633A
V LO 0.4500
V MI 10.001
V HI 19.500 V E3633A
For example, if the DVM reads 19.495 V, adjust the voltage to 19.495 V using the knob and arrow keys
V HI 19.495
I LO 0.499 A
I LO 0.500 A E3633A
I MI 10.000 A E3633A
I MI 9.999 A
I HI 19.500 A E3633A
I HI 19.499 A
If the entered number is within an acceptable range, an ‘‘ENTERED’’ message appears for one second. If the entered number is not correct, an ‘‘MIN VALUE’’ or ‘‘MAX VALUE’’ message appears for one second and the display shows the middle current calibration point again. The display now shows the high current calibration point
CAL MODE
Aborting a Calibration in Progress
Calibration Record for Agilent E3633A/E3634A
Calibration Record for Agilent E3633A/E3634A
Chapter 3 Calibration Procedures Error Messages
Error Messages
System Error Messages
Self-Test Error Messages
Calibration Error Messages
An Example program of Excel 97 for Calibration
An Example program of Excel 97 for Calibration
An Example program of Excel 97 for Calibration
Chapter 3 Calibration Procedures
An Example program of Excel 97 for Calibration
Chapter 3 Calibration Procedures
An Example program of Excel 97 for Calibration
Chapter 3 Calibration Procedures
An Example program of Excel 97 for Calibration
Chapter 3 Calibration Procedures
An Example program of Excel 97 for Calibration
End of Program
Declaration for Windows 95/NT
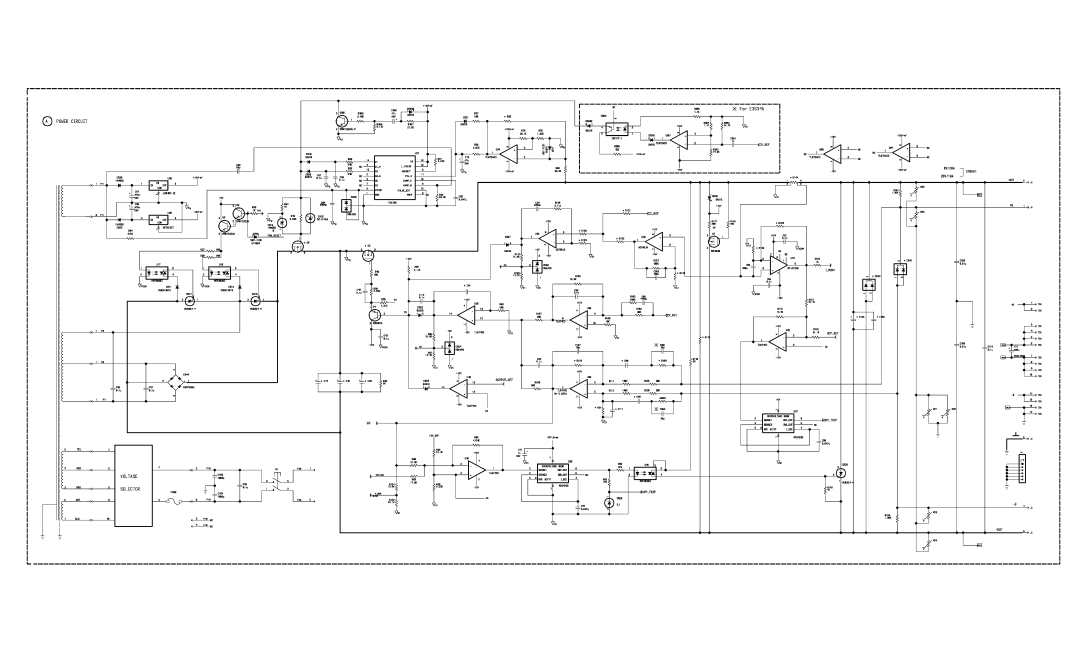
Theory of Operation
Block Diagram Overview, starting on page
Chapter 4 Theory of Operation Block Diagram Overview
Block Diagram Overview
Block Diagram
Chapter 4 Theory of Operation AC Input and Bias Supplies
AC Input and Bias Supplies
Chapter 4 Theory of Operation Floating Logic
Floating Logic
U20 Internal Signal
Chapter 4 Theory of Operation D-to-A Converter
D-to-A Converter
Chapter 4 Theory of Operation A-to-D Converter
A-to-D Converter
Chapter 4 Theory of Operation Power Mesh and Control
Power Mesh and Control
Two error amplifiers are included in a CV/CC supply, one for controlling output voltage, the other for controlling output current. Since the constant voltage amplifier tends to achieve zero output impedance and alters the output current whenever the load resistance changes, while the constant current amplifier causes the output impedance to be infinite and changes the output voltage in response to any load resistance change, it is obvious that the two amplifiers can not operate simultaneously. For any given value of load resistance, the power supply must act either as a constant voltage source or as a constant current source - it can not be both transfer between these two modes is accomplished at a value of load resistance equal to the ratio of the output voltage control setting to the output current control setting
Earth-Referenced Logic
Front Panel
Chapter 4 Theory of Operation Earth-Referenced Logic
Service
Service
Operating Checklist
Is the Power Supply Inoperative?
Does the Power Supply Fail Self-Test?
Types of Service Available
Standard Repair Service worldwide
Express Exchange U.S.A. only
Chapter 5 Service Repacking for Shipment
Repacking for Shipment
Agilent Technologies recommends that you always insure shipments
To Replace the Power-Line Fuse
Electrostatic Discharge ESD Precautions
Chapter 5 Service Electrostatic Discharge ESD Precautions
Surface Mount Repair
Installation Procedure
To Disconnect the Output Using an External Relay
Unit Reports Errors 740 to
Troubleshooting Hints
Unit is Inoperative
Unit Fails Self-Test
Bias Supplies Problems
Self-Test Procedures
Power-On Self-Test
Complete Self-Test
±10% tolerance
Chapter 5 Service Self-Test Procedures 106
Replaceable Parts
Replaceable Parts
To Order Replaceable Parts
Backdating and Part Changes
E3633/E3634-60002 Main PC Assembly
E3633/E3634-60002 Main PC Assembly
Chapter 6 Replaceable Parts
Chapter 6 Replaceable Parts
E3633/E3634-60002 Main PC Assembly
Chapter 6 Replaceable Parts
E3633/E3634-60002 Main PC Assembly
Chapter 6 Replaceable Parts
E3633/E3634-60002 Main PC Assembly
Chapter 6 Replaceable Parts
E3633/E3634-60002 Main PC Assembly
Chapter 6 Replaceable Parts
E3633/E3634-60002 Main PC Assembly
Chapter 6 Replaceable Parts
Designator
Chapter 6 Replaceable Parts
For use with E3634A model only
E3633-60003 Front-Panel Display PC Assembly
E3633-60003 Front-Panel Display PC Assembly
E3633-60011 Front Frame Assembly
E3633A/E3634A Power Supply Assembly
E3633-60011 Front Frame Assembly
Manufacturer’s List
Manufacturer’s List
Chapter 6 Replaceable Parts Manufacturer’s List 122
Backdating
Backdating
Schematics
Mechanical Disassembly, on page
Page
Page
Page
Page
Page
Page
Page
Page
Copyright 1998 Agilent Technologies All Rights Reserved