REMOTE CONTROL

Inserting batteries

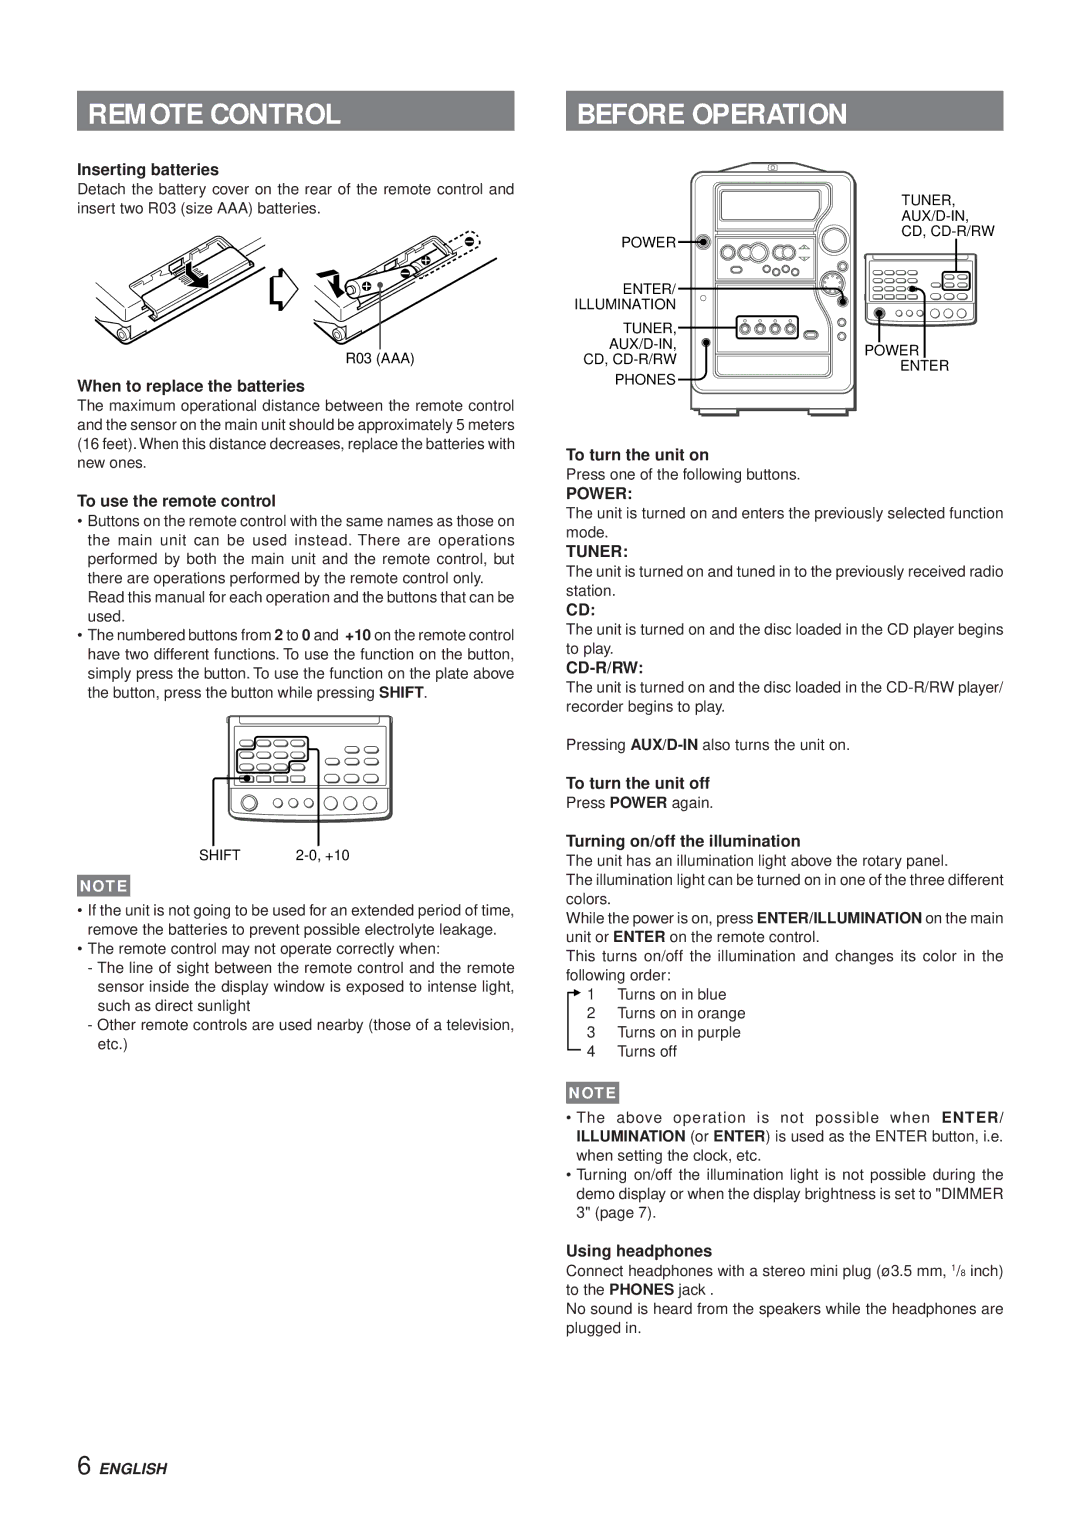
Detach the battery cover on the rear of the remote control and insert two R03 (size AAA) batteries.

R03 (AAA)

When to replace the batteries

The maximum operational distance between the remote control and the sensor on the main unit should be approximately 5 meters (16 feet). When this distance decreases, replace the batteries with new ones.

To use the remote control

Buttons on the remote control with the same names as those on the main unit can be used instead. There are operations performed by both the main unit and the remote control, but there are operations performed by the remote control only.

Read this manual for each operation and the buttons that can be used.

The numbered buttons from 2 to 0 and +10 on the remote control have two different functions. To use the function on the button, simply press the button. To use the function on the plate above the button, press the button while pressing SHIFT.

SHIFT

2-0, +10

NOTE

If the unit is not going to be used for an extended period of time, remove the batteries to prevent possible electrolyte leakage.

The remote control may not operate correctly when:

-The line of sight between the remote control and the remote sensor inside the display window is exposed to intense light, such as direct sunlight

-Other remote controls are used nearby (those of a television, etc.)

BEFORE OPERATION


TUNER,


AUX/D-IN,

POWER

CD, CD-R/RW


ENTER/


ILLUMINATION


TUNER,


AUX/D-IN,

POWER

CD, CD-R/RW

ENTER

PHONES


To turn the unit on

Press one of the following buttons.

POWER:

The unit is turned on and enters the previously selected function mode.

TUNER:

The unit is turned on and tuned in to the previously received radio station.

CD:

The unit is turned on and the disc loaded in the CD player begins to play.

CD-R/RW:

The unit is turned on and the disc loaded in the CD-R/RW player/ recorder begins to play.

Pressing AUX/D-INalso turns the unit on.

To turn the unit off

Press POWER again.

Turning on/off the illumination

The unit has an illumination light above the rotary panel.

The illumination light can be turned on in one of the three different colors.

While the power is on, press ENTER/ILLUMINATION on the main unit or ENTER on the remote control.

This turns on/off the illumination and changes its color in the following order:

1 Turns on in blue

2Turns on in orange

3 Turns on in purple

4 Turns off

NOTE

The above operation is not possible when ENTER/ ILLUMINATION (or ENTER) is used as the ENTER button, i.e. when setting the clock, etc.

Turning on/off the illumination light is not possible during the demo display or when the display brightness is set to "DIMMER 3" (page 7).

Using headphones

Connect headphones with a stereo mini plug (ø3.5 mm, 1/8 inch) to the PHONES jack .

No sound is heard from the speakers while the headphones are plugged in.

6 ENGLISH

Page 6
Image 6
Aiwa XR-MR5 manual Remote Control, Before Operation, Power, Tuner, Cd-R/Rw

XR-MR5 specifications

The Aiwa XR-MR5 is a notable addition to the realm of portable audio devices, well-regarded for its fusion of classic design with modern features. This compact cassette player and recorder captures the essence of nostalgia while integrating contemporary technologies, making it a unique offering for audiophiles and casual listeners alike.

One of the standout features of the XR-MR5 is its robust sound quality. Aiwa has a legacy of crafting products that deliver exceptional audio performance, and the XR-MR5 is no exception. It employs advanced speaker technology, ensuring clear and crisp sound reproduction, whether you're playing cassettes or listening to FM radio. The dynamic range is impressive, offering a rich depth that resonates well with all genres of music.

The device showcases a variety of playback options, including cassette tapes, FM/AM radio, and auxiliary connectivity. This versatility allows users to enjoy music from different sources, breathing new life into their vintage cassette collection while also accommodating modern devices. The auxiliary input makes it easy to connect smartphones or digital music players, bridging the gap between past and present.

In terms of design, the Aiwa XR-MR5 boasts a compact size that enhances its portability, making it an ideal companion for travel or outdoor activities. Its build quality reflects durability while maintaining an aesthetically pleasing appearance. The user interface is intuitive, featuring easy-to-navigate buttons and a clear display, allowing for seamless operation.

Another significant highlight of the XR-MR5 is its battery life. This device is designed for maximum efficiency, providing hours of uninterrupted playback on a single charge. This long-lasting battery makes it an excellent choice for individuals who enjoy listening to music on the go.

The cassette recording feature is particularly appealing for those who appreciate analog recording methods. Users can effortlessly create mixtapes or preserve their favorite songs with high-quality recordings. Additionally, the unit is equipped with a built-in microphone, enhancing its functionality for voice recording purposes.

To summarize, the Aiwa XR-MR5 is a remarkable blend of classic and contemporary. With its impressive audio performance, versatile playback options, and portable design, it caters to a wide range of users. Whether you're revisiting the era of cassette tapes or looking for a reliable portable recording device, the XR-MR5 stands out as a solid choice that celebrates the rich history of audio technology while embracing modern conveniences.