Information Bulletin 102103 Continued from previous Page
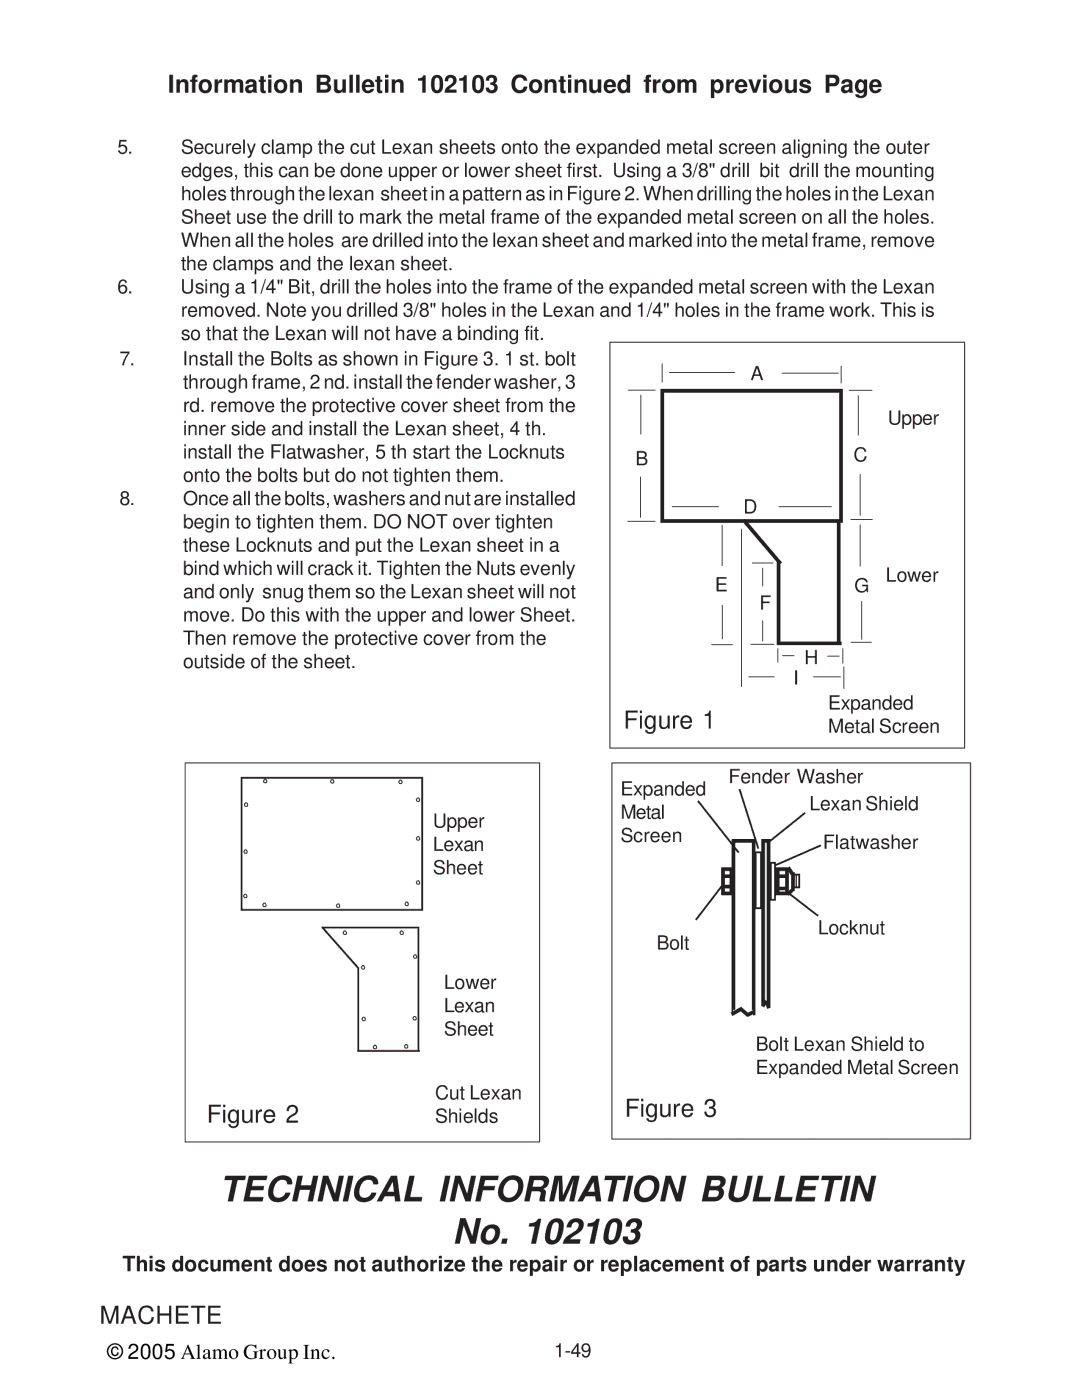
5.Securely clamp the cut Lexan sheets onto the expanded metal screen aligning the outer edges, this can be done upper or lower sheet first. Using a 3/8" drill bit drill the mounting holes through the lexan sheet in a pattern as in Figure 2. When drilling the holes in the Lexan Sheet use the drill to mark the metal frame of the expanded metal screen on all the holes. When all the holes are drilled into the lexan sheet and marked into the metal frame, remove the clamps and the lexan sheet.
6.Using a 1/4" Bit, drill the holes into the frame of the expanded metal screen with the Lexan removed. Note you drilled 3/8" holes in the Lexan and 1/4" holes in the frame work. This is so that the Lexan will not have a binding fit.
7.Install the Bolts as shown in Figure 3. 1 st. bolt
through frame, 2 nd. install the fender washer, 3 ![]()
![]() A
A ![]()
![]()
| rd. remove the protective cover sheet from the |
|
|
|
|
|
|
|
|
|
|
|
|
|
|
|
|
|
|
|
|
|
|
|
|
| Upper |
|
|
|
|
|
|
|
|
|
|
|
|
|
|
|
|
|
|
|
|
|
|
|
|
|
| ||
| inner side and install the Lexan sheet, 4 th. |
|
|
|
|
|
|
|
|
|
|
|
|
|
|
|
|
|
|
|
|
|
|
|
|
| |
| install the Flatwasher, 5 th start the Locknuts |
| B |
|
|
|
|
|
|
|
|
|
|
|
|
|
|
|
|
|
|
| C | ||||
| onto the bolts but do not tighten them. |
|
|
|
|
|
|
|
|
|
|
|
|
|
|
|
|
|
|
|
|
|
|
|
|
|
|
|
|
|
|
|
|
|
|
|
|
|
|
|
|
|
|
|
|
|
|
|
|
|
|
|
|
| |
8. | Once all the bolts, washers and nut are installed |
|
|
|
|
|
|
|
|
|
| D |
|
|
|
|
|
|
|
|
|
|
| ||||
| begin to tighten them. DO NOT over tighten |
|
|
|
|
|
|
|
|
|
|
|
|
|
|
|
|
|
|
|
|
|
|
|
|
|
|
|
|
|
|
|
|
|
|
|
|
|
|
|
|
|
|
|
|
|
|
|
|
|
|
|
|
| |
| these Locknuts and put the Lexan sheet in a |
|
|
|
|
|
|
|
|
|
|
|
|
|
|
|
|
|
|
|
|
|
|
|
|
|
|
| bind which will crack it. Tighten the Nuts evenly |
|
|
|
|
|
|
|
|
|
|
|
|
|
|
|
|
|
|
|
|
|
|
|
|
|
|
|
|
|
|
|
|
| E |
|
|
|
|
|
|
|
|
|
|
|
|
| G Lower | ||||||
| and only snug them so the Lexan sheet will not |
|
|
|
|
|
|
|
|
|
|
|
|
|
|
|
|
|
|
| |||||||
|
|
|
|
|
|
|
|
|
|
|
|
|
|
|
|
|
| ||||||||||
| move. Do this with the upper and lower Sheet. |
|
|
|
|
|
|
|
|
|
|
|
| F |
| ||||||||||||
|
|
|
|
|
|
|
|
|
|
|
|
|
|
| |||||||||||||
| Then remove the protective cover from the |
|
|
|
|
|
|
|
|
|
|
|
|
|
|
|
|
| H |
|
|
|
|
|
|
| |
|
|
|
|
|
|
|
|
|
|
|
|
|
|
|
|
|
|
|
|
|
|
|
|
| |||
|
|
|
|
|
|
|
|
|
|
|
|
|
|
|
|
|
|
|
|
|
|
|
|
| |||
| outside of the sheet. |
|
|
|
|
|
|
|
|
|
|
|
|
|
|
|
|
|
|
| |||||||
|
|
|
|
|
|
|
|
|
|
|
|
|
|
|
|
|
|
| |||||||||
|
|
|
|
|
|
|
|
|
|
|
|
|
|
|
|
|
|
|
| ||||||||
|
|
|
|
|
|
|
|
|
|
|
|
|
|
|
|
|
| I |
|
|
|
| |||||
|
|
|
|
|
|
|
|
|
|
|
|
|
|
|
|
|
|
|
|
|
|
|
|
|
| ||
|
| Figure 1 |
|
|
|
|
|
|
|
|
| Expanded | |||||||||||||||
|
|
|
|
|
|
|
|
|
|
| Metal Screen | ||||||||||||||||
Figure 2
Upper
Lexan
Sheet
Lower
Lexan
Sheet
Cut Lexan Shields
Expanded | Fender Washer | |||||||||
|
|
|
|
|
|
|
|
| Lexan Shield | |
Metal |
|
|
|
|
|
|
|
|
| |
|
|
|
|
|
|
|
|
|
| |
Screen |
|
|
|
|
|
|
|
|
| Flatwasher |
|
|
|
|
|
|
|
|
|
| |
|
|
|
|
|
|
|
|
|
| Locknut |
|
|
|
|
|
|
|
|
|
| |
|
|
|
|
|
|
|
|
|
| |
Bolt |
|
|
|
|
|
|
|
|
| |
|
|
|
|
|
|
|
|
| ||
|
|
|
|
|
|
|
|
| ||
|
|
|
|
|
|
|
|
|
| |
|
|
|
|
|
|
|
|
|
|
|
|
|
|
|
|
|
|
|
|
|
|
Bolt Lexan Shield to
Expanded Metal Screen
Figure 3
TECHNICAL INFORMATION BULLETIN
No. 102103
This document does not authorize the repair or replacement of parts under warranty
MACHETE
© 2005 Alamo Group Inc. |