Apple
Multiple Scan 20 Display
User’s Guide
K Apple Computer, Inc
Contents
1 Setting Up
2 Using the Display Software
3 Adjusting the Picture
Notes for IBM PC-Compatible Users
Tips and Troubleshooting
Technical Information
Appendix A
Radio and television interference
Communications regulation information
FCC statement
DOC statement
1 Setting Up
Important safety instructions
What about electromagnetic emissions?
Apple Multiple Scan 20 Display
Getting ready to set up
Power jumper cord
Monitor cable
Power cord receptacle Monitor cable
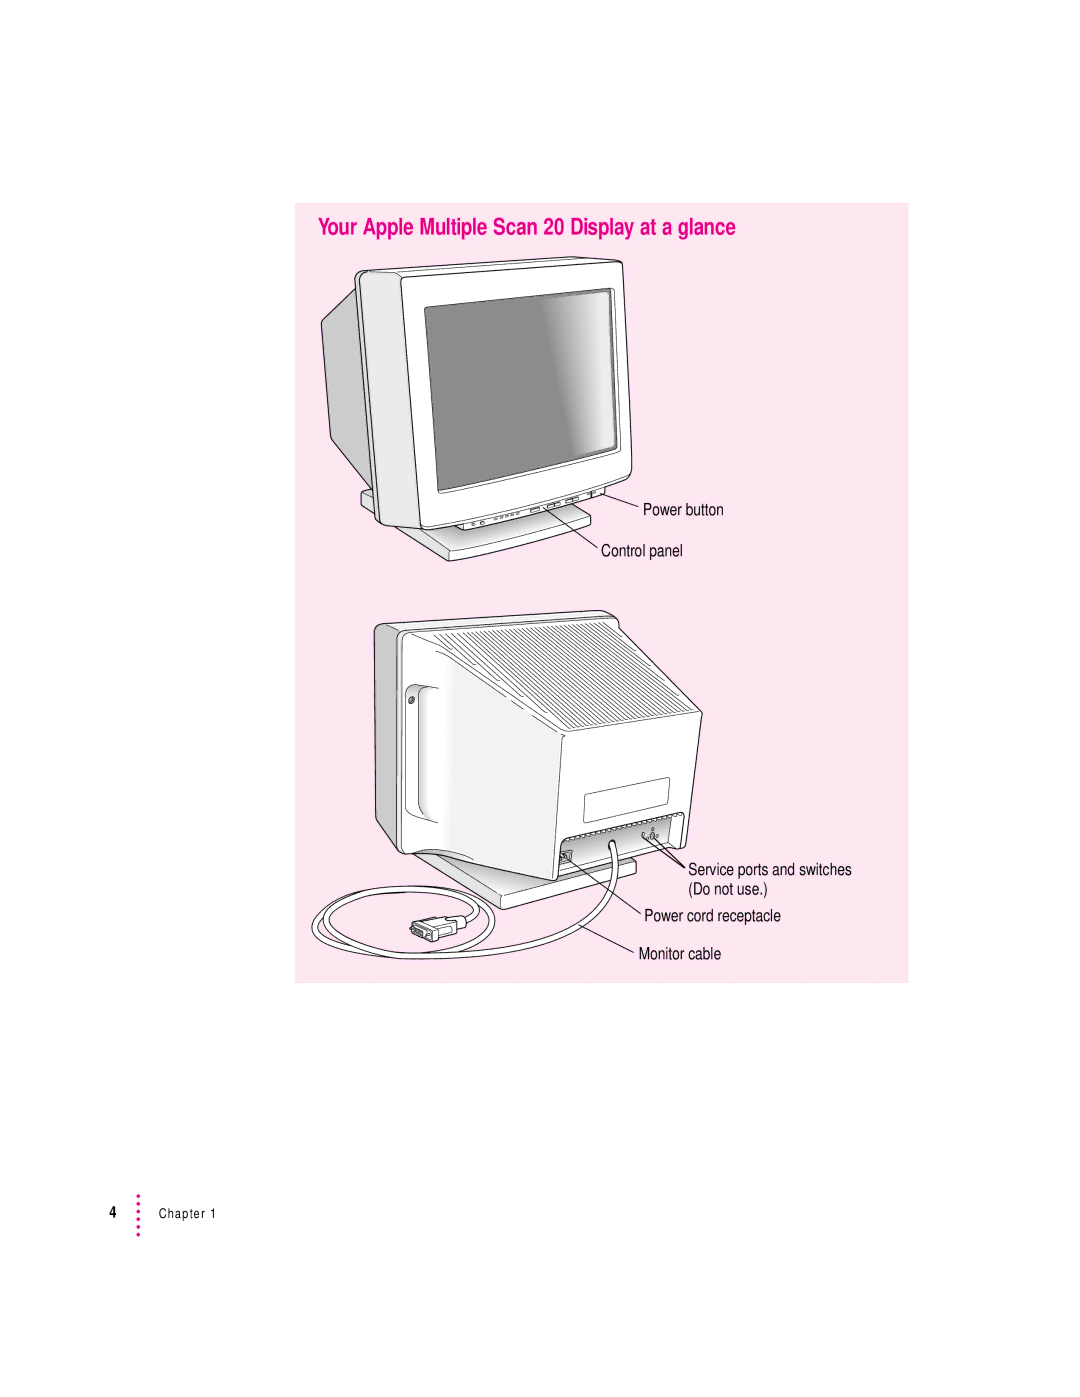
Your Apple Multiple Scan 20 Display at a glance
Power button Control panel
Service ports and switches Do not use
Lifting and positioning the monitor
Choosing a good location for your monitor
Hold the front of the monitor securely
To position the monitor on a table or desk, follow these steps
Using more than one monitor
Do you need a video card?
Connecting the monitor to your computer
Connecting your keyboard to the monitor
4 Tighten the thumbscrews on the connection
Turning the monitor on
Installing the display software
The Installer screen appears
2 Using the Display Software
About the Control Strip
Working with the Control Strip
Changing screen resolution
Other things you can do with the Monitors control panel
What happens after you turn on the energy saving feature
Conserving energy
Using ColorSync
Using Energy Saver with a screen saver
To set up ColorSync for a specific monitor
Configuring the Control Strip
Showing and hiding the Control Strip
Setting a keyboard command to show and hide the Control Strip
Double-click the Control Strip icon to open it
Changing the font in Control Strip menus
Choose Control Panels from the Apple K menu
Click the close box to close the control panel
Indicator lights
3 Adjusting the Picture
Reset button
for picture controls
Adjusting the brightness of the picture
Making adjustments to the picture
Adjusting the contrast of the picture
Follow these steps
Adjusting the center of the picture
When the picture is centered properly, there is an equal border
1 Press and hold down the x button on the monitor until the fi
Follow these steps
Adjusting the size of the picture
26 Chapter
Adjusting the rotation and color uniformity of the picture
Follow these steps
1 Press and hold down the x button on the monitor until the fi
Adjusting the shape of the picture
Follow these steps
Use these controls
Adjusting the convergence of the picture
Selecting the color temperature
30 Chapter
Resetting controls to original levels
Resetting brightness and contrast
Resetting all picture controls
Resetting individual picture controls
While holding down the Control button , press the Reset button
4 Tips and Troubleshooting
Care and cleaning
Troubleshooting
Protecting your monitor from theft
The monitor’s power indicator light doesn’t come on
Tips and Troubleshooting
m Make sure that your computer and monitor are turned on
The screen image is off center
Tips and Troubleshooting
No colors appear on the screen
The screen image is too large or too small
After many hours of use, the screen image appears dim
You can’t control the sound volume of a CD
You don’t see the monitor resolution you want
Over time, you experience eyestrain
After you change the screen resolution, icons move
The monitor does not go to sleep
You see two resolution options labeled 640x870 75 Hz
When you change resolutions, the monitor goes blank
40 Chapter
Appendix A Notes for IBM PC-Compatible Users
Compatibility
Your monitor may not look exactly as shown
Connecting the monitor to your IBM PC-compatible computer
42 Appendix A
This adapter is shipped with your monitor
Using the monitor
44 Appendix A
Appendix B Technical Information
Vertical refresh rate
90-132, 198-260
Horizontal scan rate
Interfaces
Temperature
Tilt swivel base
Humidity noncondensing
Monitor cable specifications
m 15-pin miniature D-type connector
Output signal
Cupertino, California
Apple Computer, Inc
1 Infinite Loop
030-8886-A