Manuals
/
ATI Technologies
/
Computer Equipment
/
Computer Hardware
ATI Technologies
X600
manual
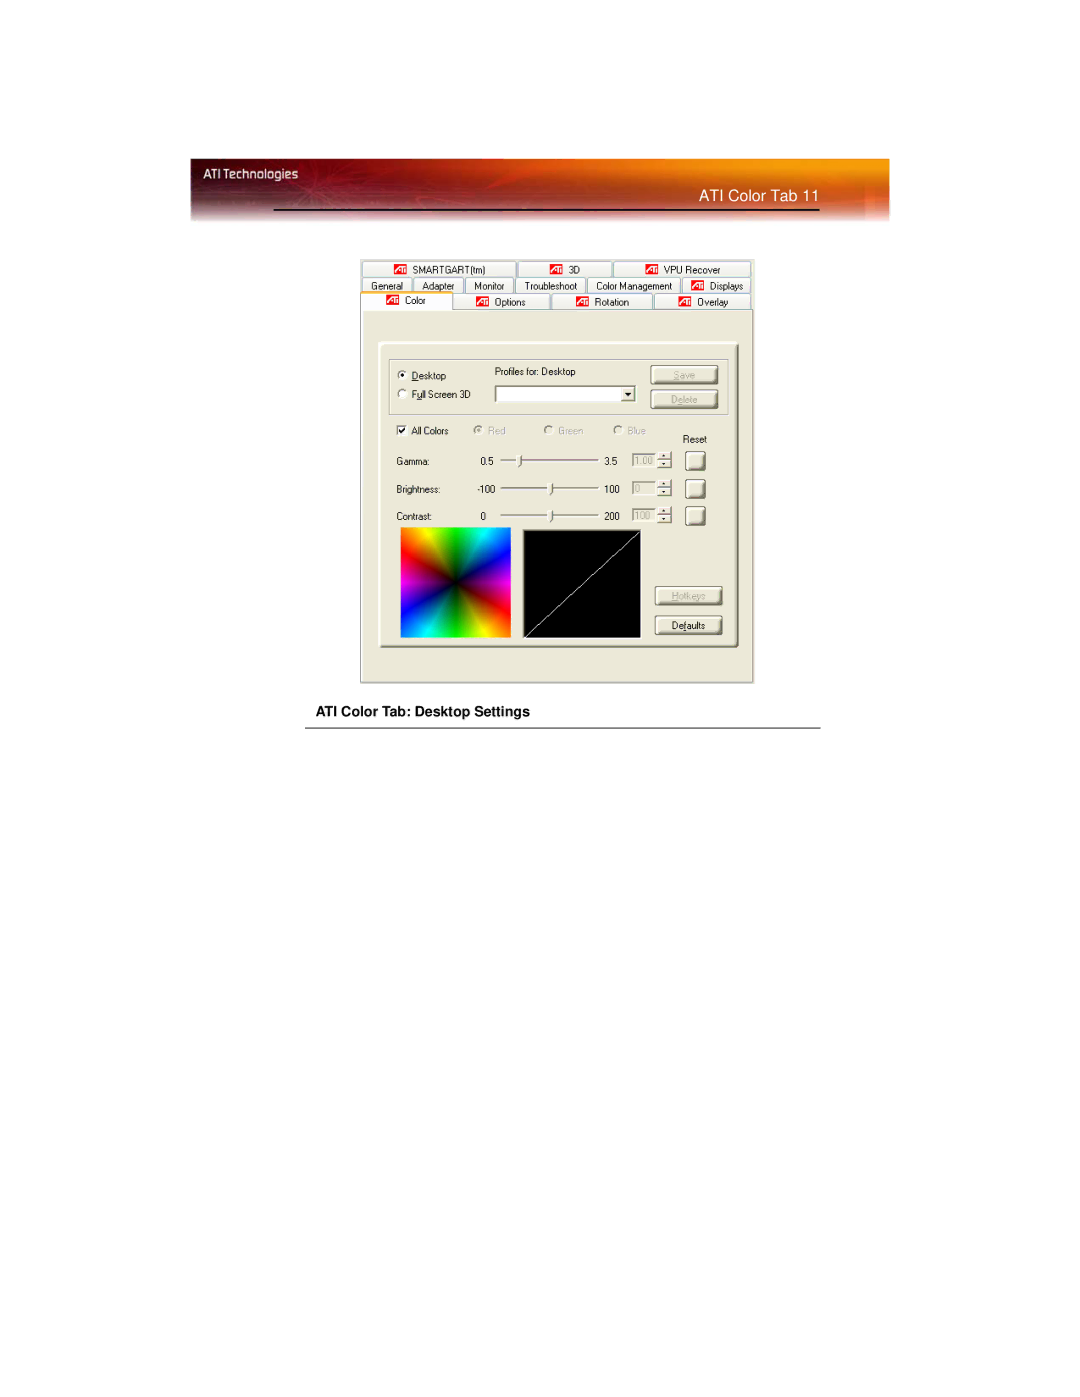
ATI Color Tab Desktop Settings
Models:
X600
1
17
60
60
Download
60 pages
50.15 Kb
14
15
16
17
18
19
20
21
Connecting Your Monitors
Adjusting Monitor Display
ATI Color Tab Desktop Settings
ATI VPU Recover Tab
Windows Volume Control
Safety
Radeon X600 Features
To enable or disable a display
Using TV Display Alone
Clone Mode Options
Page 17
Image 17
ATI Color Tab 11
ATI Color Tab: Desktop Settings
Page 16
Page 18
Page 17
Image 17
Page 16
Page 18
Contents
Radeon
Disclaimer
Important Safety Instructions
Page
Table of Contents
Index
Compliance Information
External Connections
Radeon X600 Features
Graphic Features
Video output or Video In/Video Out Vivo connection
Connecting Your Monitors
Using Multiple Displays
Connections and Adapters for the Radeon X600 Card
To connect your monitors
Single CRT
Display Connectors Comments Configuration Used
Display
Single DFP
CRT display +
Single TV
DFP display +
DFP display
Accessing the Catalyst Software Suite
Features
Introduction
Multiple Displays and 3D Gaming
ATI Displays Tab
Windows Display Properties Settings Tab
ATI Displays Tab
To save a display-device scheme
To enable or disable a display
ATI Color Tab
ATI Color Tab Desktop Settings
ATI Color Tab
To create a Desktop or Full Screen 3D profile
To apply the settings for a Full Screen 3D profile
To apply the settings for a specific Desktop profile
To access the Color Hotkeys Settings dialog
Hotkeys
Color Hotkey Settings
Color Hotkeys Settings
Color Hotkeys Settings Dialog
Modifier key
To remove assigned hotkeys
ATI Options Tab
ATI Options Tab
ATI Options Tab
Options Details Tab
ATI Options Details Tab
ATI Rotation Tab
ATI Rotation Tab
To rotate a single display
Rotation HotKeys
To rotate multiple displays
To assign rotation hotkeys
ATI Overlay Tab
ATI Overlay Tab
Video Overlay
ATI Overlay Tab
Clone Mode Settings
Clone Mode Options
ATI 3D Tab
ATI 3D Tab
Custom Properties Dialog OpenGL or Direct 3D
Custom Properties Dialog
Custom Properties Dialog
Smoothvision HD Anti-Aliasing slider
Filtering slider
HD Anisotropic
Texture Preference
Mipmap Detail
Custom Properties Dialog Smartshader Effects
Smartshader applies preset pixel effects on
Direct 3D Compatibility Settings
Direct 3D Compatibility Settings
OpenGL Compatibility Settings
OpenGL Compatibility Settings
ATI VPU Recover Tab
ATI VPU Recover Tab
ATI VPU Recover Tab
Enable VPU Recover checkbox
Prepare an Error Report checkbox
ATI VPU Recover Tab
Using TV Out View your PC’s display on a TV
Using TV Display and Capture Features
To enable or disable the TV display
Starting Windows with TV Display Enabled
Composite Cable or
Using Scart Connectors for European TVs
Using and Adjusting TV Display Features
How To Enable/Disable The TV Display
Using a Monitor vs. Using TV Display
Adjusting Monitor Display
Viewing Text on a TV
Switching to a larger display font
Reducing Edge Distortion
Increasing the horizontal size of a TV display
Using Games and Applications
Using TV Display Alone
Select your TV broadcast format
Increasing the contrast of a TV display
Adjust your TV screen size
Page
Adjust the composite dot crawl on your TV Display
Adjust the S-Video sharpness of your TV display
Adjust the luma flicker removal setting on your TV Display
Page
Video Cable or Composite Cable
Windows Volume Control
Connect to a TV, VCR, or Camcorder for video capturing
Click Change device Click Configure
Capturing video using Windows Movie Maker
Capturing video using Windows Movie Maker
Industry Canada Compliance Statement
FCC Compliance Information
CE-befolgungInformationen
CE Compliance Information
’Information de conformité de la CE
Index
Custom settings Desktop
Horizontal size
Theater Mode Triple Buffering TV display 39
Top
Page
Image
Contents