Router
Table of Contents
Introduction
Advantages of a Wireless Network
Important Factors for Placement and Setup
Placement of your Wireless G Plus Mimo Router
Wireless Router or Access Point Placement
Introduction
Choose the Quietest Channel for your Wireless Network
Avoid Obstacles and Interference
Cordless Phones
Secure Connections, VPNs, and AOL
Introduction
Product Overview
Built-In Dynamic Host Configuration Protocol Dhcp
Integrated 10/100 4-Port Switch
Easy Install Wizard
Universal Plug and Play UPnP
Integrated G Plus Mimo Wireless Access Point
Product Overview
MAC Address Filtering
Easy Install Wizard Software System Requirements
Package Contents
Knowing your Router
System Requirements
Knowing your Router
Modem/WAN Status LED
Wireless Network LED
Internet/Connected LED
Power/Ready LED
Connections to Computers Wired Computer Ports Yellow
Power Jack Gray
Rear Panel
Connection to Modem Modem Port Blue
Reset Button
Resetting the Router
Restoring the Factory Defaults
Connecting and Configuring your Router
Ethernet USB Easy Install Wizard
Modem Requirements
Step Run the Easy Install Wizard Software
Examining Settings
Connecting and Configuring your Router
Welcome Screen
Progress Screen
Multi-NICs Screen
Connecting and Configuring your Router
Step Checking the Connection
User Name and Password Needed
Wireless Setup
Step Configuring the Router
Checking Internet
Finished
Step Connecting your Gateway Router
Alternate Setup Method
Section
Logging into the Router
Alternate Setup Method
Logging out of the Router
Understanding the Web-Based Advanced User Interface
Internet Status Indicator
Quick-Navigation Links
Home Button
Help Button
Login/Logout Button
Features
LAN Settings
Internet Settings
Version Info
Alternate Setup Method
Setting your Connection Type
Change WAN MAC Address
Host Name
Subnet Mask
IP Address
ISP Gateway Address
My ISP Provides More Than One Static IP Address
Your connection type is PPPoE if
Setting your ISP Connection Type to PPPoE
Service Name
Password
User Name
MTU
Pptp Password
Service IP Address
Pptp Account
My IP Address
My Subnet Mask
Connection ID optional
Select your State
Setting Custom Domain Name Server DNS Settings
User Decide Login Server Manually
Configuring your WAN Media Access Controller MAC Address
Entering a Specific MAC Address
Cloning your MAC Address
Viewing the LAN Settings
Using the Web-Based Advanced User Interface
Changing LAN Settings
Dhcp Server
Using the Web-Based Advanced User Interface
IP Pool
Lease Time
Viewing the Dhcp Client List
Changing the Wireless Network Name Ssid
Configuring the Wireless Network Settings
802.11g-Only Mode
Using the Wireless Mode Switch
802.11g & 802.11b
Off
Auto Channel Selection Feature and Changing the Channel
Changing the Wireless Channel
Changing the Wireless Security Settings
Using the Broadcast Ssid Feature Protected Mode Switch
WPA2 Requirements
Setting WPA/WPA2-Personal PSK
Using the Web-Based Advanced User Interface
Setting WPA-PSK
Setting WPA Security
Setting WEP Encryption
Using the Web-Based Advanced User Interface
Using a Hexadecimal Key
Using the Access Point Mode
Setting MAC Address Control
Setting up an Allow Access List
Address from the list
Setting up a Deny Access List
Configuring the Firewall
Configuring Internal Forwarding Settings
Manually Entering Settings into the Virtual Server
Choosing an Application
Setting Client IP Filters
Enabling the Demilitarized Zone DMZ
Setting up the Router’s Dynamic DNS Update Client
Using Dynamic DNS
Blocking an Icmp Ping
Parental Control
Utilities
Restarting the Router
Restarting the Router to Restore Normal Operation
Restoring Factory Default Settings
Saving a Current Configuration
Restoring a Previous Configuration
Using the Web-Based Advanced User Interface
Checking for a New Version of Firmware
Updating the Firmware
Downloading a New Version of Firmware
Updating the Router’s Firmware
Using the Web-Based Advanced User Interface
Changing System Settings
Setting or Changing the Administrator Password
Changing the Login Time-Out Setting
Enabling Remote Management
Setting the Time and Time Zone
Enabling/Disabling NAT Network Address Translation
Enabling/Disabling UPnP
Enabling/Disabling Auto Firmware Update
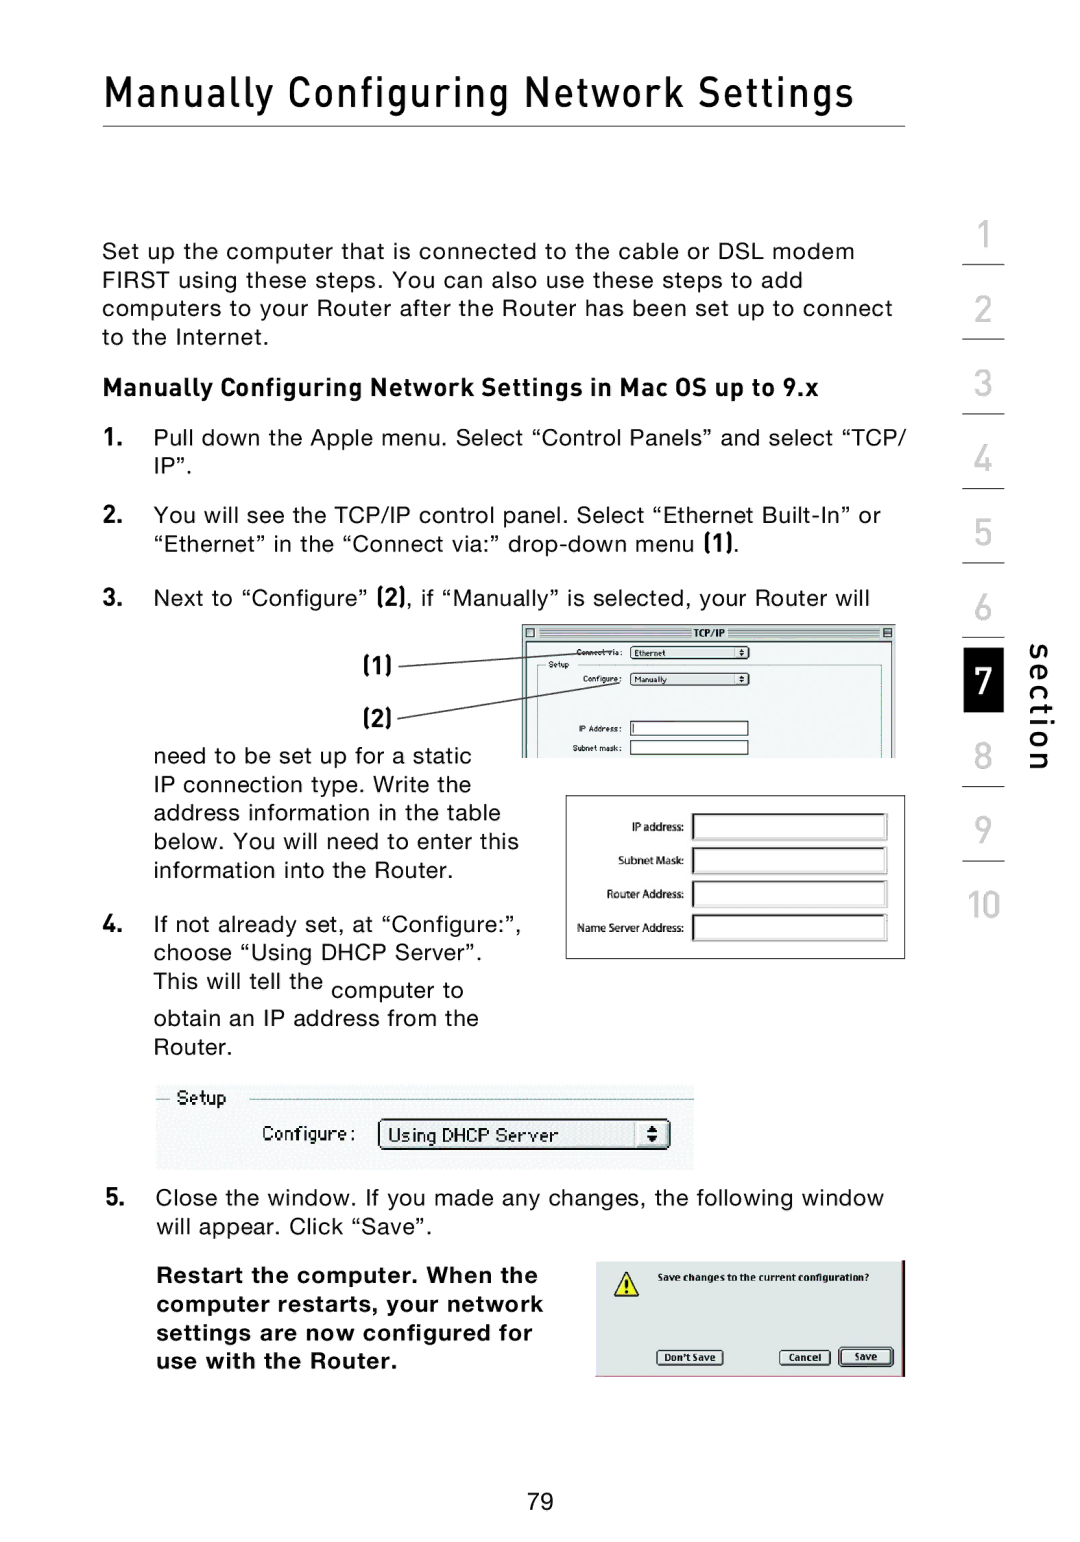
Manually Configuring Network Settings in Mac OS up to
Manually Configuring Network Settings
Manually Configuring Network Adapters in Mac OS
Manually Configuring Network Settings
Section
Manually Configuring Network Settings
Manually Configuring Network Adapters in Windows 98SE or Me
Internet Explorer 4.0 or Higher
Recommended Web Browser Settings
Netscape Navigator 4.0 or Higher
Troubleshooting
Problem
Solution
Easy Install Wizard cannot find my Router
Troubleshooting
Section
Troubleshooting
Can’t connect to the Internet wirelessly
Troubleshooting
Troubleshooting
For example C3030FAF4BB2C3D44BC3D4E7E4 = 128-bit key
Troubleshooting
C3030FAF4BB2C3D44BC3D4E7E4 = 128-bit key
Troubleshooting
XP WPA
Troubleshooting
Troubleshooting
101
Wireless Comparison Chart
Information
FCC Statement
Federal Communications Commission Notice
Modifications
Information
Canada-Industry Canada IC
Europe-European Union Notice
Belkin Corporation Limited Lifetime Product Warranty
How state law relates to the warranty
Wi-FIInteroperability Certificate
108
109
Belkin B.V
Belkin Corporation
Manu l’utilisateur
Table des matières
Connexion et configuration de votre Routeur
Avantages d’un réseau sans fil
Mimo
Choix de l’emplacement de votre Routeur Sans Fil G+
Téléphones sans fil
Éviter les obstacles et les interférences
Connexions sécurisées, VPN et AOL
Introduction
Présentation du produit
Dhcp Dynamic Host Configuration Protocol intégré
Switch 10/100 à 4 Ports intégré
Assistant Installation Facile
UPnP Universal Plug and Play
Présentation du produit
Point d’accès G+ Mimo intégré
Filtrage des adresses MAC
Configuration requise pour l’Assistant Installation Facile
Configuration requise
Faites connaissance avec votre Routeur
Contenu de l’emballage
Faites connaissance avec votre Routeur
Témoin du réseau sans fil
Témoins de l’état des ordinateurs filaires
Témoin de l’état du réseau WAN
Témoin Internet/Connecté
Témoin Alimentation/Prêt
Face arrière
Prise pour bloc d’alimentation Gris
Connexion au modem Port modem Bleu
Bouton de réinitialisation
Réinitialisation du Routeur
Rétablissement des paramètres par défaut
Branchement et Configuration du Routeur
Configuration requise pour le modem
Ethernet USB Assistant Installation Facile
Remarque aux utilisateurs de Windows
Étape 1 Exécutez l’Assistant Installation facile
Écran d’accueil
Branchement et Configuration du Routeur
Écran de progression
Examen des paramètres
Écran pour plusieurs cartes réseau
Branchement et Configuration du Routeur
Nom d’utilisateur et mot de passe requis
Étape 3 Vérification de la connexion
Configuration sans fil
Étape 4 Configuration du Routeur
Vérification de l’Internet
Terminé
Étape 1 Connexion de votre routeur de passerelle
Autre méthode de configuration
Section
Connexion au Routeur
Autre méthode de configuration
Déconnexion du Routeur
Comprendre l’Interface utilisateur évoluée basée sur le Web
Raccourcis de navigation
Bouton Accueil
Indicateur de l’état de l’Internet
Bouton Aide
Bouton Connexion/Déconnexion
Paramètres Internet
Paramètres LAN
Informations la version
Nom de la
Autre méthode de configuration
Définition du type de connexion
Réglage du type de connexion FAI comme « IP Dynamique »
Nom dhôte
Changer l’Adresse MAC du WAN
Adresse IP
Réglage du type de connexion FAI comme « IP fixe »
Masque de sous-réseau
Adresse de passerelle du FAI
Vous possédez une connexion de type PPPoE si
Configuration de votre connexion de type PPPoE
Nom d’utilisateur
Nom du service
Mot de passe
Déconnexion après X…
Adresse IP du service
Compte Pptp
Mot de passe Pptp
Mon adresse IP
Mon masque de sous-réseau
Identifiant de connexion facultatif
Sélectionnez votre état de résidence
’utilisateur décide manuellement de la connexion au serveur
Configuration de l’adresse MAC Media Access Controller WAN
Saisie d’une adresse MAC spécifique
Clonage de votre adresse MAC
Visualisation des paramètres du réseau local LAN
Utilisation de l’Interface utilisateur Avancée basée
Modification des paramètres de réseau local LAN
Serveur Dhcp
Utilisation de l’Interface utilisateur Avancée basée
Plage d’adresses IP
Durée d’autorisation
Affichage de la page Liste des clients Dhcp
Modification du nom du réseau sans fil Ssid
Configuration des paramètres du réseau sans fil
Mode 802.11g-Only
802.11g et 802.11b
Éteint
Modification du canal
Switch en Mode Protégé
Utilisation de l’option d’émission du Ssid
Modification des paramètres de sécurité sans fil
Configuration WPA/WPA2-Personal PSK
Configuration requise pour le WPA2
Utilisation de l’Interface utilisateur Avancée basée
Configuration du WPA-PSK
Configuration du WPA
Configuration du chiffrement WEP
Utilisation de l’Interface utilisateur Avancée basée
Utilisation d’une clé hexadécimale
Utilisation du mode Point d’accès
Dresser une liste d’ordinateurs « autorisés »
Configuration de l’Adresse MAC
Dresser une liste d’ordinateurs « refusés »
Configuration du pare-feu
Configuration des paramètres de retransmission interne
Choix d’une application
Saisie manuelle des paramètres du serveur virtuel
Définition de filtres IP de clients
Activer de la zone démilitarisée DMZ
Utilisation du serveur DNS dynamique
Configuration du client DNS Dynamique du Routeur
Blocage du ping Icmp
Contrôle Parental
Utilitaires
Redémarrage du routeur
Rétablissement des paramètres par défaut du constructeur
Enregistrement de la configuration actuelle
Rétablissement d’une configuration précédente
Utilisation de l’Interface utilisateur Avancée basée
Recherche d’une nouvelle version du micrologiciel
Mise à jour du micrologiciel
Téléchargement de la nouvelle version du micrologiciel
Mise à jour du micrologiciel du Routeur
Utilisation de l’Interface utilisateur Avancée basée
Modification du délai de temporisation de la connexion
Entrer ou modifier le mot de passe administrateur
Activer de la gestion à distance
Définition d’un fuseau horaire
Activation/Désactivation du NAT Network Address Translation
Activer/Désactiver l’UPnP
Configuration manuelle des paramètres du réseau
Configuration manuelle des Adaptateurs réseau sous Mac
Configuration manuelle des paramètres du réseau
Section
Configuration manuelle des paramètres du réseau
Configuration manuelle des paramètres du réseau
Internet Explorer 4.0 ou version ultérieure
Paramètres de navigateur recommandés
Netscape Navigator 4.0 ou version ultérieure
Problème
Dépannage
’Assistant Installation Facile ne peut trouver mon Routeur
Dépannage
Section
Dépannage
Je n’arrive pas à me connecter sans fil à Internet
Dépannage
Dépannage
Par exemple C3030FAF4BB2C3D44BC3D4E7E4 = clé 128 bits
Dépannage
C3030FAF4BB2C3D44BC3D4E7E4 = clé 128 bits
Dépannage
Dépannage
Dépannage
Dépannage
101
Tableau comparatif des réseaux sans fil
Déclaration FCC
Europe Prescription Union européenne
Canada-Industrie Canada IC
Garantie limitée à vie du produit de Belkin Corporation
Relation entre le Droit national et la garantie
Certificat d’interopérabilité Wi-FI
108
Routeur Sans FIl G+ Mimo
MIMORouter
Einleitung
Inhaltsverzeichnis
Anschließen und Konfigurieren des Routers
Die Webgestützte Erweiterte Benutzeroberfläche benutzen
Vorzüge eines kabellosen Netzwerks
Einleitung
Einleitung
Aufstellung des kabellosen Routers oder Access Points
Aufstellung des kabellosen G+ Mimo Routers
Wichtige Faktoren bei Aufstellung und Einrichtung
Schnurlose Telefone
Vermeiden Sie Hindernisse und Störungsquellen
Sichere Verbindungen, VPNs und AOL
Wählen Sie den „ruhigsten Kanal für Ihr kabelloses Netzwerk
Einleitung
Produktübersicht
Integriertes Dhcp Dynamic Host Configuration Protocol
Integrierter 10/100 4-Port Switch
Installationsassistent
UPnP Universal Plug&Play
Integrierter Kabelloser G+ Mimo Access Point
Produktübersicht
MAC Adress-Filter
Beschreibung des Routers
Anforderungen für den Installationsassistenten
Verpackungsinhalt
Systemvoraussetzungen
Beschreibung des Routers
Funknetzwerk-LED
Statusanzeige des verkabelten Computers
Modem/WAN Status-LED
Internet/Verbindungsanzeige
Betriebs-/Bereitschaftsanzeige
Netzanschluss Grau
Rückseite
Computeranschlüsse Anschlüsse für verkabelte Computer
Modemanschluss Blau
Rücksetztaste
Zurücksetzen des Routers
Wiederherstellung der Werkseinstellungen
Ethernet USB Installationsassistent
Anschließen und Konfigurieren des Routers
Modemanforderungen
Schritt Ausführen des Installationsprogramms
Willkommensfenster
Anschließen und Konfigurieren des Routers
Statusanzeige
Untersuchen der Einstellungen
Fenster für mehrere Netzadapter
Anschließen und Konfigurieren des Routers
Benutzername und Kennwort werden benötigt
Schritt Überprüfen der Verbindung
Funkeinrichtung
Schritt Konfigurierung des Routers
Verbindungsprüfung
Abschluss
Schritt Anschließen des Gateway-Routers
Alternatives Einrichtungsverfahren
Kapitel
Alternatives Einrichtungsverfahren
Anmelden an den Router
Abmelden vom Router
Navigationslinks
Home-Schaltfläche
Internetstatus-Anzeige
Schaltfläche Hilfe
Schaltfläche „Login/Logout Anmelden/Abmelden
Funktionen
LAN-Einstellungen
Interneteinstellungen
Versionsinfo
Alternatives Einrichtungsverfahren
Einstellen des Verbindungstyps
Einstellen des Provider-Verbindungstyps auf Dynamische IP
Hostname
WAN MAC-Adresse ändern
IP-Adresse
Einstellen des Provider-Verbindungstyps auf Statische IP
Subnet-Mask
ISP-Gateway-Adresse
Einstellen des ISP-Verbindungstyps auf PPPoE
Benutzername
Servicename
Kennwort
Trennen nach
Service-IP-Adresse
PPTP-Konto
PPTP-Kennwort
Eigene IP-Adresse
Eigene Subnet-Mask
Verbindungskennung optional
Auswahl des Bundesstaats
Einstellen des Verbindungstyps für Telstra BigPond
Festlegen individueller DNS-Einstellungen
Manuelle Nutzer-Serveranmeldung
Einrichten der WAN-MAC-Adresse
Eingeben einer bestimmten MAC-Adresse
Klonen der MAC-Adresse
Anzeigen der LAN-Einstellungen
Verwenden der Webgestützten Erweiterten Benutzeroberfläche
LAN-Einstellungen ändern
DHCP-Server
Verwenden der Webgestützten Erweiterten Benutzeroberfläche
IP-Pool
Frist
Anzeigen der DHCP-Client-Liste
Ändern des Netzwerknamens Ssid
Konfigurieren der kabellosen Netzwerkeinstellungen
Verwendung des Funkmodus
802.11g-Only-Modus Nur 802.11g
Aus
Ändern des Funkkanals
Verwenden der Funktion „Broadcast Ssid Ssid rundsenden
Geschützter Modus
Änderungen der Sicherheitseinstellungen des Funknetzwerks
WPA/WPA2-Personal einstellen PSK
WPA2-Anforderungen
Verwenden der Webgestützten Erweiterten Benutzeroberfläche
WPA-PSK einstellen
Einstellen der WPA-Sicherheitsfunktion
Aktivieren der WEP-Verschlüsselung
Verwenden der Webgestützten Erweiterten Benutzeroberfläche
C3 03 0F AF 0F 4B B2 C3 D4 4B C3 D4 E7 = 128-Bit-Schlüssel
Verwenden eines Hexadezimalschlüssels
Betriebsmodus Access Point
Erstellen einer Zugriffsliste
MAC-Adressenkontrolle einstellen
Aufstellen einer Ausschlussliste
Konfigurieren der Firewall
Interne Weiterleitungseinstellungen konfigurieren
Auswählen einer Anwendung
Manuelle Eingabe von Einstellungen in den virtuellen Server
Einstellen der Client-IP-Filter
Aktivieren der DMZ-Funktion
Verwenden der dynamischen DNS
Einstellen des Update-Clients für Dynamisches DNS
Blockieren von ICMP-Pings
Kindersicherung
Dienstprogramme
Wiederherstellen des Normalbetriebs durch einen Neustart
Neustart des Routers
Wiederherstellen der Werkseinstellungen
Sichern der aktuellen Konfiguration
Wiederherstellen einer früheren Konfiguration
Verwenden der Webgestützten Erweiterten Benutzeroberfläche
Abfragen einer neuen Firmware-Version
Aktualisierung der Firmware
Herunterladen einer neuen Firmware-Version
Aktualisieren der Router-Firmware
Verwenden der Webgestützten Erweiterten Benutzeroberfläche
Einstellen oder Ändern des Administratorkennworts
Ändern der Systemeinstellungen
Ändern der Einstellung für das Anmeldezeitlimit
Aktivieren der Fernverwaltung
Einstellen von Uhrzeit und Zeitzone
Aktivieren/Deaktivieren der NAT-Funktion
EIN Administratorkennwort Festlegen . NAT Netzwerka
Aktivieren/Deaktivieren von UPnP
Verwenden der Webgestützten Erweiterten
Manuelles Konfigurieren der Netzwerkeinstellungen
Manuelles Konfigurieren der Netzwerkeinstellungen
Kapitel
Manuelles Konfigurieren der Netzwerkeinstellungen
Manuelles Konfigurieren der Netzwerkeinstellungen
Internet Explorer 4.0 oder höher
Empfohlene Browser-Einstellungen
Netscape Navigator 4.0 oder höher
Lösung
Fehlerbehebung
Der Installationsassistent findet meinen Router nicht
Fehlerbehebung
Kapitel
Fehlerbehebung
Ich kann keine Funkverbindung zum Internet herstellen
Fehlerbehebung
Verringerung der Übertragungsrate des kabellosen Netzwerks
C3030FAF4BB2C3D44BC3D4E7E4 = 128-Bit-Schlüssel
Fehlerbehebung
Unterstützen die Produkte von Belkin WPA?
Fehlerbehebung
Fehlerbehebung
Fehlerbehebung
Fehlerbehebung
101
Vergleich zwischen verschiedenen WLAN-Standards
FCC-Erklärung
Informationen
Achtung Hochfrequente Strahlungen
Hinweis der Federal Communications Commission
Modifikationen
Informationen
Service
Problembehebung
Garantieleistung
Garantiedauer
Garantiegesetze
Wi-FIInteroperabilitäts-Zertifikat
108
Kostenloser technischer Support
Hand
Inhoud
De router aansluiten en configureren
Inleiding
Gebruik maken van de geavanceerde web-based
Voordelen van een draadloos netwerk
Inleiding
Plaatsing van uw draadloze router of accesspoint
Inleiding
De beste plaats voor uw draadloze G+ Mimo router
Vermijd obstakels en interferentie
Draadloze telefoons
Kies het stilste kanaal voor het draadloze netwerk
Veilige verbindingen, VPN’s en AOL
Inleiding
Productoverzicht
Ingebouwd Dynamic Host Configuration Protocol Dhcp
Geïntegreerde 10/100 4-poorts switch
Universal Plug-and-Play UPnP
Ondersteuning voor VPN Pass-Through
Geïntegreerd draadloos G+ Mimo accesspoint
Productoverzicht
MAC-adressenfilter
Kennismaken met uw router
Systeemvereisten voor Easy Install Wizard software
Inhoud van de verpakking
Systeemvereisten
Kennismaken met uw router
LED voor draadloos netwerk
Status-LED’s voor bedrade Computers
Modem/WAN-status-LED
LED voor Internet/Verbinding gemaakt
LED voor Voeding/Gereed
Voedingsingang Grijs
Achterzijde router
Poorten voor bedrade computers Geel
Modemaansluiting Blauw
Resetknop
De router resetten
De standaard fabriekswaarden herstellen
Modemspecificaties
De router aansluiten en configureren
Stap 1 Start de Easy Install Wizard-software
Openingsscherm
De router aansluiten en configureren
Voortgangsscherm
Instellingen beoordelen
Multi-NIC’s scherm
De router aansluiten en configureren
Gebruikersnaam en wachtwoord vereist
Stap 3 De verbinding controleren
Draadloze setup
Stap 4 Configuratie van de router
Controle van de internetverbinding
Gereed
Stap 1 Uw gateway-router aansluiten
Alternatieve installatiemethode
Hoofdstuk
Alternatieve installatiemethode
Inloggen op de router
Router uitloggen
Internetstatusindicator
Snelnavigatiekoppelingen
Homeknop
Helpknop
Login/Logout-knop
Features Kenmerken
LAN Settings LAN--instellingen
Internetinstellingen
Versie-informatie
Alternatieve installatiemethode
Uw type verbinding instellen
Verbindingstype instellen op Dynamic IP Dynamisch IP
Hostnaam
WAN MAC-adres wijzigen
IP-adres
Verbindingstype instellen op Static IP Statisch IP
Subnetmasker
ISP-gateway-adres
Uw type verbinding is PPPoE als
Uw Internetverbinding instellen op PPPoE
Service Name Servicenaam
Password Wachtwoord
User Name Gebruikersnaam
Disconnect after X… Verbinding verbreken na
Service IP Address Service-IP-adres
Pptp Password PPTP-wachtwoord
My IP Address Mijn IP-adres
My Subnet Mask Mijn subnetmasker
Connection ID Verbindings-ID optioneel
Selecteer uw staat
Aangepaste DNS Domain Name Server instellingen aanbrengen
Alternatieve installatiemethode
Specifieke MAC-adressen invoeren
Uw MAC-adres klonen
De LAN-instellingen bekijken
Subnet Mask Subnetmasker
IP Address IP-adres
Local Domain Name Lokale domeinnaam
Lease Time Leasetijd
De pagina met de DHCP-cliëntenlijst bekijken
De naam van het draadloze netwerk Ssid wijzigen
De instellingen van het draadloze netwerk configureren
802.11g-Only-modus
Wisselen van draadloze modus
802.11g en 802.11b
Uit
Automatische kanaalkeuze en wijziging van het kanaal
Van draadloos kanaal wisselen
Protected Mode-schakelaar
Broadcast SSID-functie gebruiken
WPA/WPA2-PersonalPSK instellen
Systeemvereisten voor WPA2
Hoofdstuk
WPA-PSK instellen
WPA-beveiliging instellen
WEP-encryptie-instellingen bepalen
Page
C3 03 0F AF 0F 4B B2 C3 D4 4B C3 D4 E7 = 128-bits sleutel
Gebruik maken van een hexadecimale sleutel
Gebruik maken van de accesspointmodus
Instellingen voor het beheren van MAC-adressen bepalen
Page
Configuratie van de firewall
Interne forwarding-instellingen configureren
Applicaties kiezen
Instellingen handmatig in de virtuele server invoeren
Cliënt IP-filters instellen
De gedemilitariseerde zone DMZ activeren
Gebruik maken van een dynamisch DNS
De Dynamic DNS Update Client van de router installeren
ICMP-pings blokkeren
Utilities Hulpprogramma’s
Router opnieuw starten
De fabrieksinstellingen herstellen
De huidige configuratie opslaan
Vorige configuratie herstellen
Page
Beschikbaarheid van nieuwe firmwareversies nagaan
De firmware bijwerken
Een nieuwe firmwareversie downloaden
Firmware van de router bijwerken
Page
Systeeminstellingen wijzigen
De inlog-timeoutinstelling wijzigen
Beheer op afstand mogelijk maken
Tijd en tijdzone instellen
Zorg Ervoor DAT U HET Beheerderswachtwoord Hebt
NAT Network Address Translation inschakelen/uitschakelen
Automatische software-update inschakelen/uitschakelen
Gebruik maken van de geavanceerde web-based
UPnP inschakelen/uitschakelen
Handmatig netwerkinstellingen configureren
Netwerkadapters onder Mac OS X handmatig configureren
Handmatig netwerkinstellingen configureren
Hoofdstuk
Handmatig netwerkinstellingen configureren
Handmatig netwerkinstellingen configureren
Internet Explorer 4.0 of hoger
Aanbevolen instellingen van de webbrowser
Netscape Navigator 4.0 of hoger
Problemen oplossen
Probleem
Oplossing
De Easy Install Wizard kan de router niet vinden
Problemen oplossen
Hoofdstuk
Problemen oplossen
Komt de naam van uw draadloze netwerk in dit overzicht voor?
Problemen oplossen
Problemen oplossen
C3030FAF4BB2C3D44BC3D4E7E4 = 128-bits sleutel
Problemen oplossen
Ondersteunen de producten van Belkin WPA?
Problemen oplossen
Problemen oplossen
Problemen oplossen
Problemen oplossen
101
Vergelijkend overzicht van draadloze technologieën
FCC-verklaring
Informatie
Waarschuwing Blootstelling aan radiofrequente straling
Kennisgeving van de Federal Communications Commission FCC
Informatie
Veranderingen
Kennisgeving betreffende de Europese Unie
Beperkte levenslange productgarantie van Belkin Corporation
De garantie en de wet
Verklaring van interoperabiliteit met Wi-Fi
108
Gratis technische ondersteuning
Manu
Índice de contenidos
Conexión y configuración de su router
Introducción
Utilización de la interfaz de usuario avanzado a
Ventajas de una red inalámbrica
Introducción
Colocación de su Router inalámbrico G + Mimo
Introducción
Factores importantes de colocación e instalación
Colocación de su router inalámbrico o punto de acceso
Evitar obstáculos e interferencias
Teléfonos inalámbricos
Seleccionar el canal más tranquilo para su red inalámbrica
Conexiones seguras, VPN y AOL
Introducción
Esquema general del producto
Plug-and-play universal UPnP
Conmutador de 4 puertos 10/100 integrado
Admite paso por VPN
Asistente de instalación sencilla
Esquema general del producto
Punto de acceso inalámbrico G + Mimo integrado
Filtrado de direcciones MAC
Presentación de su router
Contenido del paquete
Requisitos del sistema
Presentación de su router
Indicador LED de estado de WAN/módem
Indicador LED de red inalámbrica
Indicador LED de conexión/Internet
Indicador LED de encendido/listo
Panel posterior
Toma de alimentación Gris
Conexión a módem puerto de módem Azul
Reinicio del router
Botón de reinicio
Conexión y configuración de su router
Requisitos del módem
Ethernet USB Asistente de instalación sencilla
Sección
Pantalla de bienvenida
Conexión y configuración de su router
Pantalla de progreso
Comprobación de los ajustes
Pantalla de múltiples NIC
Conexión y configuración de su router
Se necesita el nombre del usuario y la contraseña
Paso 3 Comprobación de la conexión
Configuración inalámbrica
Paso 4 Configuración del router
Comprobación de la conexión de Internet
Finalización
Paso 1 Conexión de su Router Gateway
Método alternativo de configuración
Sección
Método alternativo de configuración
Acceso al router
Salir del router
Vínculos de navegación rápida
Botón de inicio
Indicador del estado de Internet
Botón de ayuda
Botón de Login/Logout acceder/salir
Características
Ajustes LAN
Ajustes de Internet
Información sobre la versión
Método alternativo de configuración
Configuración de su tipo de conexión
Cambiar la dirección MAC de WAN
Host Name nombre de host
IP Address dirección IP
Subnet Mask máscara de subred
ISP Gateway Address dirección de pasarela de ISP
Su tipo de conexión es PPPoE si
Configuración del tipo de conexión de su ISP como PPPoE
Service Name nombre de servicio
Password contraseña
User name nombre de usuario
Disconnect after X… desconectar después de
Protocolo de túnel punto a punto
Service IP Address dirección IP de servicio
Cuenta Pptp
Contraseña Pptp
My IP Address mi dirección IP
My Subnet Mask mi máscara de subred
Connection ID conexión ID, opcional
Seleccionar su estado
El usuario decide el servidor de acceso manualmente
Método alternativo de configuración
Introducción de una dirección MAC específica
Clonación de su dirección MAC
Visualización de los ajustes LAN
Cómo utilizar la interfaz de usuario avanzado a
Modificación de los ajustes LAN
Dhcp Server sevidor Dhcp
Cómo utilizar la interfaz de usuario avanzado a
IP Pool conjunto IP
Lease Time tiempo límite de concesión
Visualización de la página de la lista de clientes Dhcp
Modificación del Nombre de red inalámbrica Ssid
Configuración de los ajustes de red inalámbrica
Modo 802.11g-Only
Utilización del Conmutador del Modo Inalámbrico
Selección automática de canal y cambio de canal
Modificación del canal inalámbrico
Empleo de la propiedad de Emisión Ssid
Conmutador de modo protegido
Modificación de los ajustes de encriptación inalámbrica
Ajuste WPA/WPA2-Personal PSK
Requisitos para WPA2
Cómo utilizar la interfaz de usuario avanzado a
Establecimiento de la seguridad WPA
Configuración de WPA-PSK
Configuración de la encriptación WEP
Cómo utilizar la interfaz de usuario avanzado a
C3 03 0F AF 0F 4B B2 C3 D4 4B C3 D4 E7 = clave de 128 bits
Cómo utilizar una clave hexadecimal
Utilización del modo de punto de acceso
Configurar una lista de acceso permitido
Configuración del control de direcciones MAC
Configurar una lista de acceso denegado
Configuración del firewall
Configuración de los ajustes de reenvío interno
Selección de una aplicación
Introducción manual de los ajustes en el Servidor Virtual
Configuración de los filtros IP de clientes
Activación de Demilitarized Zone DMZ
Uso de DNS dinámico
Bloqueo de un Icmp Ping
Control parental
Utilidades
Reinicio del router
Restablecimiento de los ajustes de fábrica predeterminados
Guardar una configuración actual
Restablecimiento de una configuración anterior
Cómo utilizar la interfaz de usuario avanzado a
Búsqueda de una nueva versión del Firmware
Actualización del firmware
Descarga de una nueva versión del firmware
Actualización del firmware del router
Cómo utilizar la interfaz de usuario avanzado a
Modificación del tiempo límite de acceso
Modificación de los ajustes del sistema
Activación de la gestión a distancia
Establecimiento de la hora y de la zona horaria
Cómo utilizar la interfaz de usuario avanzado a
Activar/Desactivar la actualización automática del firmware
Activar/Desactivar UPnP
Configuración manual de los ajustes de red en Mac OS hasta
Configuración manual de los ajustes de red
Configuración manual de los adaptadores de red en Mac OS
Configuración manual de los ajustes de red
Sección
Configuración manual de los ajustes de red
Configuración manual de los ajustes de red
Internet Explorer 4.0 o superior
Ajustes recomendados para el navegador de Internet
Netscape Navigator 4.0 o superior
Resolución de problemas
Problema
Solución
Resolución de problemas
Resolución de problemas
Sección
Resolución de problemas
¿Aparece en los resultados el nombre de su red inalámbrica?
Resolución de problemas
Resolución de problemas
C3030FAF4BB2C3D44BC3D4E7E4 = clave de 128 bits
Resolución de problemas
¿Soportan los productos Belkin la seguridad WPA?
Resolución de problemas
Resolución de problemas
Resolución de problemas
Resolución de problemas
101
Tabla de comparación inalámbrica
Información
Declaración de la FCC
Advertencia Exposición a las radiaciones de radiofrecuencia
Información
Modificaciones
Canadá Industry Canada IC
El período de cobertura
Cobertura de la presente garantía
¿Qué excluye la presente garantía?
Cómo acceder a nuestros servicios
Lo que la legislación establece con respecto a la garantía
Certificado de interoperabilidad Wi-Fi
108
Asistencia técnica gratuita
Manu d’uso
Indice
Introduzione
Impostazioni del browser web consigliate
Introduzione
Vantaggi di una rete wireless
Collocazione del Router G+ Mimo Wireless
Collocazione del router o dell’access point wireless
Introduzione
Telefoni cordless
Evitare ostacoli e interferenze
Connessioni protette, VPN e AOL
Introduzione
Descrizione generale del prodotto
Switch a 4 porte 10/100 incorporato
Programma di installazione guidata
Supporto del servizio VPN Pass-Through
Access Point G+ Mimo Wireless incorporato
Descrizione generale del prodotto
Il filtro indirizzi MAC
Conoscere il Router
Contenuto della confezione
Requisiti del sistema
Conoscere il Router
LED di stato WAN/Modem
LED rete wireless
LED Internet/Connesso
LED alimentazione/pronto
Jack di alimentazione Grigio
Pannello posteriore
Connessioni ai computer porte di computer cablati Giallo
Connessione al Modem porta del modem BLU
Pulsante di reset
Reset del router
Ripristino delle impostazioni predefinite
Collegamento e configurazione del Router
Ethernet USB Programma di installazione guidata
Requisiti previsti per il modem
Per utenti Windows Inserire il CD-ROM
Fase Lanciare il programma di installazione guidata
Schermata di benvenuto
Collegamento e configurazione del Router
Progress Screen Finestra di avanzamento
Verifica delle impostazioni
Schermata Multi-NIC
Fase
Modem e al computer
Collegamento e configurazione del Router
Fase 3 Verifica della connessione
Nome utente e Password obbligatori
Configurazione wireless
Fase 4 Configurazione del router
Verifica Internet
Completato
Fase 1 Collegamento del Router Gateway
Metodo alternativo di installazione
Sezione
Metodo alternativo di installazione
Connessione al router
Disconnessione del router
Indicatore di stato Internet
Link di navigazione rapida
Pulsante Home
Pulsante Help
Pulsante Login/Logout
Caratteristiche
Impostazioni LAN
Impostazioni Internet
Informazioni sulle versioni
Metodo alternativo di installazione
Impostazione del proprio tipo di connessione
Predefinizione del tipo di connessione ISP come IP dinamico
Nome host
Modifica dell’indirizzo WAN MAC
Indirizzo IP
Predefinizione del tipo di connessione ISP come IP statico
Maschera di sottorete
Indirizzo Gateway dell’ISP
Il proprio tipo di connessione è PPPoE se
Impostare il tipo di connessione su PPPoE
Disconnettere dopo X…
Nome utente
Password Pptp
Account Pptp
Indirizzo IP di servizio
Il mio indirizzo IP
La mia maschera di sottorete
ID di connessione opzionale
Selezionare il proprio paese
Selezione manuale del server di login
Metodo alternativo di installazione
Digitazione di un indirizzo MAC specifico
Clonazione dell’indirizzo MAC
Visualizzazione delle impostazioni LAN
Utilizzo dell’interfaccia utente avanzata basata sul web
Modifica delle impostazioni LAN
Utilizzo dell’interfaccia utente avanzata basata sul web
Server Dhcp
Pool IP
Visualizzazione della pagina di elenco dei client Dhcp
Modifica del nome della rete wireless Ssid
Configurazione delle impostazioni della rete wireless
Modalità solo 802.11g
Utilizzo della modalità switch wireless
Selezione automatica e cambio del canale
Modifica del canale wireless
Commutazione in modalità protetta
Utilizzo della funzione Ssid broadcast
Impostazione della protezione WPA-Personal PSK
Requisiti WPA2
Utilizzo dell’interfaccia utente avanzata basata sul web
Impostazione della protezione WPA-PSK
Impostazione della protezione WPA
Impostazione della crittografia WEP
Utilizzo dell’interfaccia utente avanzata basata sul web
C3 03 0F AF 0F 4B B2 C3 D4 4B C3 D4 E7 = chiave a 128-bi
Utilizzo di una chiave esadecimale
Utilizzo della modalità Access Point
Impostazione del controllo degli indirizzi MAC
Utilizzo dell’interfaccia utente avanzata basata sul web
Configurazione della protezione firewall
Configurazione delle impostazioni di inoltro interno
Scelta di un’applicazione
Immissione manuale delle impostazioni nel server virtuale
Impostazione dei filtri relativi all’IP del client
Attivazione dell’impostazione DMZ Demilitarized Zone
Utilizzo del DNS dinamico
Arresto di un Ping Icmp
Parental Control filtro famiglia
Utility
Riavvio del router per ripristinare il normale funzionamento
Riavvio del Router
Ripristino delle impostazioni predefinite
Salvataggio di una configurazione corrente
Ripristino di una configurazione precedente
Utilizzo dell’interfaccia utente avanzata basata sul web
Controllo di una nuova versione del firmware
Aggiornamento del Firmware
Download di una nuova versione del firmware
Aggiornamento del firmware del router
Utilizzo dell’interfaccia utente avanzata basata sul web
Modifica della durata di connessione
Impostazione o modifica della password amministratore
Attivazione della gestione a distanza
Impostazione dell’ora e del fuso orario
Utilizzo dell’interfaccia utente avanzata basata sul web
Abilitazione / disabilitazione del servizio UPnP
Utilizzo dell’interfaccia utente avanzata basata sul
Configurazione manuale delle impostazioni di rete
Configurazione manuale delle impostazioni di rete
Sezione
Configurazione manuale delle impostazioni di rete
Configurazione manuale delle impostazioni di rete
Internet Explorer versione 4.0 o superiore
Impostazioni del browser web consigliate
Netscape Navigator versione 4.0 o successive
Soluzione
Risoluzioni dei problemi
Il programma di installazione guidata non trova il Router
Risoluzioni dei problemi
Sezione
Risoluzioni dei problemi
Il nome della rete wireless appare nei risultati?
Risoluzioni dei problemi
Risoluzioni dei problemi
C3030FAF4BB2C3D44BC3D4E7E4 = codice a 128 bit
Risoluzioni dei problemi
Prodotti Belkin supportano la modalità WPA?
Risoluzioni dei problemi
Risoluzioni dei problemi
Risoluzioni dei problemi
Risoluzioni dei problemi
Qual è la differenza tra 802.11b, 802.11g, G+ Mimo e Pre-N?
Tabella di confronto wireless
Informazioni
Dichiarazione FCC
Attenzione esposizione alle radiazioni di radiofrequenza
Informazioni
Modifiche
Europa Comunicato dell’Unione Europea
Prodotto garantito a vita da Belkin Corporation Limited
Cosa stabilisce la legge riguardo alla garanzia
Certificato di interoperabilità Wi-FI
108
Router G+ Mimo Wireless