Bitronics AutoSwitch Kit User Manual
F1U126-KIT
Bitronics AutoSwitch Set Benutzerhandbuch Handleiding Bitronics
AutoSwitch Kit Manuale utente Kit AutoSwitch Bitronics
P73121/F1U126-KIT/EU/man.qxd 4/28/00 106 PM Page
English Français Deutsche Nederlands Italiano
Table of Contents
P73121/F1U126-KIT/EU/man.qxd 4/28/00 106 PM Page
En Fr De Ne It
P73121/F1U126-KIT/EU/man.qxd 4/28/00 106 PM Page
Introduction
Features
Other Parts Needed if necessary
Package Contents
Technical Specifications
ON DIP 1 2 3
Product Detail
10 seconds
Hardware Installation
Setting up your Parallel Port - ECP/EPP Mode
Usage - 4 PCs to 1 device mode
Software Installation
A. Windows 95/98 and Windows NT
File Transfer Function
Windows 95 / 98 and NT
Setting up the Bitronics Software for use with 1 PC to 4 Devices
Windows 95 / 98 and NT continued
Click on “Settings” button, configure the ports as shown
Windows 95 / 98 and NT continued
Click “OK” when finished
Windows 95 / 98 and NT continued
Change printer port from LPT1 to AutoSwitch port
Windows 95 / 98 and NT continued
Click on the “Details” tab. In the pull-down menu “Print to the following port”, select the correct port this printer is connected to on the Bitronics switch
Skip to page
Windows 95 / 98 and NT continued
Change printer port from LPT1 to AutoSwitch port Windows NT only
Windows NT
Click “OK” when finished
Windows NT continued
P73121/F1U126-KIT/EU/man.qxd 4/28/00 106 PM Page
How does it work?
Using the Bitronics Software
Using the Bitronics Software continued
EXAMPLE Sharing One Printer and a Zip Drive or any other mass storage device
Using the Bitronics Software continued
2. Click on the port that has the mass storage device connected. In this case, it is a Zip Drive on Port A. As you can see, the “Display Name” entered above appears below as you had entered it. Click “OK”
Using the Bitronics Software continued
If no printers are installed
Using the Bitronics Software continued
Removing and Adding the Bitronics Switch Icon from the System Tray
Using the Bitronics Software continued
ADVANCED USER TIP
Appendix
Changing your PC’s parallel port mode to ECP
Hewlett-Packard
Appendix continued
IBM Aptiva
Micron
Appendix continued
Packard Bell
Sony
Appendix continued
P73121/F1U126-KIT/EU/man.qxd 4/28/00 106 PM Page
Appendix continued
Belkin Components One Year Product Warranty
Information
FCC Statement
CE Declaration of Conformity
Autres pièces nécessaires le cas échéant
Caractéristiques
Introduction
Contenu de l’emballage
de 0 à 95%, pas de condensation
Spécifications techniques
10 secondes
Détails relatifs au produit
Installation du matériel
Installation de votre port parallèle-Mode ECP/EPP
Utilisation 4 PC - 1 périphérique
Installation du logiciel
A. Windows 95/98/NT
Fonction de transfert de fichiers
B. Windows Cliquez sur « File Transfer ». C. MS-DOS
Windows 95 / 98 and NT
Windows 95 / 98 and NT suite
Cliquez sur le bouton « Settings » et configurez le port comme indiqué ci-dessous
Dans cet exemple, comme nous avons un lecteur Zip sur le port A, nous
Windows 95 / 98 and NT suite
LPx1 - PA autoswitch - Sélectionnez cette option si l’imprimante
Passez à la page
Windows 95 / 98 and NT suite
Windows NT
Windows NT suite
Comment cela fonctionne t-il ?
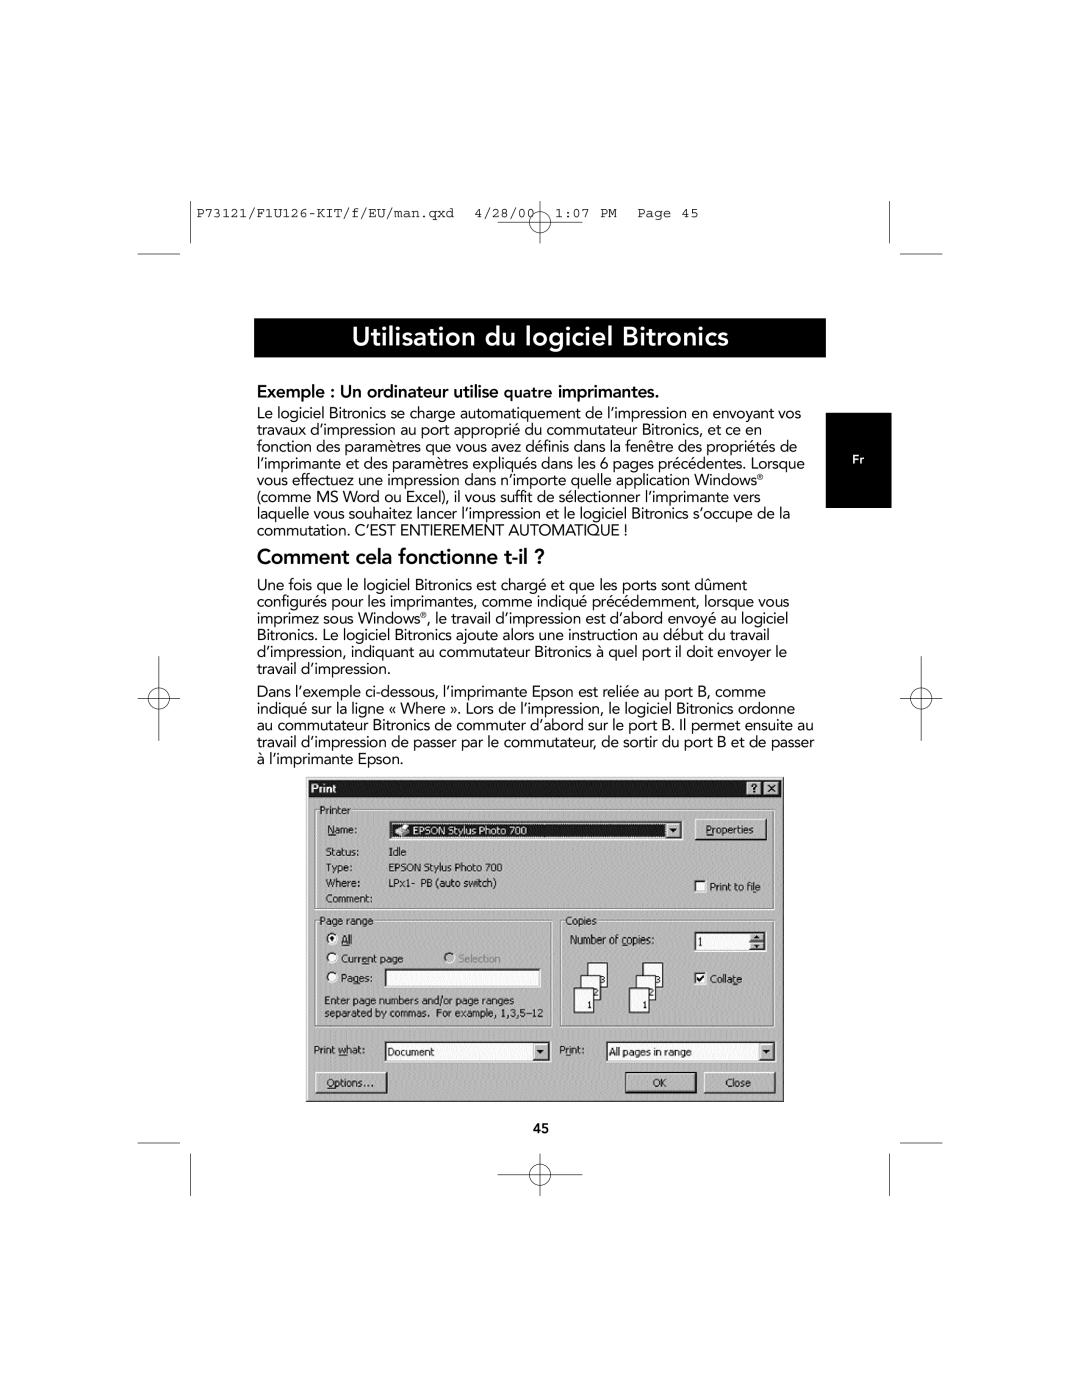
Utilisation du logiciel Bitronics
Utilisation du logiciel Bitronics suite
EXEMPLE Partage d’une imprimante et d’un lecteur Zip ou de tout autre unité de stockage à grande capacité
Utilisation du logiciel Bitronics suite
2. Cliquez sur le port auquel est raccordé le « Mass Storage Device ». Dans ce cas, il s’agit d’un lecteur Zip sur le port A. Comme vous pouvez le constater, le « Display Name » indiqué plus haut apparaît au dessous tel que vous l’aviez saisi. Cliquez sur « OK »
Utilisation du logiciel Bitronics suite
Si aucune imprimante n’est installée
ASTUCE POUR USAGER EXPERIMENTE
Utilisation du logiciel Bitronics suite
Annexe
Passer du mode port parallèle au mode ECP
Gateway
Appendix continued
Hewlett-Packard
Les instructions correspondant à cet ordinateur ne figurent pas
Appendix continued
Micron
Appendix continued
Packard Bell
Sony
Appendix continued
Models PCV-130/150
Models PCV-200/210/220/230/240
Appendix continued
Sony PCG-705/707/717/719 Notebooks
Sony PCG-729
P73121/F1U126-KIT/f/EU/man.qxd 4/28/00 107 PM Page
Appendix continued
Réglementation FCC
Information
Déclaration de conformité CE
Garantie produit limitée à vie de Belkin Components
Leistungsmerkmale
Einleitung
Weitere Komponenten bei Bedarf
Packungsinhalt
0 bis 95%, nicht-kondensierend
Technische Daten
10 Sekunden
Produktansicht
ON DIP 1 2 3
PC wählt zwischen 2 Geräten
Hardware-Installation
Konfigurieren der Parallelschnittstelle ECP/EPP-Modus
Anwendung- 4 PCs teilen sich ein Gerät
Software-Installation
File Transfer-Funktion
Windows 95/98/NT
Konfigurieren der Bitronics Software für den 14 Modus
Windows 95/98/NT Fortsetzung
Klicken Sie auf die Schaltfläche „SETTINGS Einstellungen, und konfigurieren Sie die Ports wie nachstehend gezeigt
Klicken Sie auf OK, wenn Sie fertig sind
Windows 95/98/NT Fortsetzung
Druckeranschluß von LPT1 in AutoSwitch Port ändern
Klicken Sie auf die Registerkarte DETAILS. Wählen Sie im Pulldown-Menü „Anschluß für die Druckerausgabe den Anschluß, mit dem dieser Drucker am Bitronics-Datenumschalter verbunden ist
Windows 95/98/NT Fortsetzung
Weiter mit Seite
Windows 95/98/NT Fortsetzung
Windows NT
Druckeranschluß von LPT1 in AutoSwitch Port ändern nur Windows NT
Klicken Sie auf OK, wenn Sie fertig sind
Windows NT Fortsetzung
P73121/F1U126-KIT/g/EU/man.qxd 4/28/00 108 PM Page
Funktionsweise
Verwendung der Bitronics Software
Verwendung der Bitronics Software Fortsetzung
BEISPIEL Gemeinsame Nutzung eines Druckers und eines Zip- Laufwerks oder anderen Massenspeichergeräts
Verwendung der Bitronics Software Fortsetzung
2. Klicken Sie auf den Port, an dem das Massenspeichergerät angeschlossen ist. In diesem Fall befindet sich ein Zip-Laufwerk an Port A. Wie Sie sehen, erscheint als Name die oben als „Display Name eingegebene Bezeichnung. Klicken Sie auf OK
Verwendung der Bitronics Software Fortsetzung
Betrieb ohne Verwendung von Druckern
Verwendung der Bitronics Software Fortsetzung
Tip für Profis
Verwendung der Bitronics Software Fortsetzung
Einstellung des ECP-Modus auf der PC Parallelschnittstelle
Anhang
Dell
Anhang Fortsetzung
Gateway
Hewlett-Packard
IBM Aptiva
Anhang Fortsetzung
Micron
Anhang Fortsetzung
Packard Bell
Sony
Anhang Fortsetzung
Modelle PCV-130/150
PCV-200/210/220/230/240
Sony PCG-705/707/717/719 Notebooks
Anhang Fortsetzung
Sony PCG-729
P73121/F1U126-KIT/g/EU/man.qxd 4/28/00 108 PM Page
Informationen
Belkin Components
Belkin Components B.V
Voordelen
Inleiding
Extra onderdelen optioneel
Inhoud verpakking
Technische specificaties
10 seconden
Producteigenschappen
ON DIP 1 2 3
Apparatuur installeren
Instellen van uw parallelle poort positie ECP/EPP
Toepassing - positie ‘4 PC’s op 1 apparaat’
Software installeren
Functie Gegevensoverdracht
Windows 95/98/NT vervolg
Installeren van Bitronics Software voor één PC op vier apparaten
Windows 95/98/NT vervolg
Klik op de knop ‘SETTINGS’ Instellingen en stel de poorten in zoals onderstaand
Klik op OK als u klaar bent
Windows 95/98/NT vervolg
Klik op ‘START’, ‘SETTINGS’ instellingen, ‘PRINTERS’
Printerpoort wijzigen van LPT1 naar AutoSwitch poort
Windows 95/98/NT vervolg
Alleen Windows 95/98 ga voor Windows NT door naar pagina
Windows 95/98/NT vervolg
Klik op het tabblad ‘DETAILS’. Selecteer in het afrolmenu ‘Print to the following port’ de juiste poort waarop deze printer op de Bitronics switch is aangesloten
Ga door naar pagina
Windows 95/98/NT vervolg
Windows NT
Klik op OK als u klaar bent
Windows NT vervolg
P73121/F1U126-KIT/n/EU/man.qxd 4/28/00 110 PM Page
Hoe gaat dit in zijn werk?
Gebruik van de Bitronics software
Gebruik van de Bitronics software vervolg
de onderstaande afbeelding is te zien dat de Zip Drive
Gebruik van de Bitronics software vervolg
Klik op OK
Gebruik van de Bitronics software vervolg
Geen printers geïnstalleerd?
Gebruik van de Bitronics software vervolg
TIP VOOR ERVAREN GEBRUIKERS
Gebruik van de Bitronics software vervolg
Wijziging van de parallelle poortmodus van uw PC in ECP
Bijlage
setup-programma
Gateway
Bijlage vervolg
Hewlett-Packard
IBM Aptiva
Bijlage vervolg
Micron
Packard Bell
Bijlage vervolg
Sony
7. Kies ‘ECP’ en druk op ‘ENTER
Bijlage vervolg
Sony PCG-729
Bijlage vervolg
P73121/F1U126-KIT/n/EU/man.qxd 4/28/00 110 PM Page
Informatie
Belkin Components
Belkin Components B.V
Caratteristiche
Introduzione
Altri pezzi richiesti se necessari
Il pacchetto contiene
P73121/F1U126-KIT/i/EU/man.qxd 4/28/00 111 PM Page
ON DIP
Dettagli sul prodotto
1 2 3
ACCESO
Installazione hardware
Impostazione della Porta Parallela - Modalità ECP / EPP
Impiego - Modalità 4 PC a 1 dispositivo
Installazione Software
A. Windows 95/98 e Windows NT
Funzione di trasferimento file
Windows 95 / 98 e NT
Windows 95 / 98 e NT continua
Cliccare sul pulsante SETTINGS e configurare le porte come indicato
Infine cliccate su OK
Windows 95 / 98 e NT continua
Per cambiare la porta della stampante da LPT1 a AutoSwitch
Windows 95 / 98 e NT continua
Cliccare sulla linguetta “DETTAGLI”. Nel menu a tendina compare Print to the following port selezionare la porta corretta alla quale la stampante è collegata sullo switch Bitronics
Passare a pagina
Windows 95 / 98 e NT continua
Windows NT
Infine cliccare su OK
Windows NT continua
P73121/F1U126-KIT/i/EU/man.qxd 4/28/00 111 PM Page
Come funziona?
Per utilizzare il Software Bitronics
Per utilizzare il Software Bitronics continua
ESEMPIO Condivisione di una Stampante e di un drive Zip o di una qualsiasi altra memoria di massa
Per utilizzare il Software Bitronics continua
2. Cliccare sulla porta che ha la MEMORIA DI MASSA collegata. In questo caso si tratta di un drive Zip‚ sulla Porta A. Come potete vedere, il Display Name digitato appare in basso una volta inserito. Cliccare su OK
Per utilizzare il Software Bitronics continua
Se non è stata installata nessuna stampante
SUGGERIMENTO PER GLI UTENTI PIÙ ESPERTI
Per utilizzare il Software Bitronics continua
Modifica della modalità da porta parallela del PC in ECP
Appendice
Gateway
Appendice continua
Hewlett-Packard
IBM Aptiva
Appendice continua
Micron
Packard Bell
Sony
Appendice continua
Modelli PCV-130/150
Appendice continua
Dichiarazione FCC
Informazioni
Dichiarazione di Conformità CE
Garanzia di un anno Belkin Components