Manuals
/
BenQ
/
Computer Equipment
/
Projector
BenQ
MW767 Settings page, i. You can adjust order settings, ii. You can adjust Slideshow settings
Models:
MX822ST
MW767
MX766
1
67
107
107
Download
107 pages
44.41 Kb
64
65
66
67
68
69
70
71
<
>
Troubleshooting
Specs
Install
Timing chart
Warranty
Dimension
Maintenance
Connecting a computer
SYSTEM SETUP Advanced
Thermal Sensor 1 open error
Page 67
Image 67
Settings page:
i
ii
iii
iv
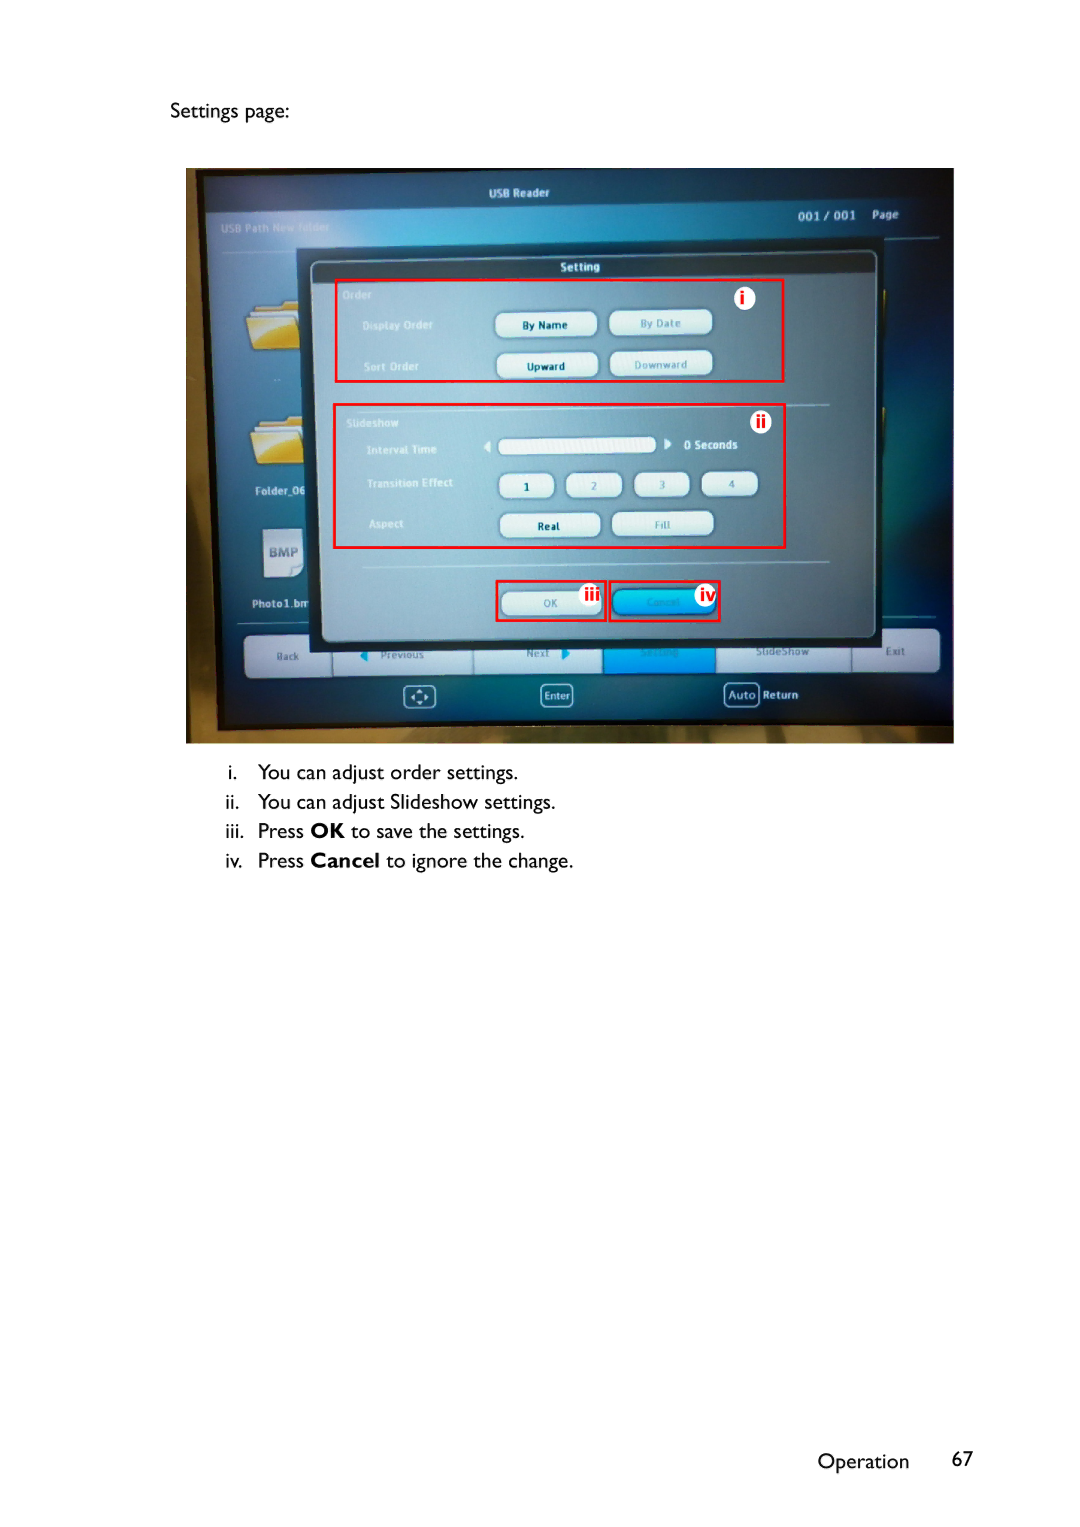
i. You can adjust order settings.
ii.
You can adjust Slideshow settings.
iii.
Press
OK
to save the settings.
iv.
Press
Cancel
to ignore the change.
Operation 67
Page 66
Page 68
Page 67
Image 67
Page 66
Page 68
Contents
User Manual
MX766/MW767/MX822ST Digital Projector
Positioning your
Important safety
Warranty and Copyright
Specifications
1. Please read this manual before
Important safety instructions
remove the lens cap when the
3. Refer servicing to qualified service personnel
Safety Instructions Continued
Locations near fire alarms
6 Important safety instructions
Introduction
Projector features
Standard accessories
Shipping contents
Document camera
Optional accessories
Front/upper side
Projector exterior view
See Projector on page 12 for details
Rear/lower side
16. RGB PC/Component video YPbPr/ YCbCr signal input jack
I Power/POWER indicator light
Controls and functions
Projector
3. Volume /Arrow keys / Left, / Right
Mounting the projector
1. ON
Remote control
6. Volume /Arrow keys / Left Right
12. NETWORK SETTING
17. NETWORK
Operating the laser pointer
15. VIDEO
16. HDMI
Replacing the remote control battery
1. Front Table
Positioning your projector
Choosing a location
Set Rear Ceiling in the SYSTEM SETUP Basic
Obtaining a preferred projected image size
Vertical offset
Projection dimensions
Screen size
Distance from screen m
Screen size
Vertical offset
Diagonal
Connection
Operation System
Operation System
Minimum Hardware Requirements
Requirements
To connect the projector to a notebook or desktop computer using USB
Connecting a computer or monitor
Connecting a computer
To connect the projector to a notebook or desktop computer using VGA
To connect the projector to a monitor
Connecting a monitor
Connecting an HDMI source device
Connecting Video source devices
To connect the projector to an HDMI source device
To connect the projector to a Component Video source device
Connecting a Component Video source device
to YUV. See Changing Color Space on page 36 for details
To connect the projector to an S-Video/Video source device
Connecting an S-Video/composite source device
document camera will display on the screen
Connecting with document camera
1. To connect the projector to a document camera via VGA
2. To connect the projector to a document camera via USB
Starting up the projector
Operation
Adjusting the projection angle
Adjusting the projected image
Auto-adjusting the image
MX766/MW767 MW822ST
Using build-in test pattern
Fine-tuning the image size and clarity
MX766/MW767
MODE/ENTER . The Keystone correction
Correcting keystone
Language and press Enter to
Using the menus
If you forget the password
Using a security cable lock
Utilizing the password function
Setting a password
Changing the password
Entering the password recall procedure
2. Press MODE/ENTER. The message INPUT CURRENT PASSWORD displays
Disabling the password function
Switching input signal
Changing Color Space
This function is only available when the HDMI input port is in use
Magnifying and searching for details
About the aspect ratio
Selecting the aspect ratio
Selecting a picture mode
Optimizing the image
Adjusting Brightness
Using Wall Color
Fine-tuning the image quality in user modes
Setting the User 1/User 2 mode
Setting a preferred color temperature
Adjusting Tint
Adjusting Sharpness
Adjusting Brilliant Color
2. Press MODE/ENTER and the 3D Color Management page displays
To cancel the timer, perform the following steps
Setting the presentation timer
MODE/ENTER
Hiding the image
Remote paging operations
Freezing the image
Muting the sound
Adjusting the sound
Adjusting the sound level
Operating in a high altitude environment
Menu position in the SYSTEM SETUP Basic Menu Settings menu sets the
Turning off the Power on/off ring tone
Adjusting the microphone’s sound level
Personalizing the projector menu display
Lamp Mode
Select the lamp saver mode
Description
Use Teaching Template
If you are in a DHCP environment
Configuring the Wired LAN Settings
Configuring the Wireless LAN Settings
Controlling the projector through a LAN environment
Controlling the projector remotely through a web browser
through Q Presenter on page 59 for details
52 Operation
Operation
ii. To switch input source, click on your desired signal
Page
56 Operation
The Wireless LAN page allows you to adjust the Wirless LAN settings
The Wired LAN page allows you to adjust the Wired LAN settings
Operation
58 Operation
Displaying image through Q Presenter
iv. You can click to disconnect all connected projectors
Page
ix. Once set, press Apply to save the changes
Using the Projection Login Code
Using the Web Control Lock
Preparation
Using the broadcassting function
Presenting From a USB Reader
Image File Types
Press
Controlling USB Reader
Press
iii. Press OK to save the settings
Settings page
i. You can adjust order settings
ii. You can adjust Slideshow settings
Remote Desktop Control through Q Presenter
Remote Desktop Control does not support PC Standby mode
ENTER
Shutting down the projector
PointDraw Pen
Menu system
Menu operation
72 Operation
Disable/3 mins/10 mins/15 mins/20
Disable/5 mins/10 mins/15 mins/20
Disable/30 mins/1 hr/2 hrs/3 hrs/4
Operation
5. SYSTEM SETUP Advanced
74 Operation
Adjusts the clock phase to reduce image
Description of each menu
1. DISPLAY menu
not white. See Using Wall Color on page 40 for details
teaching.See Use Teaching Template on page 48 for details
1. DISPLAY menu
3D Mode
3D Sync Invert
video image. See Adjusting Color on page 40 for details
2. PICTURE menu
SeeAdjusting Contrast on page 40 for details
Adjusts the color saturation level -- the amount of each color in a
See Switching input signal on page 36 for details
2. PICTURE menu 3. SOURCE menu
See Adjusting Brilliant Color on page 41 for details
all the Picture Mode settings to default values
one or more mirrors. See Choosing a location on page 17 for
4. SYSTEM SETUP Basic menu
Using the menus on page 33 for details
Sound Reminder
Auto Power Off
4. SYSTEM SETUP Basic menu
Direct Power On
Signal Power On
See PointDraw Pen on page 70 for details
4. SYSTEM SETUP Basic menu
start-up. Four options are available BenQ logo, MyScreen, Black, or
5. SYSTEM SETUP Advanced menu
test pattern on page 31 for details
5. SYSTEM SETUP Advanced menu
Closed Caption Enable
Caption Version
Audio Pass Through
5. SYSTEM SETUP Advanced menu
See Using the Projection Login Code on page 63 for details
See Using the broadcassting function on page 64 for details
Selecting On the projector can be detected by AMX controller
5. SYSTEM SETUP Advanced menu 6. INFORMATION menu
Returns all settings to the factory preset values
AMX Device Discovery
Care of the projector
Maintenance
Cleaning the lens
Cleaning the projector case
Getting to know the lamp hour
Setting Lamp Mode eco function as Economic or SmartEco mode
Setting Auto Power Off
Lamp information
88 Maintenance
Status
Timing of replacing the lamp
Message
90 Maintenance
Replacing the lamp
2. Loosen the screw on the lamp cover
Page
8. Ensure the handle is fully laid flat and locked in place
Resetting the lamp timer
92 Maintenance
7. Tighten the screws that secure the lamp
Normal power-down cooling
Indicators
Power events
Powering up
94 Maintenance
Thermal Sensor 2 open error
Thermal Sensor 2 short error
Thermal IC #2 I2C Connection error
The projector does not turn on
Troubleshooting
Remote control does not work
The password is incorrect
Mechanical
Specifications
Optical
Electrical
MX822ST 329 mm W x 137.2 mm H x 246.5 mm D
Dimensions
Specifications
MX766/MW767 329 mm W x 137.2 mm H x 256.2 mm D
127.7
Ceiling mount installation
221.0
146.0
Minimum installation requirements
Wall mount installation
Distance from floor
100 Specifications
Minimum Ceiling Height mm = f + H + b + 60 + 262.2+ c
Screen
Supported timing for PC input
Timing chart
102 Specifications
Supported timing for HDMI input
Supported timing for Video and S-Video inputs
Supported timing for Component-YPbPr input
NTSC
Video timing
Supported 3D signal for HDMI HDCP input
PC timing
PC timing
Supported 3D signal for D-SUB input
106 Specifications
Supported 3D signal for Video and S-Video input
Copyright
Warranty and Copyright information
Limited warranty
Patents