Product Code 885-V31/V33
Page
Introduction
Important Safety Instructions
For repair or adjustment
For Users in the UK, EIRE, Malta and Cyprus only
Contents
Stitch Setting Chart
Setting the Stitch
Useful Functions
Useful Sewing Tips
Troubleshooting
Care and Maintenance
Embroidering Neatly
Attaching the Embroidery Foot
Lighting Start/Stop button
Machine Features
27. *2
Accessories
Bobbin clip
Following are available as optional accessories
Front view
Names of Machine Parts and Their Functions
Right-side/rear view
Needle and presser foot section
Start/stop button
Operation buttons
Memory key
Operation panel
Page
Getting Ready
Turning the Machine On/Off
Power supply precautions
DUnplugjack. the power cord from the power supply
CUnplug the power supply cord from the electrical outlet
Turning on the machine
Turning off the machine
Viewing the LCD
LCD Liquid Crystal Display Operation
LCD Liquid Crystal Display Operation
Changing the machine settings
DWhen settings are complete, press Back key
BPresspanel. Settings key on the display
ATurn on the sewing machine
CPress the item to be set
DPressnext page. Next page key to switch to
Checking machine operating procedures
BPress Sewing machine help key on the display panel
CPress the item to be displayed
Bobbin precautions
Winding/Installing the Bobbin
Winding the bobbin
This model Other model
Winding/Installing the Bobbin
Start/stop button lights up in orange
For embroidering, use the embroidery bobbin thread
Make sure that the thread passes under the pretension disk
Press Start/stop button once
LSlide the sewing speed controller to the right
When the thread became tangled under the bobbin winder seat
Install the bobbin wound with thread
Installing the bobbin
EWind the bobbin again
Actual size
Be careful not to drop the bobbin
Bobbin cover opens
Be sure to insert the bobbin correctly
Cutter cuts the thread
Reattach the bobbin cover
When pulling up the bobbin thread may be necessary
BInsert the bobbin into the bobbin case
CPass the bobbin thread through the slot
Getting Ready
About the spool of thread
Upper Threading
Upper Threading
Information about the spools of thread is described below
Threading the upper thread
ATurn on the machine BRaise the presser foot lever
Presser foot is raised
Passshownthebelow.thread through the guides in the order
Thread take-up lever
Upper threading is finished
Such a case, start from m again
BThreadeye. the upper thread for the left needle
Using the twin needle
HTurnstitch.on the sewing machine and select a
Pass the thread through the eye of the needle from the front
JPress
IPress
KPress Back key
LStart sewing
Needle precautions
Replacing the Needle
Replacing the Needle
Ball point needle gold colored
Checking the needle
Transparent nylon thread
Embroidery needles
Replacing the needle
BTurn off the sewing machine
DLower the presser foot lever
Install the twin needle in the same way
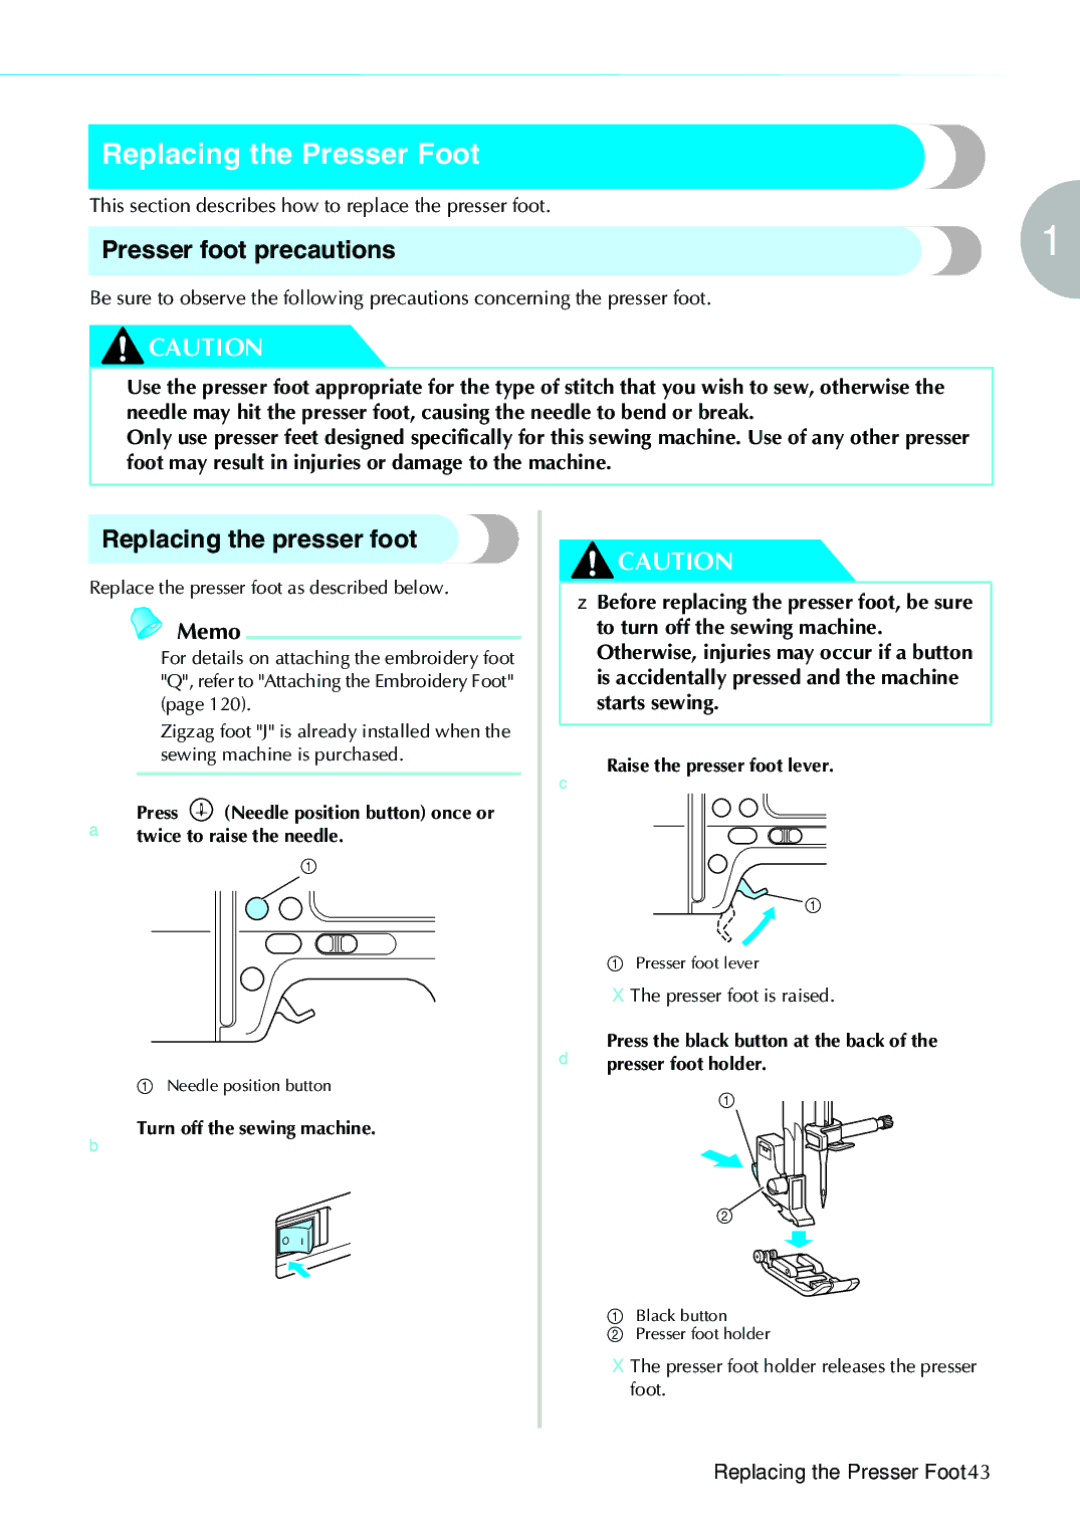
Replacing the Presser Foot
Presser foot precautions
Replacing the presser foot
Replacing the Presser Foot
Presser foot is attached
Removing and attaching the presser foot holder
For details, refer to Replacing the presser foot
Presser foot is removed from the presser bar
Free-arm sewing
Sewing Cylindrical Pieces
Free-arm sewing makes sewing cylindrical pieces easy
ARemove the flat bed attachment
Sewing Basics
Sewing
General sewing procedure
Sewing
Selecting stitching
BAttach the presser foot
CTurn on the sewing machine
Positioning the fabric
CPlace the fabric under the presser foot
Fabric is now positioned to be sewn
Starting to sew
Using the operation button
BPress Start/stop button once
DCut the threads
Sewing can be started and stopped using the foot controller
Using the foot controller
ATurn off the sewing machine
GCut the threads
For details, refer to Starting to sew
Securing the stitching
Machine stops sewing
Machine starts sewing in the normal sewing direction
Release Start/stop button or foot controller
Cutting the thread
Sewing stitches
BRaisefabric.the presser foot lever, then remove
Using the thread cutter
Adjusting the stitch width
Setting the Stitch
Setting the Stitch
Means the setting cannot be adjusted
DPress on for stitch width control setting
Adjusting stitch width using the sewing speed controller
AConnect the foot controller
BAttach zigzag foot J
Adjusting the thread tension
Adjusting the stitch length
Correct thread tension
Upper thread is too tight
Upper thread is too loose
Useful Functions
Useful Functions
ATurn on the machine
BSelect a stitch
BPress the stitch selection
Automatically cutting the thread
CPress on the screen
To turn programmed thread cutting off, press
Mirroring stitches
Without programmed thread cutting
Press on the screen
Default stitch length is 2.5 mm
Saving stitch settings
CSet the stitch length to 2.0 mm DPress
Changed again and is pressed, or if
Trial sewing
Useful Sewing Tips
Changing the sewing direction
Sewing curves
Sewing thin fabrics
Sewing hook-and-loop fastener
Sewing an even seam allowance
Sewing stretch fabrics
Aligning the fabric with a needle plate marking
Aligning the fabric with the presser foot
Sewing Basics
Utility Stitches
Utility stitches
Stitch Setting Chart
Stitch Setting Chart
Stitch Name
Side cutter is optional
Preventing fraying in medium Weight and thin fabrics 5.0
Sewing overcasting stitches using overcasting foot G
Overcasting Stitches
4.0
Overcasting Stitches
Sewing overcasting stitches using zigzag foot J
Side cutter is attached
Sewing overcasting stitches using the optional side cutter
HPosition the fabric in the side cutter
ILowersewing.the presser foot lever, and then start
Seam allowance is cut while the stitching is sewn
Basic Stitching
Basting
Basic stitching
For details, refer to Adjusting the stitch width
FWhen sewing is finished, cut the thread
Basic Stitching
Changing the needle position
Blind Hem Stitching
Sew a blind hem according to the following procedure
Blind hem stitching on
AReverse the skirt or pants
DFold back the fabric inside along the basting
Blind Hem Stitching
FAttach blind hem foot R
GSelect a stitch
Needle is too far to the left
If the needle catches too much of the hem fold
If the needle does not catch the hem fold
Needle is too far to the right
Buttonhole Stitching
Buttonhole Stitching
Buttonhole sewing
Size of the buttonhole is set
CAttach buttonhole foot a
DSelect a stitch
FPullpossible.down the buttonhole lever as far as
Adjust the stitch width
Adjust the stitch length
Changing the density of the stitching
Changing the stitch width
Feed dogs are lowered
Button sewing
CAttach button-fitting foot M
DSelect stitch
Drop feed lever is normally set to the right side
Do not press Thread cutter button
Inserting a centered zipper
Zipper Insertion
JRemove the basting stitching
Zipper Insertion
Wrong side of fabric Mm 1/8 inch
Inserting a side zipper
Zipper Insertion
NTopstitch around the zipper
Stretch stitching
Sewing Stretch Fabrics and Elastic Tape
Sewing Stretch Fabrics and Elastic Tape
BSelect stitch 4 or
Elastic attaching
Appliqué, Patchwork and Quilt Stitching
Appliqué, Patchwork and Quilt Stitching
DAttach zigzag foot J ESelect a stitch
Appliqué stitching
Piecing
Patchwork crazy quilt stitching
Select stitch 21 or
Piecing straight stitch shows a P on the LCD
Quilting
ABaste the fabric to be quilted
Walking foot is attached
† Walking foot † Presser foot holder
Using the optional quilting guide
Refer to Removing and attaching the presser foot holder
Free-motion quilting
Make sure that the quilting foot is not slanted
Turn on the sewing machine, and then select a stitch 3 or
Triple stretch stitching
Reinforcement Stitching
Bar tack stitching
Reinforcement Stitching
EPullpossible.down the buttonhole lever as far as
BAttach buttonhole foot a
Memo
Select stitch 58 or
Darning
EPullpossible.down the buttonhole lever as far as
Eyelet Stitching
CAdjust either the stitch width or the stitch
6.0 or Eyelet stitch
Belts 15/64
Decorative Stitching
Decorative Stitching
CAttach zigzag foot J
Fagoting
DSelect stitch 32 or
ESet the stitch width to 7.0 mm 1/4 inch
GAfter sewing is finished, remove the paper
Scallop stitching
DTrim along the stitches
Be careful not to cut the stitches
CSewinchparallel. stitching at intervals of 1 cm 3/8
Smocking
DPull the bobbin threads to create gathers
Smooth the gathers by ironing them
Shell tuck stitching
AFold the fabric along the bias BAttach zigzag foot J
CSelect stitch 20 , and then increase the thread tension
Joining
AInstall the wing needle
Heirloom stitching
CSelect stitch
DStart sewing
EPress on the LCD
Pattern displayed at the top of the screen is mirrored
DSew along the center of the unfrayed section
Embroidery
What to prepare
Embroidering Neatly
Fabric
Embroidery thread option
Embroidering Neatly
Embroidery step by step
This section describes how to attach the embroidery foot Q
Attaching the Embroidery Foot
Attaching the embroidery foot
Turn the screwdriver toward the back
Attaching the Embroidery Foot
FHold the embroidery foot Q with your right hand, as shown
Set the embroidery foot perpendicular
EAttach the presser foot holder
Removing the embroidery foot
Attaching the Embroidery Unit
Embroidery unit precautions
Attaching the embroidery unit
Attaching the Embroidery Unit
DTurn on the sewing machine
ARemove the embroidery frame
Removing the embroidery unit
BPress , and then press
CTurn off the sewing machine
† When it cannot be ironed or placed in the hoop
Preparing the Fabric
Attaching a stabilizer material to the fabric
Preparing the Fabric
Setting the fabric in the embroidery frame
Embroidery frame medium
Embroidery frame small option
Medium Option Embroidery sheet large option
Embroidery sheet
For details, refer to
BPlace the embroidery sheet on the inner frame
For details, refer to Winding/Installing the Bobbin
This section describes how to attach the embroidery frame
Attaching the Embroidery Frame
Attaching the embroidery frame
Attaching the Embroidery Frame
Removing the embroidery frame
Selecting Embroidery Patterns
Copyright information
Embroidery pattern types
LCD liquid crystal display operation
† Setting the display while embroidering
Selecting Embroidery Patterns
Operation keys
LCD button Example Selecting alphabet characters
134
Press this key to change the thread settings
Press this key again to cancel multi- color
Example Selecting an embroidery pattern
Specify the characters for embroidery
Selecting alphabet characters
Selecting a frame pattern
Selecting an embroidery pattern
APress
Select the pattern
Select the stitch
Using an embroidery card
CTurn on the sewing machine DPress On the screen
ESelect a pattern
Embroidering a pattern
Embroidering
Embroidering
Prepareon the screen.embroidery thread of the color shown c
HPress Start/stop button again
EPress Start/stop button
Display will return to the initial screen
Cut the excess thread
Prepare the base fabric and the appliqué fabric
Appliquéing
ASelect an appliqué pattern
Applique Material is displayed on the screen
142
Editing and Saving Patterns
CCheck and adjust the layout
AAfter selecting. the embroidery pattern, press
Press
Change position keys
Size key
Layout key
Rotation key
Simply increase the tension slightly to continue sewing
Connecting character patterns
Stitching starting point is set to lower left of the design
Enter DEF and press Press KPress to turn it to
APress Start/stop button to stop the sewing machine
Resewing
Thread runs out partway through a design
ASet up the upper or bobbin thread Press
Stopping while embroidering
Forward one stitch increases the stitch number
KRestart the embroidery
ETurn off the sewing machine
Switch screens using Previous page key
Selected pattern is shown in reverse highlighting
CPress
Appendix
Cleaning the machine surface
Care and Maintenance
Cleaning the race
FRemove the bobbin case
Do not apply oil to the bobbin case
Care and Maintenance
Correctly install the needle
Troubleshooting
Presser foot lever is raised Lower the presser foot lever
Has a burr on it
Troubleshooting
Threaded correctly, or the bobbin
Upper thread was not Correct the upper threading
Authorized service center Direction
Thread tension is incorrect Adjust the tension of the upper
Dust has accumulated under Remove the needle plate cover
Press the needle position button
Attached
Embroidery unit is not Attach the embroidery unit
No pattern selected Select a pattern
Bobbin case, etc., is plugged up
Error messages
Was pushed at a LCD screen other than the sewing LCD screen
Needle may break and cause injury
Lever is lowered
On the LCD was pressed when no card was inserted
Cutter button was pressed while the presser foot was raised
Memory is full and the pattern cannot be saved
Troubleshooting
An Embroidery Memory Card that may not compatible with your
Embroidery key was pressed when the embroidery unit is not
Machine has been inserted
Certain licensed designs cannot be read by this machine
Canceling the operation beep
Adjusting the LCD
BPresspanel. Setting key in the operation
Operation beep
DPress OFF for the buzzer
Screen for changing the beep setting appears
Index
Index
166
10 , 24
Page