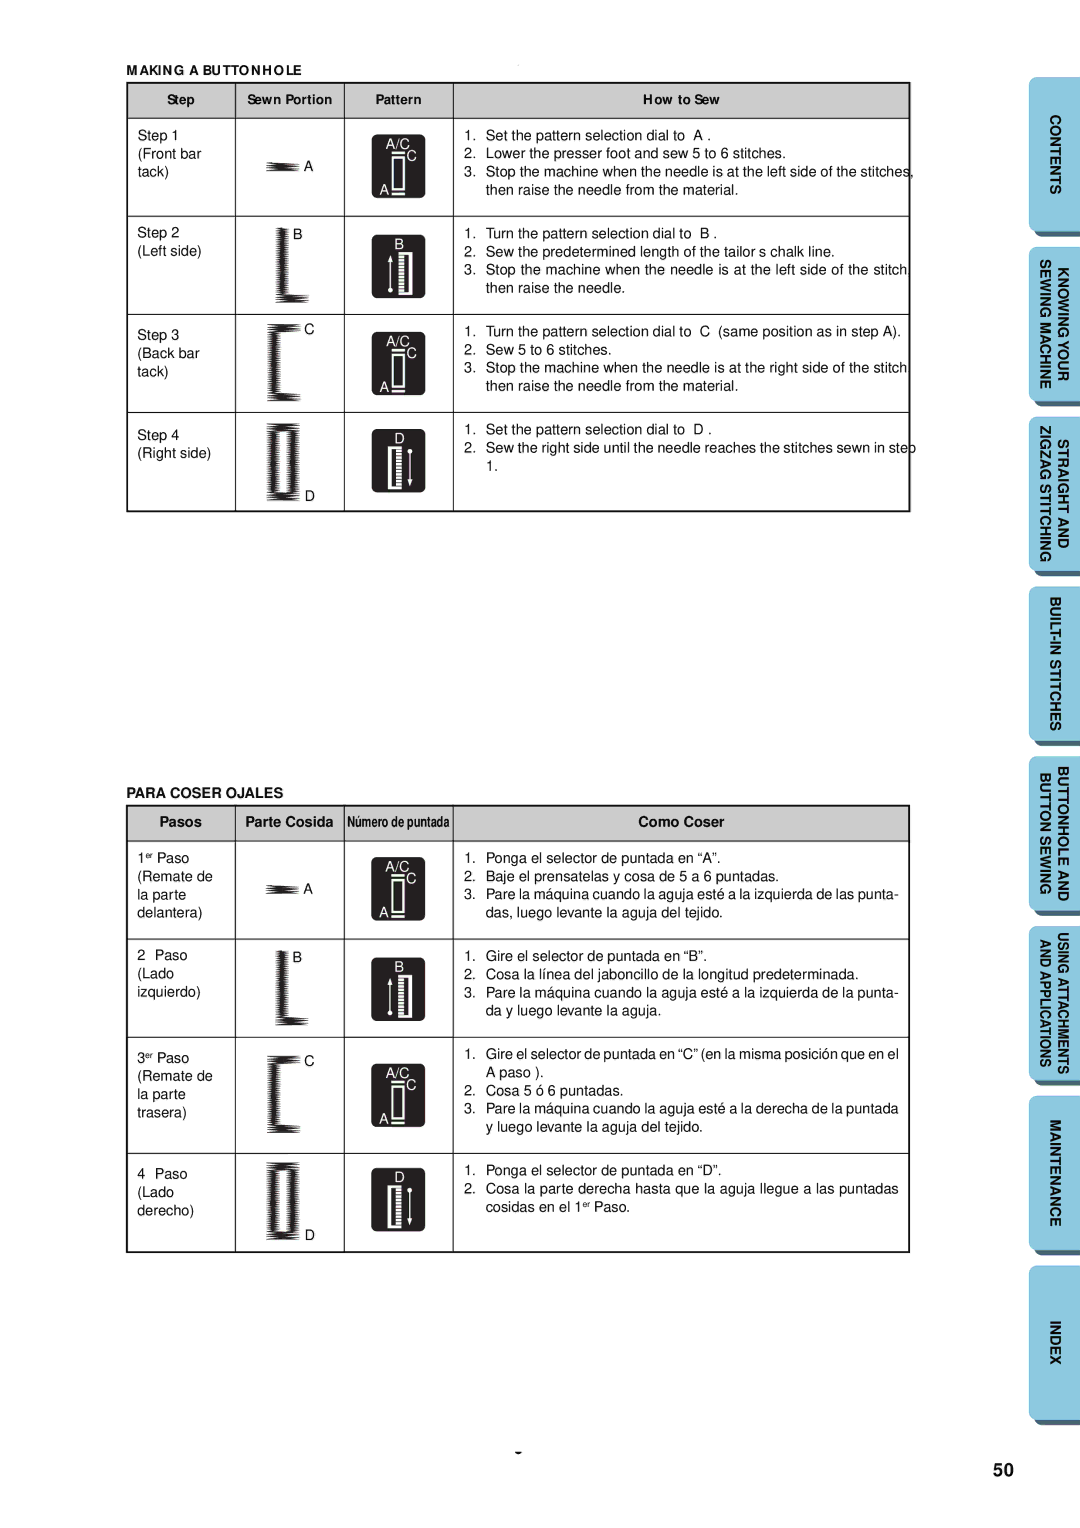
MAKING A BUTTONHOLE
Step | Sewn Portion | Pattern |
| How to Sew |
|
|
|
|
|
Step 1 |
| A/C | 1. | Set the pattern selection dial to “A”. |
(Front bar |
| 2. | Lower the presser foot and sew 5 to 6 stitches. | |
A | C | |||
tack) |
| 3. | Stop the machine when the needle is at the left side of the stitches, | |
|
|
Athen raise the needle from the material.
Step 2 | B |
|
| B | 1. | Turn the pattern selection dial to “B”. | |
(Left side) |
|
|
| 2. | Sew the predetermined length of the tailor’s chalk line. | ||
|
|
|
|
| |||
|
|
|
|
| |||
|
|
|
|
|
| 3. | Stop the machine when the needle is at the left side of the stitch, |
|
|
|
|
|
| ||
|
|
|
|
|
| ||
|
|
|
|
|
| ||
|
|
|
|
|
| ||
|
|
|
|
|
|
| then raise the needle. |
|
|
|
|
|
|
| |
|
|
|
|
|
|
| |
|
|
|
|
|
|
| |
|
|
|
|
|
|
| |
|
|
|
|
|
|
| |
|
|
|
|
|
|
|
|
Step 3 | C | A/C | 1. | Turn the pattern selection dial to “C” (same position as in step A). | |||
|
| 2. | Sew 5 to 6 stitches. | ||||
(Back bar |
|
|
|
| C | ||
|
|
|
| ||||
tack) |
|
|
|
|
| 3. | Stop the machine when the needle is at the right side of the stitch, |
|
| A |
|
|
|
| then raise the needle from the material. |
|
|
|
|
|
| ||
|
|
|
|
| |||
|
|
|
|
|
|
|
|
Step 4 |
|
|
| D | 1. | Set the pattern selection dial to “D”. | |
|
|
| 2. | Sew the right side until the needle reaches the stitches sewn in step | |||
(Right side) |
|
|
|
|
| ||
|
|
|
|
| |||
D |
|
|
|
|
| 1. | |
|
|
|
|
| |||
|
|
|
|
|
| ||
|
|
|
|
|
| ||
|
|
|
|
|
| ||
|
|
|
|
|
| ||
|
|
|
|
|
|
| |
|
|
|
|
|
|
| |
|
|
|
|
|
|
| |
|
|
|
|
|
|
| |
|
|
|
|
|
|
| |
PARA COSER OJALES
Pasos | Parte Cosida | Número de puntada |
| Como Coser | |||
|
|
|
|
|
|
|
|
1er Paso |
| A/C | 1. | Ponga el selector de puntada en “A”. | |||
(Remate de |
| 2. | Baje el prensatelas y cosa de 5 a 6 puntadas. | ||||
A |
|
|
| C | |||
|
|
| |||||
la parte |
|
|
|
| 3. | Pare la máquina cuando la aguja esté a la izquierda de las punta- | |
|
|
|
|
| |||
delantera) |
| A |
|
|
|
| das, luego levante la aguja del tejido. |
|
|
|
|
| |||
|
|
|
| ||||
|
|
|
|
|
|
|
|
2° Paso | B |
|
| B | 1. | Gire el selector de puntada en “B”. | |
(Lado |
|
|
| 2. | Cosa la línea del jaboncillo de la longitud predeterminada. | ||
|
|
|
|
| |||
|
|
|
|
| |||
izquierdo) |
|
|
|
|
| 3. | Pare la máquina cuando la aguja esté a la izquierda de la punta- |
|
|
|
|
| |||
|
|
|
|
| |||
|
|
|
|
| |||
|
|
|
|
| |||
|
|
|
|
|
|
| da y luego levante la aguja. |
|
|
|
|
|
|
| |
|
|
|
|
|
|
| |
|
|
|
|
|
|
| |
|
|
|
|
|
|
| |
|
|
|
|
|
|
| |
|
|
|
|
|
|
|
|
3er Paso | C |
|
|
|
| 1. | Gire el selector de puntada en “C” (en la misma posición que en el |
(Remate de |
| A/C |
| A paso ). | |||
la parte |
|
|
|
| C | 2. | Cosa 5 ó 6 puntadas. |
|
|
|
| ||||
|
|
|
| ||||
|
|
|
|
| |||
trasera) |
| A |
|
|
| 3. | Pare la máquina cuando la aguja esté a la derecha de la puntada |
|
|
|
|
|
| y luego levante la aguja del tejido. | |
|
|
|
|
|
|
| |
|
|
|
|
|
|
| |
4° Paso |
|
|
| D | 1. | Ponga el selector de puntada en “D”. | |
(Lado |
|
|
|
|
| 2. | Cosa la parte derecha hasta que la aguja llegue a las puntadas |
|
|
|
|
| |||
|
|
|
|
| |||
|
|
|
|
| |||
derecho) | D |
|
|
|
|
| cosidas en el 1er Paso. |
|
|
|
|
| |||
|
|
|
|
| |||
|
|
|
|
| |||
|
|
|
|
| |||
|
|
|
|
|
|
| |
|
|
|
|
|
|
| |
|
|
|
|
|
|
| |
|
|
|
|
|
|
| |
|
|
|
|
|
|
|
|
CONTENTS | |
SEWING MACHINE | KNOWING YOUR |
ZIGZAG STITCHING | STRAIGHT AND |
BUTTON SEWING | BUTTONHOLE AND |
AND APPLICATIONS | USING ATTACHMENTS |
MAINTENANCE | |
INDEX
50