English
Take Test Shots to Familiarize Yourself with the Camera
Testing the Camera Before Use and Liability
Introduction
Copyrights
Item Check List
Conventions Used in this Manual
Icons in this Manual
Basic Assumptions
Chapters
Contents
Setting the AF and Drive Modes
Post-Processing Images
Sensor Cleaning 229
Index to Features
Live View Shooting
Exposure Adjustments
Flash
Shooting Movies
Handling Precautions
Camera Care
LCD Panel and LCD Monitor
Cards
Quick Start Guide
Review the picture. p.50
Focus the subject. p.40
Take the picture. p.40
If necessary, the built-in flash will pop- up automatically
Nomenclature
Nomenclature
LCD Panel
Viewfinder Information
Movie shooting p.171 Creative Zone
Mode Dial
Camera User Setting
Basic Zone
Lens with a distance scale
Lens without a distance scale
Battery Charger LC-E6
Charger for Battery Pack LP-E6 p.24
Battery Charger LC-E6E
Getting Started
Attaching the Strap
Charging the Battery
Tips for Using the Battery and Charger
When not using the camera, remove the battery
Installing and Removing the Battery
Rotate the LCD monitor
Using the LCD Monitor
Flip out the LCD monitor
Face it toward you
Turning on the Power
About the Automatic Self-Cleaning Sensor
About Auto Power Off
Checking the Battery Level
Battery Life
At 23C / 73F
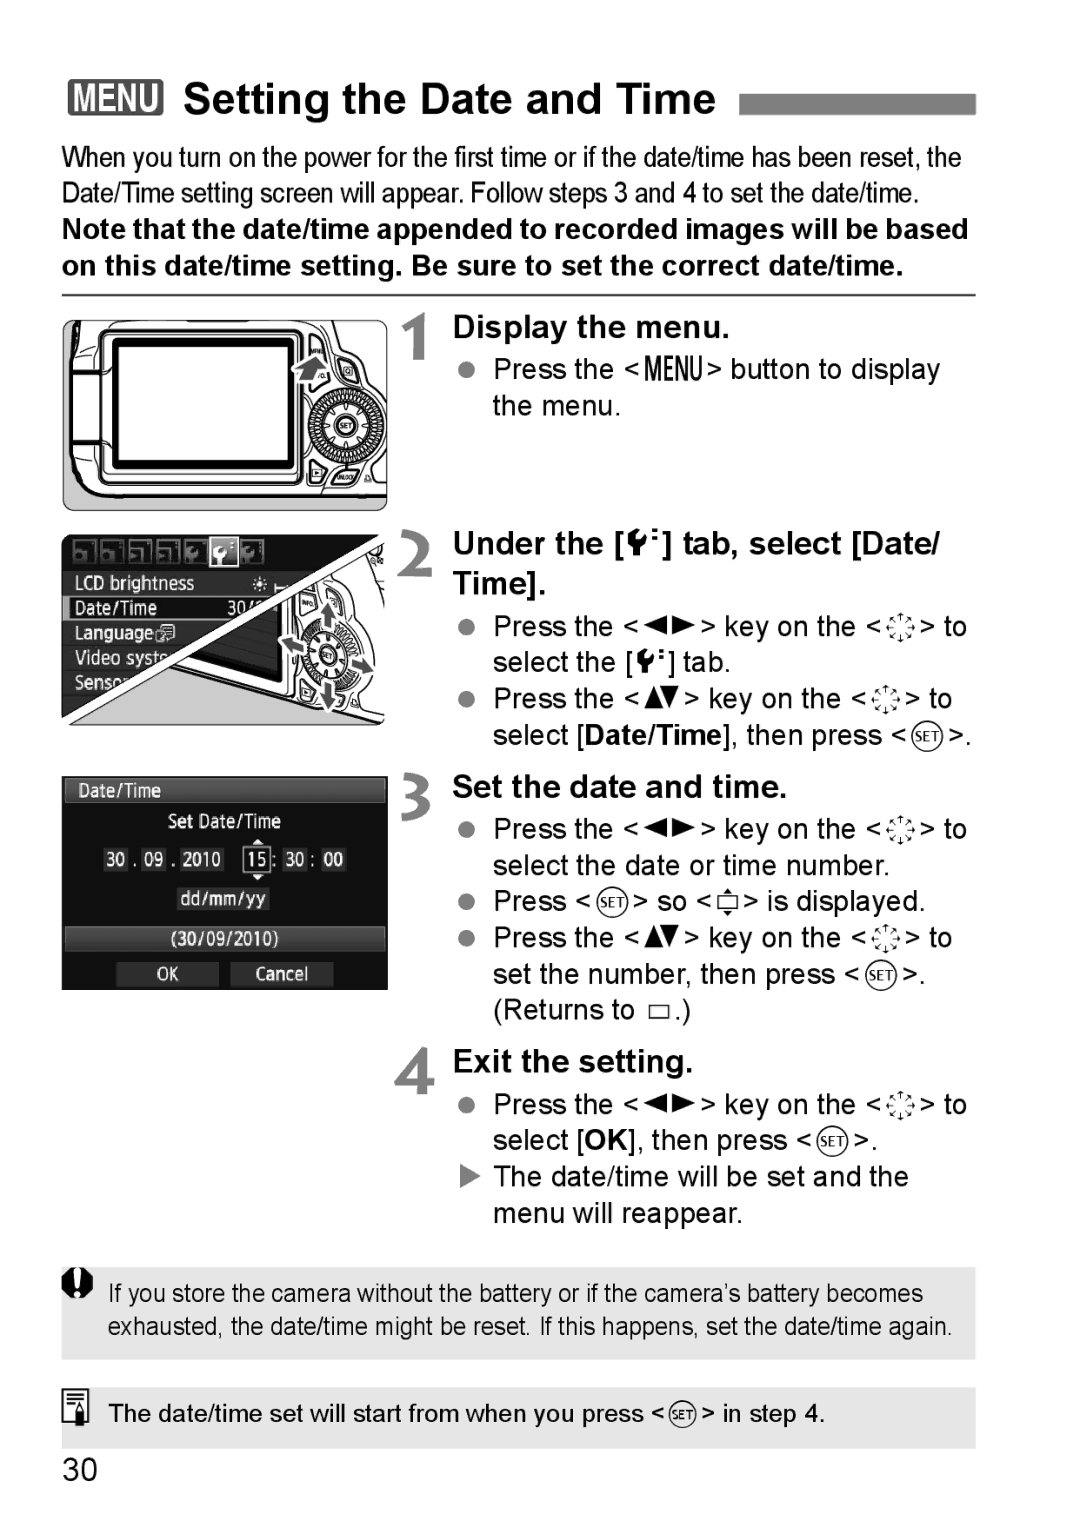
Display the menu
3Setting the Date and Time
Exit the setting
Time.Under the 6 tab, select Date
3Selecting the Interface Language
Under the 6 tab, select LanguageK
Set the desired language
Insert the card
Installing and Removing the SD Card
Installing the Card Open the cover
Slide the cover as shown by the arrows to open it
Removing the Card
Remove the card
Then open the cover
Attaching and Detaching a Lens
About Zooming
To zoom, turn the zoom ring on the lens with your fingers
Minimizing Dust
To owners of the EF-S 18-200mm f/3.5-5.6 is lens
Image Conversion Factor
Lens
Using the Lens Hood
Align the red index marks
Mark
Set the is switch to
About the Lens Image Stabilizer
Take the picture
Basic Operation
Holding the Camera
Pressing completely
Shutter Button
Pressing halfway
This releases the shutter and takes the picture
Mode Dial
Turn the 6 dial only
Using the Unlock button
Turn the 5 dial only
Displaying Shooting Settings
9Operating the Multi-controller
Ulcd Panel Illumination
QUsing the Quick Control Screen
Display the Quick Control screen
Set the desired function
Function Setting Display
Quick Control Screen Nomenclature
Menu Screen
Movie shooting mode
3Menu Operations
Basic Zone modes
Set the desired setting
Menu Setting Procedure Display the menu screen
Select the setting
Select a tab
Select Format
Before You Start
3Formatting the Card
Format the card
Execute Format in the following cases
Set the desired time
3Setting the Power-off Time/Auto Power Off
3Setting the Image Review Time
Select Image review
Shooting Settings
3Reverting the Camera to the Default SettingsN
Select Clear all camera settings
Select OK
Movie Shooting Settings
Camera Settings
Live View Shooting Settings
My Menu settings Unchanged
About the Auto Lighting Optimizer
Asic Z
Aim any AF point over
Set the Mode Dial to
1Fully Automatic Shooting
Subject
Low light, the built-in flash fired a series of flashes
Sometimes multiple AF points flash simultaneously
Although it is daylight, the flash popped up
Although flash was used, the picture came out dark
1Full Auto Techniques
Recomposing the Shot
Shooting a Moving Subject
Press the a button Image will appear on the LCD monitor
Live View Shooting
Display the shooting image on the LCD monitor
Press the shutter button completely
7Disabling Flash
Shooting Tips
Taking portraits without flash
Select a function
Set the Mode Dial to C Press the Q button
CCreative Auto Shooting
Quick Control screen will appear on the LCD monitor
Shoot by ambience selection
Blurring/sharpening the background
Drive mode/Flash firing
Focus the face
2Shooting Portraits
Use a telephoto lens
Check that the AF point covering the face flashes in red
3Shooting Landscapes
With a zoom lens, use the wide-angle end
Shooting night scenes
Simple background makes the flower, etc., stand out better
4Shooting Close-ups
Use a simple background
Move to the subject as close as possible
5Shooting Moving Subjects
Use the center AF point to focus
6Shooting Portraits at Night
Use a wide-angle lens and a tripod
QQuick Control Screen
Automatically set k User selectable
Function
On the Quick Control screen, select the desired ambience
Set the Mode Dial to any of the following modes C 2 3 4 5
Shoot by Ambience Selection
Ambience Ambience Effect
Set the ambience effect
Ambience Settings
Set the Mode Dial to any of the following modes 2 3 4
Shoot by Lighting or Scene Type
Shoot by Lighting or Scene Type
Lighting or Scene Type Settings
Page
Setting the AF Drive Modes
Selecting the AF ModeN
One-Shot AF for Still Subjects
AI Focus AF for Automatic Switching of AF Mode
AI Servo AF for Moving Subjects
Select the AF point
SSelecting the AF Point N
Press the S button
Selecting with the Dial
Maximum aperture Up to f/5.6
AF-Assist Beam with the Built-in Flash
Lens’ Maximum Aperture and AF Sensitivity
Maximum aperture Up to f/2.8
Set the lens focus mode switch to
When Autofocus Fails
MF Manual Focusing
Subjects difficult to focus
While looking at the LCD panel, turn the 6 or 5 dial
Press the R button Select the drive mode
ISelecting the Drive ModeN
Single shooting
JUsing the Self-timer
Press the R button Select the self-timer
10-sec. self-timer k 2-sec. self-timerN
Image Settings
Select Quality
3Setting the Image-recording Quality
Image-recording Quality Setting Examples
Select the image-recording quality
Guide to Image-recording Quality Settings Approx
Quality
Printing File Size Possible Maximum
About RAW
Maximum Burst During Continuous Shooting
ISO Speed Guide
Setting the ISO SpeedN
Press the i button Set the ISO speed
Flash Range
3Setting the Maximum ISO Speed for Auto Ison
About a Auto ISO Speed
Select a Picture Style
ASelecting a Picture StyleN
Select Picture Style
Picture Style Effects
Neutral
About the Symbols
Symbols
Faithful
Select a parameter
Parameter Settings and Effects
ACustomizing a Picture StyleN
Set the parameter
Monochrome Adjustment
KFilter Effect
LToning Effect
Press
ARegistering a Picture StyleN
Select User Def
Select the base Picture Style
Registering a Picture StyleN
Select the white balance
3Setting the White BalanceN
Select White balance
About White Balance
Select the custom white balance
OCustom White Balance
Photograph a white object
Plain, white object should fill the spot metering circle
PSetting the Color Temperature
UWhite Balance CorrectionN
White Balance Correction Select WB Shift/BKT
Set the white balance correction
100
White Balance Auto Bracketing
Set the white balance bracketing amount
Bracketing Sequence
Set the correction setting
3Auto Lighting OptimizerN
101
102
3Lens Peripheral Illumination Correction
Select Peripheral illumin. correct
Under the 1 tab, select
About the Lens Correction Data
103
Select Create folder
3Creating and Selecting a Folder
Create a Folder Select Select folder
Create a new folder
About Folders
Selecting a Folder
105
Creating Folders with a Personal Computer
106
3File Numbering Methods
Continuous
Next sequential file number
Auto Reset
Manual Reset
107
Select the desired option
3Setting Copyright InformationN
Select Copyright information
Enter text
Text Entry Procedure
109
About Adobe RGB
3Setting the Color SpaceN
Select Color space
110
As desired. By changing
Camera settings, you can
Creative Zone modes, you
Obtain various results
Check the display
Set the Mode Dial to d Focus the subject
Program AE
112
113
Differences Between d and 1 Full Auto
About Program Shift
Checkshoot. the viewfinder display
Set the Mode Dial to s Set the desired shutter speed
Shutter-Priority AE
114
115
Shutter Speed Display
Set the Mode Dial to f Set the desired aperture
Aperture-Priority AE
116
Depth of Field PreviewN
117
Aperture Display
Set the exposure
Manual Exposure
Set the shutter speed and aperture
118
Press the n button Select the metering mode
QSelecting the Metering ModeN
119
Setting Exposure CompensationN
120
Select Expo. comp./AEB
Canceling AEB Take the picture
HAuto Exposure Bracketing Aebn
Set the AEB amount
Recompose and take the picture
AAE LockN
Press the a button
AE Lock Effects
Bulb Exposures
123
Elapsed exposure time will be displayed on the LCD panel
Remove the eyecup
Using the Eyepiece Cover
FUsing the Remote Switch
Attach the eyepiece cover
Press the shutter button completely again
Mirror LockupN
Focus the subject, then press the shutter button completely
125
Press the remote controller’s
RRemote Control Shooting
Set the lens focus mode switch to MF
Transmit button
Check the camera’s tilt
Displaying the Electronic Level
Displaying the Electronic Level on the LCD Monitor
127
Display the electronic level
Displaying the Electronic Level in the Viewfinder
Select C.Fn IV -2 Assign SET button
128
Flash Photography
Shooting Shutter Speed Aperture
DUsing the Built-in Flash
130
Automatically set within 1/250 sec. 2 sec
Effective Range of Built-in Flash
3Using Red-eye Reduction
131
Aperture ISO Speed 100 200 400 800 1600 3200 6400 12800
Set the flash exposure compensation amount
YFlash Exposure CompensationN
Select y
132
133
Focus the subject Press the a button
AFE LockN
Press the D button to pop-up the built-in flash
134
Select Flash control
3Setting the FlashN
Normally, set this to Enable
Flash firing
136
Flash mode
Flash mode 136 Shutter sync 137
Function Built-in flash External flash
Shutter sync
Wireless flash
137
Flash exposure compensation
Setting the External Speedlite Custom Functions
138
Canceling the slave unit’s auto power off
Using Wireless FlashN
Slave Unit Settings and Position
Wireless flash set-up example
Fully Automatic Shooting with One External Speedlite
Select Built-in flash func. setting
Select Flash mode
Press the I button to pop-up the built-in flash
Set Channel
Select Wireless func
Under Wireless func., Channel, etc., will be displayed
Select Firing group
Set the desired flash ratio and shoot
142
Fully-automatic Shooting with Multiple External Speedlites
Basic settings
1All Using multiple slave Speedlites as one flash unit
Set Firing group to 1All, then shoot
AB Multiple slave units in multiple groups
144
Wireless func +3
145
FE lock
Flash exp. comp
Exp. comp
146
Wireless func +3
Setting the Flash Output Manually for Wireless Flash
Wireless func
147
Canon Speedlites other than the EX-series
External Speedlites
EOS-dedicated, EX-series Speedlites
148
Using Non-Canon Flash Units
149
Sync Speed
150
Shooting with the LCD Monitor Live View Shooting
151
AShooting with the LCD Monitor
Display the Live View image
152
Enabling Live View Shooting
Set the zLive View shoot. menu to Enable
Temperature Shooting Conditions
153
About the Information Display
154
Final image simulation for still images
Final Image Simulation
155
Picture Style
QQuick Control
Shooting Function Settings
ISettings
156
157
ZMenu Function Settings
AF mode
Grid display
158
Enable g
Disable E
Exposure simulationN
Metering timerN
Silent shootingN Mode
Disable
159
Live Mode d
Using AF to Focus
Selecting the AF Mode
Move the AF point
UFace detection Live Mode c
161
162
Live Mode and uFace Detection Live Mode Notes
163
AF operation
164
Select the AF point. N
Quick Mode f
AF point 1 Display the Live View image
165
166
167
Focusing Manually
Focus manually
You can magnify the image and focus precisely manually
168
169
Custom Function Notes
170
171
Cards which can record movies
About Full HD
Shoot the movie
Autoexposure Shooting Set the Mode Dial to k
KShooting Movies
172
173
Select Manual
Manual Exposure Shooting
Select Movie exposure
Set the shutter speed
Focus and shoot the movie
175
176
177
Final image simulation for movies
Shooting Still Photos
Shooting Stills in the k Mode
Drive mode All settable Flash Flash off
178
179
3Setting the Movie-recording Size
180
181
Total Movie Recording Time and File Size Per Minute
3Menu Function Settings
182
Menu Movie exposure
AF and metering buttons for k
KISO speed setting increments
183
KHighlight tone priority
Auto
184
Menu Sound recordingN
Manual
Wind filter
Metering timer
185
Silent shooting
186
187
Recording and Image Quality
188
Playback and TV connection
189
About images taken with another camera
Select the image
XImage Playback
Single Image Display Playback the image
Exit the image playback
Sample of Image Taken in a Creative Zone Mode
BShooting Information Display
191
192
Sample of Image Taken in a Basic Zone Mode
Sample of Movie Taken in Movie Mode
About the Highlight Alert
About the Histogram
193
About the AF Point Display
Brightness Display
XSearching for Images Quickly
HDisplay Multiple Images on One Screen Index display
194
Browse by jumping
IJump through Images Jump display
Select the jump method
195
Scroll around the image
YMagnified View
Magnify the image
196
Rotate the image
BRotating the Image
Select Rotate
197
Select an image or movie
3Setting Ratings
Select Rating
Rate the image or movie
199
Taking advantage of ratings
200
QQuick Control During Playback
Select a function and set it
Press the Q button to turn off the Quick Control screen
201
KEnjoying Movies
Playback on a TV set p.209
202
Playback on the Camera’s LCD Monitorp.204-208
Playback and Editing with a Personal Computer
203
On the single-image display, press
KPlaying Movies
Select a movie
Playback the movie
205
Check the edited movie
XEditing the Movie’s First and Last Scenes
On the movie playback screen, select
Save the movie
Select the images to be played
3Slide Show Auto Playback
Select Slide show
All images/Movies/Stills
Quit the slide show
Set Set up as desired
Start the slide show
208
Connectset. the Hdmi cable to the TV
Viewing the Images on TV
Viewing on HD High-Definition TV Sets
209
Press the x button
210
211
For Hdmi CEC TV sets
Select Ctrl over Hdmi
Movie playback menu
Connect the AV cable to the TV
Set
212
Select the image and protect it
KProtecting Images
Select Protect images
213
3Protecting All Images in a Folder or Card
214
3Checkmarking X Images to be Erased in a Batch
LErasing Images
Erase the image
Select Erase images
3Erasing All Images in a Folder or Card
216
Adjust the brightness
Changing Image Playback Settings
3Adjusting the LCD Monitor Brightness
Select LCD brightness
Set the auto rotation
3Auto Rotation of Vertical Images
Select Auto rotate
218
Post-Processing Images
219
Select Creative filters
Adjust the filter effect
Creative Filters
Select an image
Creative Filter Features
Save the image
221
Resize
Select Resize
222
223
Available Resize Settings
About Image Sizes
Resize Options According to Original Image Size
RProcessing RAW Images with the CameraN
Process the image
224
About the Magnified Display
Displaying the setting screen
Images with Aspect Ratio Setting
225
RAW Image-processing Options
226
Peripheral illumination correction p.102
227
Color space p.110
Press the I button to return to the normal view
228
Chromatic aberration correction
229
About smudges adhering to the front of the sensor
Select Clean nowf
FAutomatic Sensor Cleaning
Cleaning the Sensor Now
Disabling Automatic Sensor Cleaning
Obtain the Dust Delete Data
3Appending Dust Delete DataN
Preparation
231
About the Dust Delete Data
232
Select Clean manually
3Manual Sensor CleaningN
Select Sensor cleaning
End the cleaning
234
235
Printing p.236
Digital Print Order Format Dpof p.245
Preparing to Print
Turn on the printer Set the camera’s power switch to
Direct printing procedure is done entirely with the camera
236
Icon will appear on the upper left to
237
Press the x button
To a printer
Select the image to be printed
Select Paper settings
WPrinting
238
USetting the Page Layout
QSetting the Paper Size
YSetting the Paper Type
239
What is displayed on the screen
Set the printing effects
240
241
Set the date and file number imprinting
Start printing
Select Print, then press
242
EAdjustment of Printing Effects
Adjust levels
KBrightener
Trimming the Image
Press 0 to exit the trimming
243
Handling Printer Errors Error Messages
244
Digital Print Order Format Dpof
Setting the Printing Options Select Print order
Select Set up
Set the option as desired
246
Press the 7 button
Print Ordering
247
Prepare to print
Set the Paper settings p.238
Direct Printing with Dpof
Under the 3 tab, select Print order. Select Print
Customizing Camera
249
Select the Custom Function No
3Setting Custom FunctionsN
Select Select the group
Clearing All Custom Functions
3Custom FunctionsN
251
3Custom Function SettingsN
Fn I Exposure
252
Auto
Disable Enable Tv/Av
253
250-1/60 sec. auto
Off Auto
Fn II Image
254
Standard Strong Low
Fn III Autofocus/Drive
255
256
Enable Disable
Enable external flash only
IR AF assist beam only
AF and metering buttons
Fn IV Operation/Others
257
AF point selection method
258
Ef-A Ef-D Ef-S About focusing screen characteristics
259
260
Fn IV -5 Add image verification data
3Registering My MenuN
Select My Menu settings
About My Menu settings
Select Register to My Menu
Select Register settings
Register Camera User SettingsN
Select Camera user settings
Clearing the Camera User Settings
Menu Options which can be Registered
263
264
Reference
Camera Settings
BButton Functions
266
Shooting Settings
267
3Checking the Battery Information
Select Battery info
268
269
Registering the Battery to the Camera
Select Register
Select Register, then press Confirmation dialog will appear
Write the serial No. on a label
Labeling the Serial No. on the Battery
Take out the battery and affix the label
270
271
Select the battery pack information to be deleted
Look for the serial No
Follow on page 269 to select Delete info., then press
Connect the DC Coupler’s plug
Using a Household Power Outlet
Connect the power cord
Insert the DC Coupler
Using Eye-Fi Cards
Insert an Eye-Fi card. p.32 Select Eye-Fi settings
273
Display the connection information
274
275
Function Availability Table According to Shooting Modes
276
277
Function Availability Table According to Shooting Modes
1Shooting 1 Red
Menu Settings
278
2Shooting 2 Red
3Playback 1 Blue
279
ZShooting 4 Red
4Playback 2 Blue
6Set-up 2 Yellow
280
5Set-up 1 Yellow
7Set-up 3 Yellow
8Custom Functions Orange
Movie Shooting Mode Menus
281
9My Menu Green
OMovie 2 Red
About the menu screen in movie shooting mode
282
ZMovie 3 Red
283
Troubleshooting Guide
Battery pack does not recharge
Charger’s lamp blinks at high speed
Camera turns off by itself
Battery becomes exhausted quickly
284
No images can be shot nor recorded
285
286
Movie shooting terminates by itself
287
Camera button/dial’s function has changed
Movie sometimes freezes momentarily
288
289
Eye-Fi settings menu item does not appear
290
### is displayed
Error Codes
291
292
Bundled Accessories
System Map
AC Adapter Kit
293
System Map
Specifications
294
Autofocus
295
Viewfinder
Exposure Control
Flash
296
Shutter
Drive System
297
Movie Shooting
Image Playback
298
LCD Monitor
Post-Processing of Images
299
Battery Charger LC-E6E
Battery Pack LP-E6
Battery Charger LC-E6
300
301
EF-S 18-55mm f/3.5-5.6 is
EF-S 15-85mm f/3.5-5.6 is USM
302
EF-S 18-135mm f/3.5-5.6 is
EF-S 18-200mm f/3.5-5.6 is
Trademarks
303
EF-S 17-85mm f/4-5.6 is USM
Use of genuine Canon accessories is recommended
304
About MPEG-4 Licensing
Safety Warnings
305
306
Preventing Injury or Equipment Damage
307
European Union and EEA only
Important Safety Instructions
308
311
EOS Digital Solution Disk 310
309
314
Software Start Guide
Compatible OS
Installing the Software
311
Check that the camera is not connected to your computer
312
Click Finish
Compatible OS MAC OS X 10.4
313
Index
314
315
316
317
318
319
CEL-SQ1LA210


 2 Time].Under the [6] tab, select [Date/