Manuals
/
Carrier
/
Household Appliance
/
Heat Pump
Carrier
50BV020-064 a50-7138ef, Duct Static Pressure Probe, P/N 39EK20462, a50-7267ef
Models:
50BV020-064
1
20
68
68
Download
68 pages
11.16 Kb
17
18
19
20
21
22
23
24
Troubleshooting
Install
Unit Wiring
Maintenance
Problem
Correction Procedure
Checklist
Weight
DHS Limit Switch P/N
Page 20
Image 20
Page 19
Page 21
Page 20
Image 20
Page 19
Page 21
Contents
SAFETY CONSIDERATIONS
Installation, Start-Upand Service Instructions
CONTENTS
MAJOR SYSTEM COMPONENTS Constant Volume CV Units
GENERAL
INSTALLATION
Step 1 - Complete Pre-InstallationChecks
Table 2 - Modular Unit Shipping Table
a50-7257ef
Fig. 2 - 50BVC,J,Q020-034Dimensions
Fig. 3 - 50BVE,K020-034Dimensions
Fig. 4 - 50BVT,V,W034 High-BoyDimensions
a50-8201
Fig. 5 - 50BVT,V,W034 Low-BoyDimensions
Fig. 6 - 50BVT,V,W044-064 High-BoyDimensions
Fig. 7 - 50BVT,V,W044-064 Low-BoyDimensions
Fig. 8 - 50BVU,X034 High-BoyDimensions
Fig. 9 - 50BVU,X034 Low-BoyDimensions
Fig. 10 - 50BVU,X044-064 High-BoyDimensions
Fig. 11 - 50BVU,X044-064 Low-BoyDimensions
NOTES 1.Dimensions in inches mm
a50-7306ef
NOTES 1.Dimensions in inches mm
a50-7307ef
Size 034 Units Size 044-064Units
Shipping Weights lb
a50-8235
Table 3A - Physical Data - 50BVC,E,J,K,Q
Table 3B - Physical Data - 50BVT,U,V,W,X
Fig. 15 - Typical Fan Discharge Connections for
Multiple Fan Units
a50-7138ef
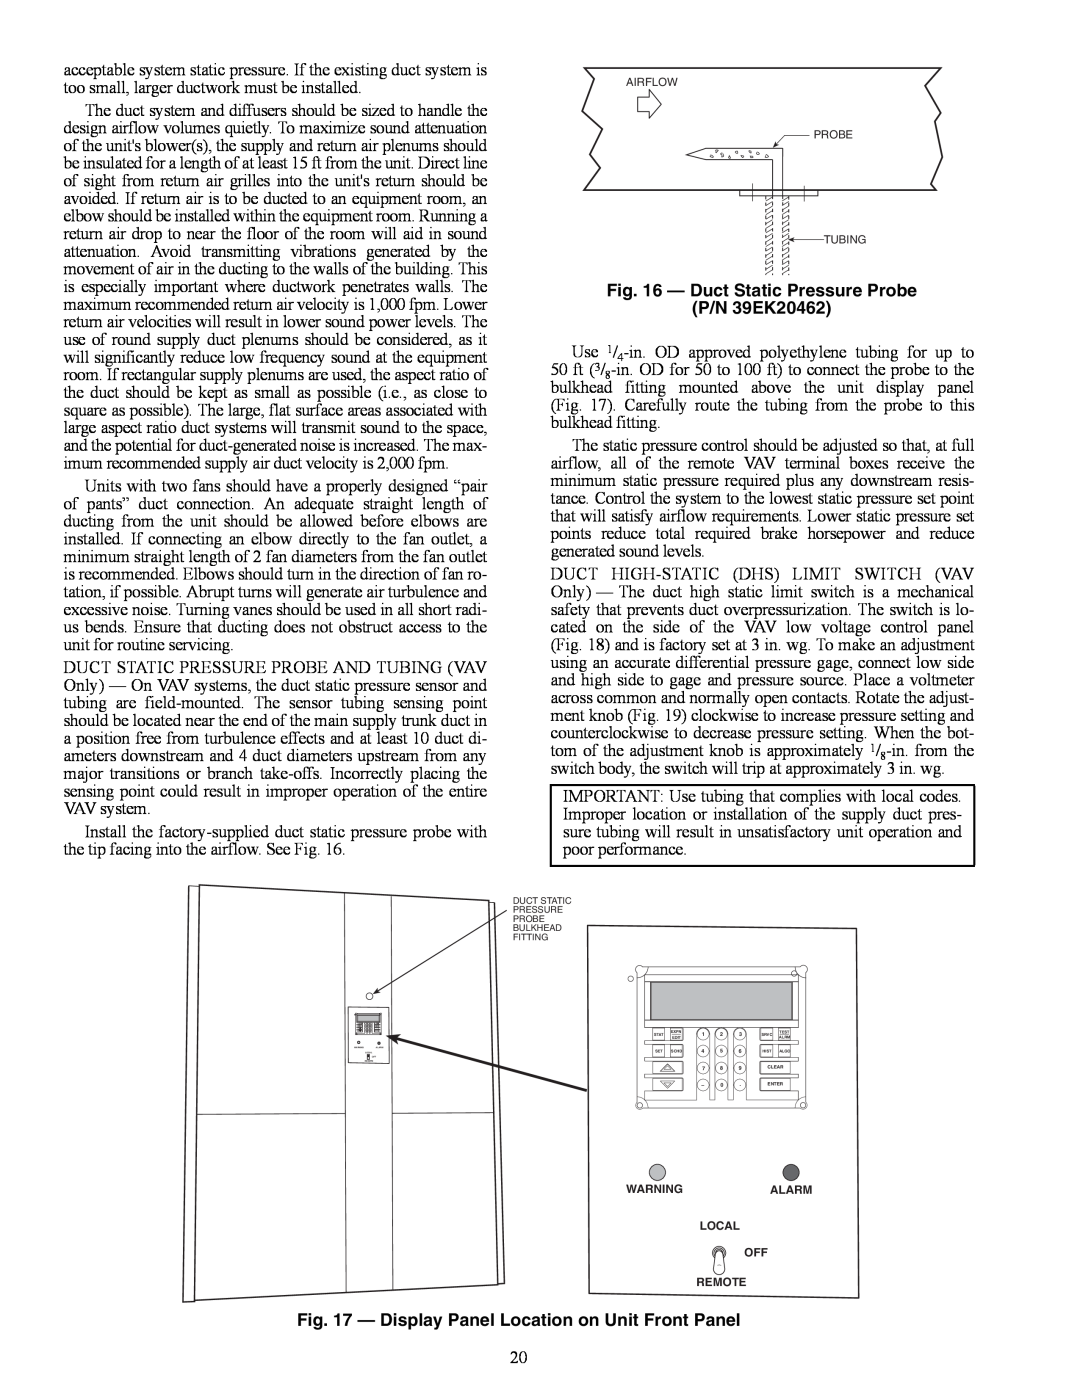
Fig. 16 - Duct Static Pressure Probe
P/N 39EK20462
a50-7267ef
Fig. 19 - DHS Limit Switch P/N
Step 4 - Make Piping Connections
a50-8253
Fig. 18 - DHS Pressure Limit Location
Table 5A - Condenser Pressure Drop
50BVC,J,Q Units
Table 5B - Condenser Pressure Drop
50BVT,V,W Units
Table 6A - Hot Water Pressure Drop
50BVC,E,J,K,Q Units
Table 6B - Hot Water Pressure Drop
50BVT,U,V,W,X Units
Step 5 - Complete Electrical Connections
Table 7B - Economizer Pressure Drop Curve
ft wg, 50BVT,U,V,W,X Units
a50-7270ef
Table 9A - Electrical Data - 50BVC,E,J,K,Q
Table 9B - Electrical Data - 50BVT,U,V,W,X
Two-StageCooling Units
Fig. 24 - Typical Wiring 18 to 30 Ton Units
a50-7272ef
a50-7273ef
Table 10 - Recommended Cables
a50-7164tf
Fig. 26 - Field Terminal Block
Installation Unit Discharge Location
a50-7275ef
Fig. 27 - Modular Unit VAV Control Panel
a39-1867t
START-UP
Table 11 - Thermistor Resistance vs Temperature
Values for Supply-AirTemperature Sensor
10 Kilo- ohm
CV Unit Start-Up
Table 13 - Fan Performance - 50BVC,E,Q020
Table 14 - Fan Performance - 50BVC,E,Q024
Table 15 - Fan Performance - 50BVC,E,Q028
Table 16 - Fan Performance - 50BVC,E,Q034
Table 17 - Fan Performance - 50BVT,U,V034
Table 17 - Fan Performance - 50BVT,U,V034 cont
Table 18 - Fan Performance - 50BVT,U,V044
Table 19 - Fan Performance - 50BVT,U,V054
Table 19 - Fan Performance - 50BVT,U,V054 cont
Table 20 - Fan Performance - 50BVT,U,V064
Table 20 - Fan Performance - 50BVT,U,V064 cont
VAV Unit Start-Up
OMNIZONE VPAC
02-06-04
Fig. 32 - LID
a50-7425ef
Fig. 33 - 50BV VFD Display
The LID display will show Year
Table 23 - Software Points
Table 21 - Controller Set Points
Table 22 - Controller Hardware Points
Table 24 - Configuration Parameters
Unoccupied space or return air temperature demand
SERVICE
MAINTENANCE
a50-186tf
Fig. 34 - Gravity Flow Method
a50-187tf
Fig. 35 - Forced Circulation Method
Evaporator Fan Performance Adjustment
TROUBLESHOOTING
Charging the System
a50-7135tf
PROBLEM
POSSIBLE CAUSE
Table 28 - Unit Troubleshooting
PROBLEM
CORRECTION PROCEDURE
POSSIBLE CAUSE
Table 31 - Clearing a Forced Input or Output
Table 29 - CV Units LED Diagnostic Codes
Table 30 - Forcing an Input or Output
Page
Page
Page
Page
FIELD WIRING
UNIT WIRING
Page
FIELD WIRING
WIRE LEGEND
a50-7282ef
TRANS-1
FIELD WIRING
PCB2 J1
PCB1
FIELD WIRING
UNIT WIRING
FIELD WIRING
PCB1
LEGEND AND NOTES FOR FIG
Copyright 2008 Carrier Corporation
Catalog No
Form 50BV-3SI
10-08
START-UPCHECKLIST
I. PRELIMINARY INFORMATION
II. PRE-START-UP
CONTROLS
III.START-UP
Top
Page
Image
Contents