User’s Guide
Abbreviations and Acronyms
Contents
Using the Keyboard
Setting Up and Using Networks
Securing Your Computer
Double-Clicking the Dell Support Icon
Traveling With Your Computer
Adding and Replacing Parts
149
Drivers and Utilities CD
Finding Information
Quick Reference Guide
Dell Support Website support.dell.com
Icon in the Microsoft Windows taskbar
To view Dell QuickSet Help, right-click the Quickset
For more information on Dell QuickSet, see Dell
QuickSet on
Front View
About Your Computer
Track stick
Light is flashing
Y B O a R D S T a T U S L I G H T S
Left Side View
D I O C O N N E C T O R S
Right Side View
Back View
Connects serial devices, such as a mouse or handheld device
About Your Computer
Bottom View
To prepare the new computer for the file transfer
Transferring Information to a New Computer
Click Finished and restart the new computer
Windows Vista
Battery Performance
Using a Battery
Dell QuickSet Battery Meter
Checking the Battery Charge
Microsoft Windows Power Meter
Charge Gauge
Power Management Modes
Conserving Battery Power
Low-Battery Warning
Standby Mode
Hibernate Mode
Charging the Battery
Configuring Power Management Settings
Replacing the Battery
Storing a Battery
Numeric Keypad
Using the Keyboard
Key Combinations
System Functions
Power Management
Battery
Display Functions
Microsoft Windows Logo Key Functions
Touch Pad
Customizing the Touch Pad and Track Stick
Changing the Track Stick Cap
Pull the cap off the track stick
Using the Keyboard
Using the Keyboard
Playing CDs or DVDs
Using Multimedia
Adjusting the Picture
Adjusting the Volume
Volume Control Window
Volume Control Buttons
Adjusting Brightness
Using the Display
Click the Windows Vista Start button →Control Panel
Microsoft Windows XP
Microsoft Windows XP
Click the Start button and click Control Panel
Using the Ambient Light Sensor
Ambient light sensor
Using the Display
Connecting a Network or Broadband Modem Cable
Setting Up and Using Networks
Setting Up a Network in Microsoft Windows XP
Wireless Local Area Network Wlan
Setting Up a Network in Microsoft Windows Vista
Checking Your Wireless Network Card
What You Need to Establish a Wlan Connection
Setting Up and Using Networks
Connecting to a Wlan
Setting Up and Using Networks
Checking Your Mobile Broadband Card
Mobile Broadband or Wireless Wide Area Network Wwan
Enabling/Disabling the Dell Mobile Broadband Network Card
Connecting to a Mobile Broadband Network
Internet Connection Firewall
Dell Wi-Fi Catcher Network Locator
For information about Dell QuickSet, see Dell QuickSet on
Button →Help and Support
Setting Up and Using Networks
Installing a PC Card or ExpressCard
Using Cards
Card Types
Card Blanks
ExpressCard
PC Card
Removing a Card or Blank
Using Cards
Security Cable Lock
Securing Your Computer
Smart Cards
About Smart Cards
Installing a Smart Card
Passwords
Using an Administrator Password
Using a Primary/System Password
Using a Hard Drive Password
Trusted Platform Module TPM
Enabling the TPM Feature
Computer Tracking Software
Security Management Software
If Your Computer Is Lost or Stolen
Securing Your Computer
Securing Your Computer
Diagnostic Lights
Troubleshooting
Diagnostic Light Codes During Post
Computer. If the computer starts
Dell Diagnostics
Dell Technical Update Service
When to Use the Dell Diagnostics
Starting the Dell Diagnostics From Your Hard Drive
Dell Diagnostics Main Menu
Troubleshooting
Dell Support Utility
Accessing the Dell Support Utility
Clicking the Dell Support Icon
Double-Clicking the Dell Support Icon
Drive Problems
Hard drive problems
CD and DVD drive problems
Problems writing to a CD/DVD-RW drive
Right-click Local Disk C
Mail, Modem, and Internet Problems
Error Messages
Troubleshooting
Click Start→Control Panel→Add or Remove Programs
Keyboard Problems
Ieee 1394 Device Problems
For Windows XP
For Windows Vista
External keyboard problems
Lockups and Software Problems
Unexpected characters
Computer does not start up
Other software problems
Computer stops responding
Program stops responding or crashes repeatedly
Network Problems
Memory Problems
If necessary, uninstall and then reinstall the program
General
Power Problems
PC Card or ExpressCard Problems
Docking Power Considerations
Ensuring Sufficient Power for Your Computer
Memory modules see Memory on
Scanner Problems
Printer Problems
Touch Pad or Mouse Problems
Sound and Speaker Problems
No sound from headphones
No sound from integrated speakers
If the display is blank
Video and Display Problems
If only part of the display is readable
If the display is difficult to read
Viewing the System Setup Screens
System Setup Program
Overview
Commonly Used Settings
System Setup Screens
Changing the Boot Sequence
Changing COM Ports
Performing a One-Time Boot
System Setup Program
Identifying Your Computer
Traveling With Your Computer
Packing the Computer
Attach a name tag or business card to the computer
Traveling by Air
Travel Tips
What Is a Driver?
Reinstalling Software
Drivers
Identifying Drivers
Reinstalling Drivers and Utilities
101
Restoring Your Operating System
103
Using Microsoft Windows System Restore
Ensure that Turn off System Restore is unchecked
Using the Operating System CD
105
106
Before You Begin
Adding and Replacing Parts
Recommended Tools
Turning Off Your Computer
Hard Drive
Follow the procedures in Before You Begin on 108
109
Returning a Hard Drive to Dell
Media Bay
Removing the Device Security Screw
111
Removing and Installing Media Bay Devices
Hinge Cover
113
Keyboard
Keyboard Keyboard screws
115
Memory
Memory module
117
Memory module
Subscriber Identity Module SIM Card
Wireless Cards
119
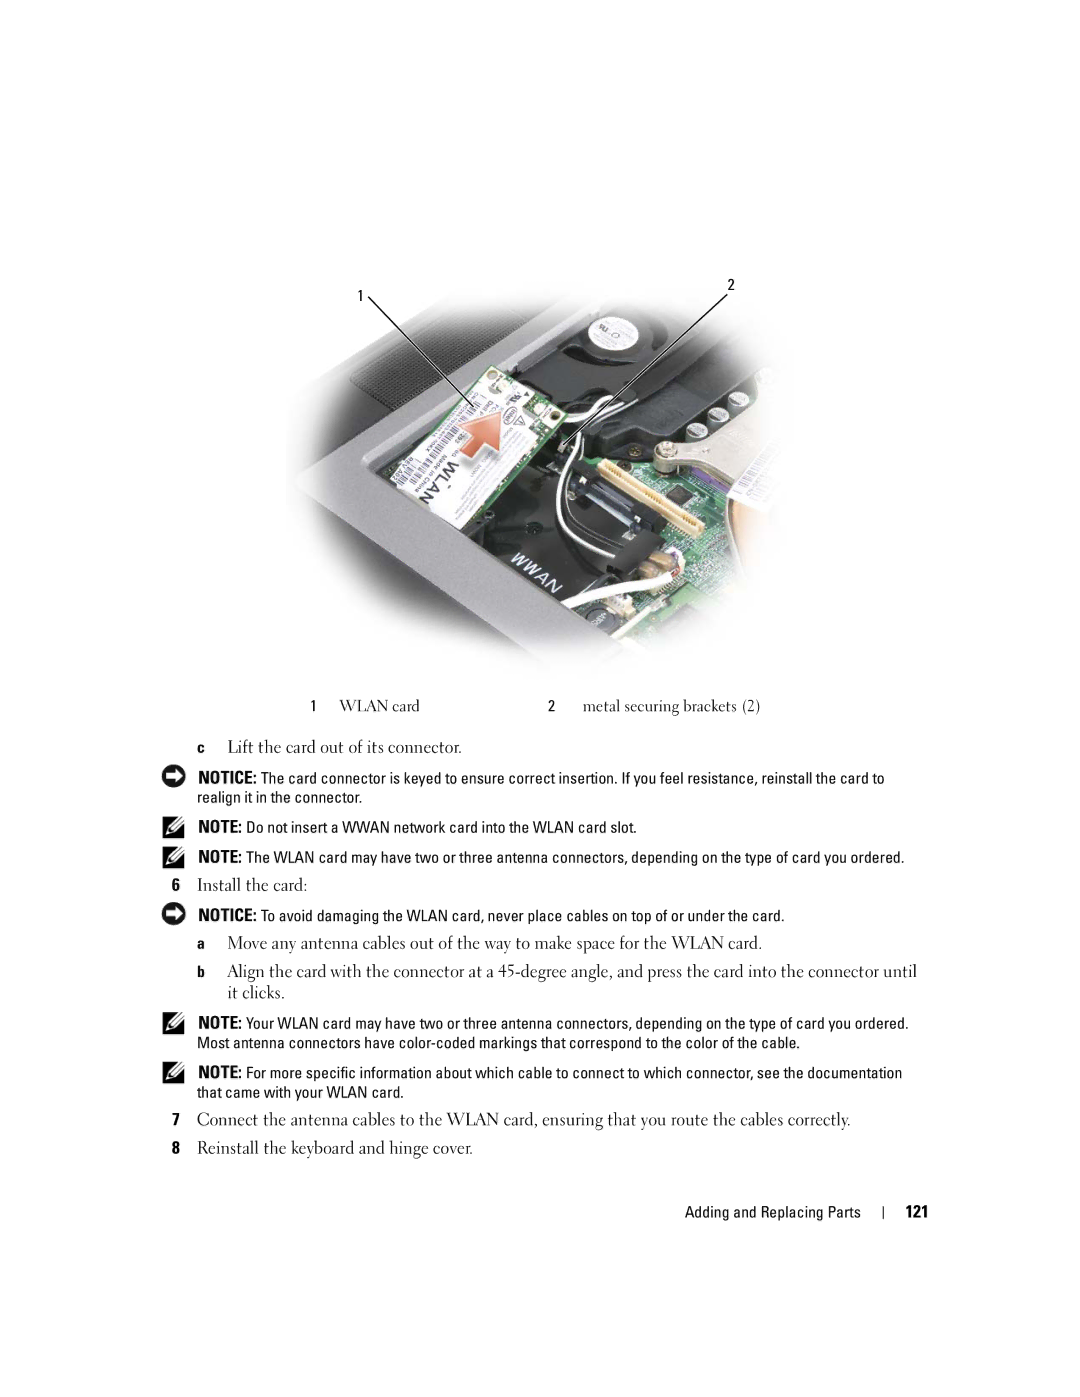
Wireless Local Area Network Wlan Cards
121
Mobile Broadband or Wireless Wide Area Network Wwan Cards
123
FCM Flash Cache Module
FCM card
125
Internal Card With Bluetooth Wireless Technology
Coin-Cell Battery
127
128
129
Dell QuickSet
130
131
Specifications
PC/SC
132
Lvds
133
134
135
136
137
138
Getting Help
Technical Support and Customer Service
Obtaining Assistance
139
DellConnect Online Services
AutoTech Service
Problems With Your Order
Automated Order-Status Service
141
142
Before You Call
For customers in the United States, call 800-WWW-DELL
Contacting Dell
143
Visit support.dell.com
Appendix
Cleaning Your Computer
Computer, Keyboard, and Display
Touch Pad
Floppy Drive
Mouse
CDs and DVDs
FCC Notice U.S. Only
Macrovision Product Notice
FCC Class B
147
148
149
Glossary
150
151
152
153
154
155
156
157
158
Video resolution See resolution

