Epson Stylus Pro User’s Guide
Page
Copyrights and Trademarks
Copyrights and Trademarks
Contents
Printing with Windows
Paper Handling 143
Control Panel 107
Problem Solver 191
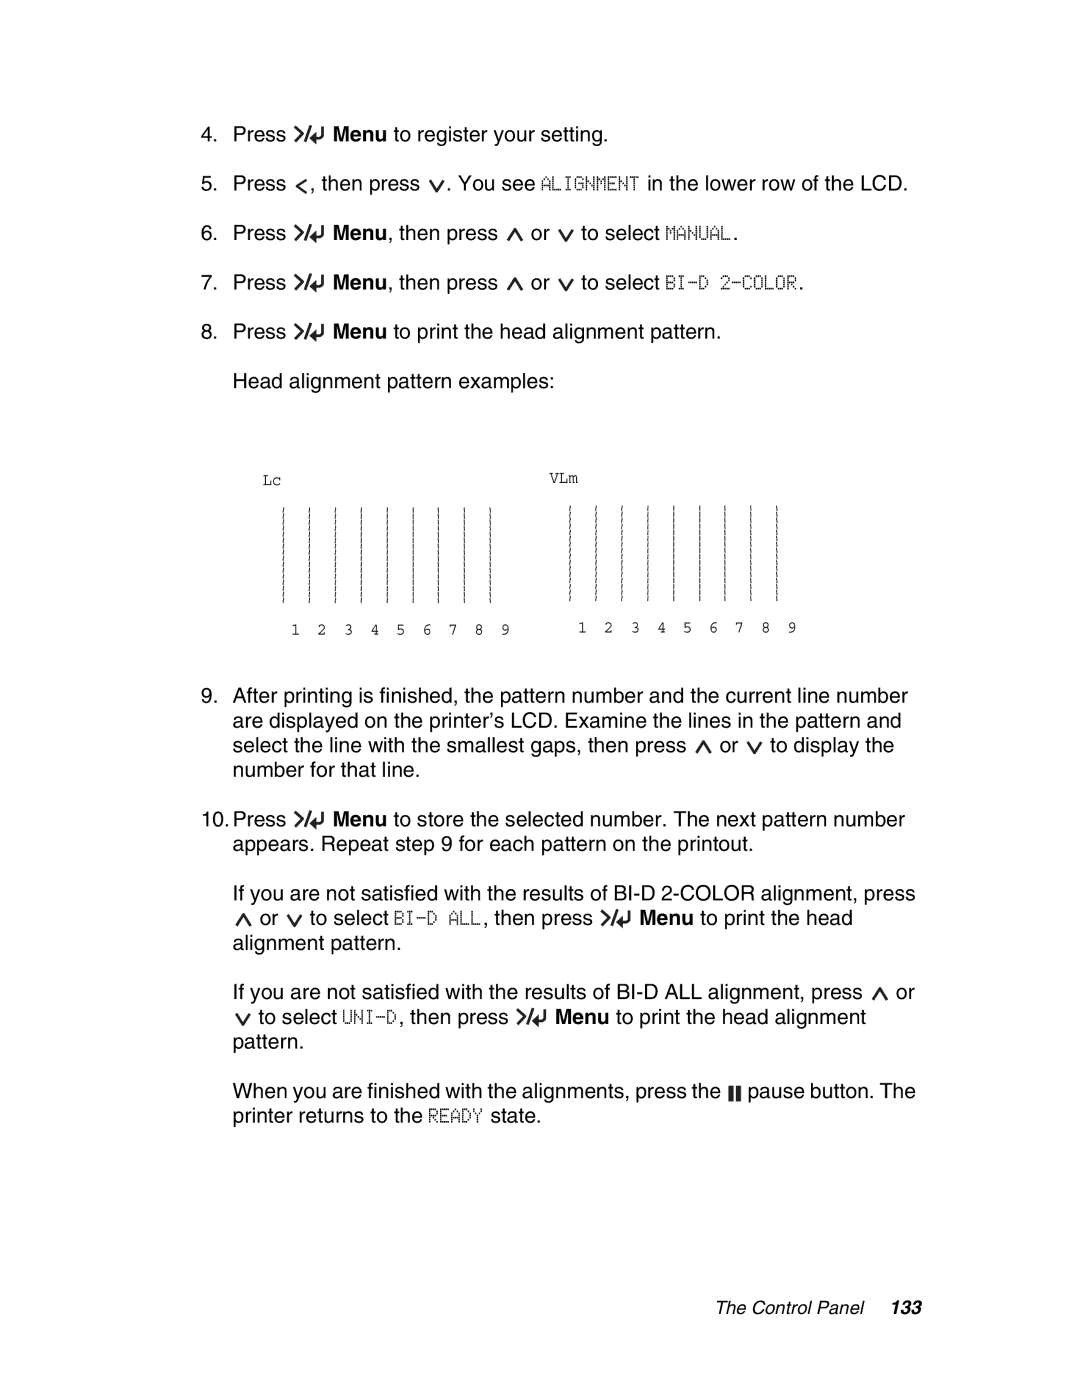
Maintenance and Transportation 169
Product Information 231
Safety Instructions 247
Options and Consumable Products 241
Index 251
Page
Settings
Setup Window Settings
Chapter
Format for
Paper Size
Presets
Print Window Settings
Orientation
Scale
Copies & Pages
Pages per Sheet
Layout
Layout Direction
Border
Scheduler
Output Options
ColorSync
Paper Handling
Cover
Print Settings
Media Type setting list
Setup
Media Type
Mode
Color
Quality and Speed slider
Automatic
Advanced Settings
Printer Color Management
Gamma
Color Controls
Color Controls for Advanced B&W Photo
ColorSync
Off No Color Adjustment
Paper Configuration
Printing with Mac OS
Auto Cut
Roll Paper Option
Single Cut
You can select the following cutting methods
Normal Cut
Double Cut
Print Page Line
Off
Save Roll Paper
Expansion
Use the Summary option to view the current settings
Saving your settings in the Print window
Summary
Using your saved settings in the Print window
Selecting Borderless Print Settings
Preview
Follow the steps below to print borderless photos
Canceling Printing
Printer Utility Window
Accessing the Epson Printer Utility2
Select SPro 4880, then click OK
Using the Printer Utilities
Epson StatusMonitor
Head Cleaning
Nozzle Check
Print Head Alignment
Epson LFP Remote Panel
Checking the print head nozzles
Manual
Cleaning the print head
Follow the on-screen instructions to align the print head
Aligning the print head
Getting Information Through On-screen Help
Uninstalling the Printer Software
Starting Epson LFP Remote Panel
Double-click the Installer icon
Printing with Mac OS
Selecting printer driver settings
Basic Settings
Printing with Windows
Printing with Windows
Canceling printing
Selecting the Media Type setting
Selecting Settings on the Main Tab
Media Type setting list
Selecting the Print Quality setting
Selecting the Color setting
Automatic mode
Selecting the Mode setting
Color Control mode
Select Automatic or Custom for the Mode setting
Color Toning
Custom mode
ICM
Selecting the Advanced settings
Color Controls
PhotoEnhance
ICM
Printing with Windows
Paper Configuration
Printing with Windows
Saving settings
Exporting and importing settings
Deleting settings
Exporting the settings
Follow the steps below to delete your settings
Selecting the Borderless setting
Selecting the Paper Source setting
Importing settings
Printing with Windows
Printing with Windows
Selecting the Paper Size setting
Select this setting to use the standard printable area
Selecting the Printable Area setting
Select this setting to center printouts
Maximum
Selecting the Roll Paper Option settings
Double Cut
Auto Rotate
To enable this function, follow the steps below
Selecting the Save Roll Paper setting
Previewing your printout
Checking Ink Levels
You can check the status of each ink cartridge
Print Preview window is not color accurate
Using the Manual function
Selecting Settings on the Page Layout Tab
Selecting the Orientation settings
Selecting the Copies setting
Selecting Double-Sided Printing setting
Selecting the Reduce/Enlarge settings
Click the Double-Sided Printing checkbox
Standard double-sided printing
Printing with Windows
Folded Booklet double-sided printing
Printing with Windows
Printing with Windows
Selecting Multi-Page settings
Selecting N-up settings
Selecting the Print Background Color setting
Selecting the Optimize Enlargement setting
Selecting the Job Settings
Nozzle Check
Using the Printer Utilities
Printer and Option Information
Epson LFP Remote Panel
Cleaning the print head
Aligning the print head
Selecting Monitoring Preferences
Disable Epson Status Monitor
Selecting Speed and Progress settings
High Speed Copies
Show Progress Meter
Coarse Rendering
Rendering Mode
Print as Bitmap
Show Mouse Over Help
Selecting Menu Arrangement settings
Getting Information Through On-screen Help
Error messages
Using the Progress Meter
Checking Printer Status and Managing Print Jobs
Accessing Status Monitor 3 from the Windows taskbar
Using Epson Status Monitor
Accessing Status Monitor 3 from the printer driver
Open the printer driver Click the Utility tab
General tips
Increasing the Print Speed
Viewing information in Status Monitor
Current Status
Setting up your printer as a shared printer
Using Speed and Progress
Sharing Your Printer
For Windows Vista
Select Local Port and click New Port
Accessing the shared printer
Click Start and then Printers and Faxes
For Windows XP
Accessing the shared printer
Uninstalling the printer driver
Updating and Uninstalling the Printer Software
Updating the driver in Windows Vista or XP
Windows Vista
Click the Change/Remove button
Windows XP
Printing with Windows
Printing with Windows
Buttons
Buttons, Lights, Messages, and Icons
Control Panel
Lights
Lights show the printer’s status and indicate errors
When to use Menu mode
Menu Settings
Messages
Press or to select a setting
Basic Menu setting procedure
Press or to select an option for the setting
Press or to select a sub menu
AUTO, USB, Network
Menu list
Print
Control Panel
INK Exec
Standard
Printer Setup
Details of Menu mode
Roll Counter or Sheet Counter
This menu contains the following items
Line
Platen GAP
Interface
Paper Margin
Code
PPR Align CHK
PPR Size CHK
Time OUT
Cutter ADJ
Auto Cleaning
Refresh Mrgn
Sheet Size CK
Test Print
Init Settings
Nozzle Check
Status Check
Version
Printer Status
Printable PG
INK Left
Usage Count
Maint Tank
USE Count CLR
JOB History
You can see the service life of each consumable
Service Life
EDM Status
Paper Number
Thickness NUM
Thickness PAT
CUT Method
PPR Feed ADJ
Drying Time
Eject Roller
Suction
ADJ
PWR Cleaning
Maintenance
Clock Setting
Cutter Repl
You can set the Bonjour settings of the printer
Network Setup
GET Ipaddress
Bonjour
Cutter Replace
Nozzle check pattern examples
Aligning the print head automatically
Make sure that paper is loaded in the printer
Aligning the print head manually
VLm
Registering the settings
Selecting paper settings
Control Panel
Printing a status sheet
Selecting the registered settings
Setting the alert value for paper
Maintenance Mode
Maintenance mode setting procedure
Press or to select a menu item
Maintenance mode list
Press or to select an option for the menu item
HEX Dump
Details of Maintenance mode items
Paper Counter
Language
Unit
CUT Pressure
Sscl
Default Panel
Roll PPR Feed
Crtg Info Menu
Control Panel
Storing Epson media
Using Epson media
Using paper other than Epson media
Using Roll Paper
Attaching the roll paper to the spindle
Removing the roll paper from the spindle
Remove the roll paper from the spindle
Loading roll paper
Paper Handling
Others
Cutting the roll paper or printing page lines
Cutting the roll paper with the cut button
Cutting the roll paper automatically
Checking the paper path
Using Cut Sheet Media
Printing page lines
Paper path list
Loading cut sheet media
Loading A3 or larger paper in the paper tray
Paper Handling
Paper Handling
Paper Handling
Loading paper smaller than A3 in the paper tray
Paper Handling
Paper Handling
Loading paper into the front manual feed slot
Paper Handling
Paper Handling
Paper Handling
Make sure the roll paper support is not raised
Loading paper into the rear manual feed slot
Make sure the roll paper support is not raised
Paper Handling
Replacing Ink Cartridges
Maintenance and Transportation
Maintenance and Transportation
Page
Maintenance and Transportation
Changing the Black Ink Cartridge
Maintenance and Transportation
Maintenance and Transportation
Maintenance and Transportation
Maintenance and Transportation
Updating the printer driver information
Replacing the Maintenance Tank
For Windows
For Mac OS
Maintenance and Transportation
Open the top cover
Replacing the Paper Cutter Blade
Maintenance and Transportation
Cleaning the Printer
Maintenance and Transportation
Maintenance and Transportation
If you have not used your printer for a long time
Preparing the printer for shipment
Transporting the Printer
Maintenance and Transportation
Setting up the printer after transportation
Maintenance and Transportation
Maintenance and Transportation
Head cleaning, ink charging, or ink drying is in progress
Troubleshooting
An error has occurred
Printer stops printing unexpectedly
Release Lever
Wrong Paper Size
Please USE
Unlock Print
Driver INK SET
Load Sheet Paper
Printer prints nothing
Printer does not turn on or stay on
Printer is not correctly connected to the computer
Select Set as Default Printer, then close the window
Your Epson printer is not selected as the default printer
For Windows Vista
For Windows XP
Follow the steps below to select the printer port
Printer sounds like it is printing, but nothing prints
Incorrect, garbled characters, or blank pages print
Printouts are not what you expected
Incorrect margins
Inverted image
Printout has smears on the bottom edge
Ruled line shifts
Horizontal banding
Print quality could be better
Faint printout or gaps
Vertical misalignment or banding
Blurry or smeared printout
Printing could be faster
Color documents print in black ink only
Roll paper cannot be cut
Paper feed or paper jam problems occur frequently
Roll paper does not eject properly
Clearing paper jams
When roll paper is jammed
Follow the steps below to remove jammed paper
Problem Solver
When paper loaded from the paper tray is jammed
Problem Solver
Problem Solver
When paper loaded from the front manual feed slot is jammed
Front Rear
When paper loaded from the rear manual feed slot is jammed
Problem Solver
Managing Color with Profiles
Macintosh Printing with a Color Profile
Setting Up Photoshop and Assigning a Profile
Open Adobe Photoshop
IEC61966-2.1
Selecting Print Settings and Printing
Click Print to print your photo
Windows Printing with a Color Profile
Select File, then select Print or Print with Preview
Selecting Print Settings and Printing
Click OK, then click OK or Print to print your photo
Paper Information
Paper settings
Roll papers
Cut sheet papers
Problem Solver
Purchase Supplies and Accessories
Where To Get Help
Problem Solver
Printing
Printer Specifications
Printable area
Mechanical
Following table shows the default paper margin for the paper
Environmental
Electrical
Standards and Approvals
Operational conditions temperature and humidity
Paper
Roll paper
Cut sheets
Ink cartridges
Macintosh
System Requirements
Windows
Interface Specifications
USB interface
Ethernet interface
Product Information
Consumable Products
Options
Roll paper spindle
Paper cutter blade
Use the following Epson ink cartridges in your printer
Maintenance tank
To replace ink cartridges, see Replacing Ink Cartridges on
Epson media
3D CAD/GIS
S042084 Singleweight Super A3/B 100 S041909
S041343
When choosing a place for this product
Important Safety Instructions
When setting up this product
Safety Instructions
When handling the ink cartridges
When using this product
When transporting this product
Index
Index