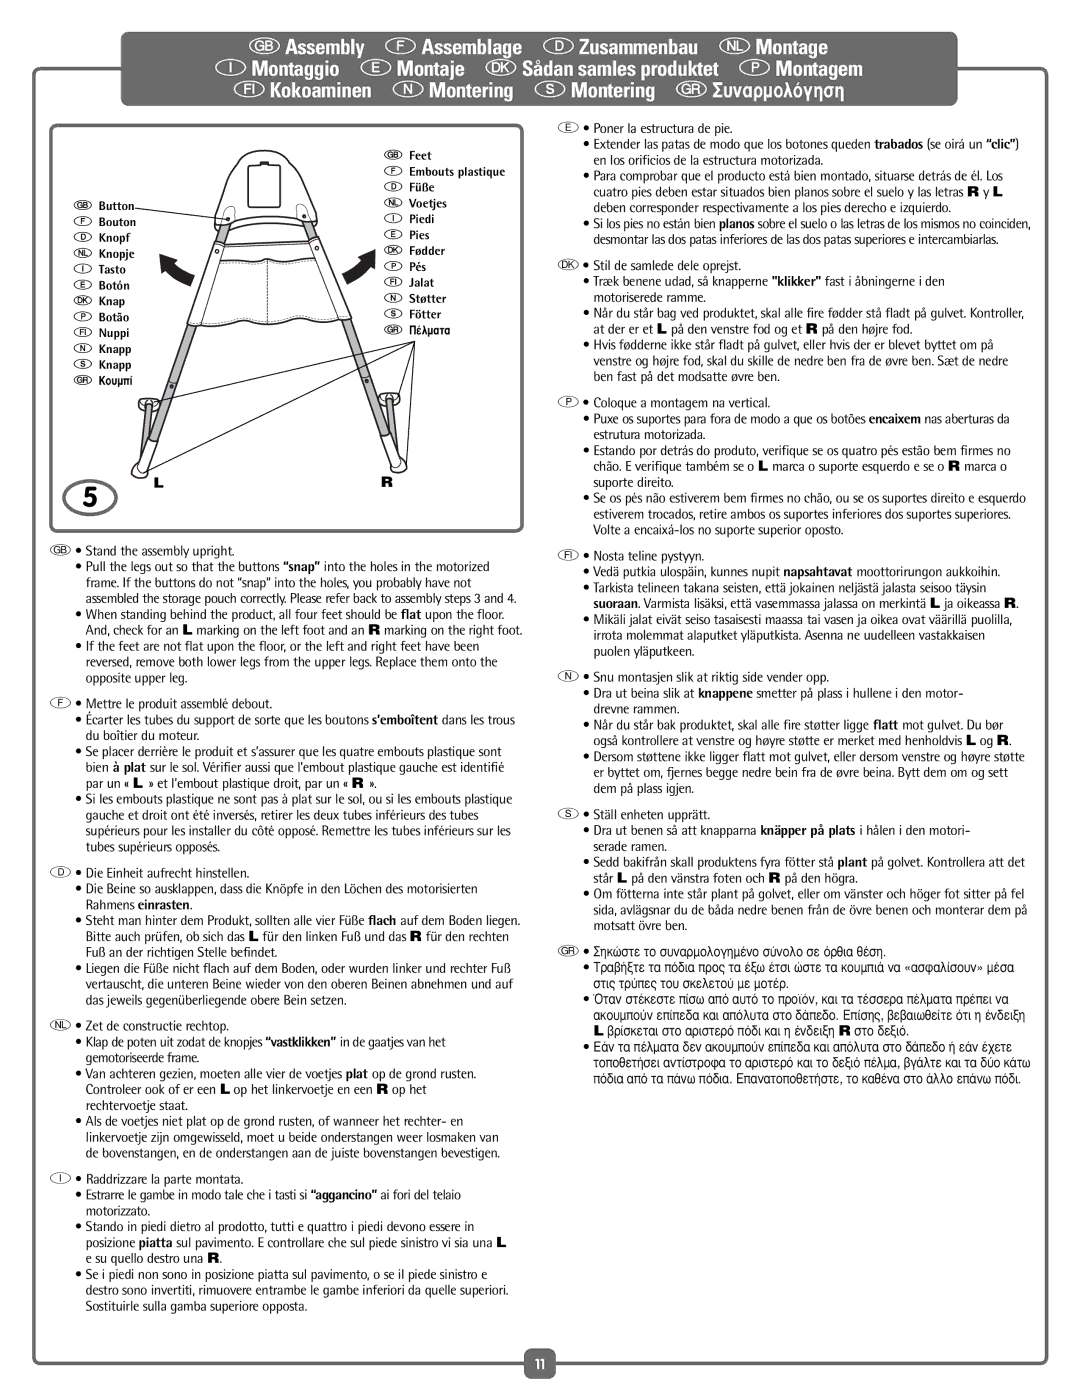
| G Feet |
| F Embouts plastique |
| D Füße |
G Button | N Voetjes |
F Bouton | I Piedi |
D Knopf | E Pies |
N Knopje | K Fødder |
I Tasto | P Pés |
E Botón | T Jalat |
K Knap | M Støtter |
P Botão | s Fötter |
T Nuppi | R ¶¤ÏÌ·Ù· |
M Knapp | |
s Knapp | |
R ∫Ô˘Ì› | |
G• Stand the assembly upright.
•Pull the legs out so that the buttons “snap” into the holes in the motorized frame. If the buttons do not “snap” into the holes, you probably have not assembled the storage pouch correctly. Please refer back to assembly steps 3 and 4.
•When standing behind the product, all four feet should be flat upon the floor. And, check for an L marking on the left foot and an R marking on the right foot.
•If the feet are not flat upon the floor, or the left and right feet have been reversed, remove both lower legs from the upper legs. Replace them onto the opposite upper leg.
F• Mettre le produit assemblé debout.
•Écarter les tubes du support de sorte que les boutons s’emboîtent dans les trous du boîtier du moteur.
•Se placer derrière le produit et s’assurer que les quatre embouts plastique sont bien à plat sur le sol. Vérifier aussi que l’embout plastique gauche est identifié par un « L » et l’embout plastique droit, par un « R ».
•Si les embouts plastique ne sont pas à plat sur le sol, ou si les embouts plastique gauche et droit ont été inversés, retirer les deux tubes inférieurs des tubes supérieurs pour les installer du côté opposé. Remettre les tubes inférieurs sur les tubes supérieurs opposés.
D• Die Einheit aufrecht hinstellen.
•Die Beine so ausklappen, dass die Knöpfe in den Löchen des motorisierten Rahmens einrasten.
•Steht man hinter dem Produkt, sollten alle vier Füße flach auf dem Boden liegen. Bitte auch prüfen, ob sich das L für den linken Fuß und das R für den rechten Fuß an der richtigen Stelle befindet.
•Liegen die Füße nicht flach auf dem Boden, oder wurden linker und rechter Fuß vertauscht, die unteren Beine wieder von den oberen Beinen abnehmen und auf das jeweils gegenüberliegende obere Bein setzen.
N• Zet de constructie rechtop.
•Klap de poten uit zodat de knopjes “vastklikken” in de gaatjes van het gemotoriseerde frame.
•Van achteren gezien, moeten alle vier de voetjes plat op de grond rusten. Controleer ook of er een L op het linkervoetje en een R op het rechtervoetje staat.
•Als de voetjes niet plat op de grond rusten, of wanneer het rechter- en linkervoetje zijn omgewisseld, moet u beide onderstangen weer losmaken van de bovenstangen, en de onderstangen aan de juiste bovenstangen bevestigen.
I• Raddrizzare la parte montata.
•Estrarre le gambe in modo tale che i tasti si “aggancino” ai fori del telaio motorizzato.
•Stando in piedi dietro al prodotto, tutti e quattro i piedi devono essere in posizione piatta sul pavimento. E controllare che sul piede sinistro vi sia una L e su quello destro una R.
•Se i piedi non sono in posizione piatta sul pavimento, o se il piede sinistro e destro sono invertiti, rimuovere entrambe le gambe inferiori da quelle superiori. Sostituirle sulla gamba superiore opposta.
E• Poner la estructura de pie.
•Extender las patas de modo que los botones queden trabados (se oirá un “clic”) en los orificios de la estructura motorizada.
•Para comprobar que el producto está bien montado, situarse detrás de él. Los cuatro pies deben estar situados bien planos sobre el suelo y las letras R y L deben corresponder respectivamente a los pies derecho e izquierdo.
•Si los pies no están bien planos sobre el suelo o las letras de los mismos no coinciden, desmontar las dos patas inferiores de las dos patas superiores e intercambiarlas.
K• Stil de samlede dele oprejst.
•Træk benene udad, så knapperne "klikker" fast i åbningerne i den motoriserede ramme.
•Når du står bag ved produktet, skal alle fire fødder stå fladt på gulvet. Kontroller, at der er et L på den venstre fod og et R på den højre fod.
•Hvis fødderne ikke står fladt på gulvet, eller hvis der er blevet byttet om på venstre og højre fod, skal du skille de nedre ben fra de øvre ben. Sæt de nedre ben fast på det modsatte øvre ben.
P• Coloque a montagem na vertical.
•Puxe os suportes para fora de modo a que os botões encaixem nas aberturas da estrutura motorizada.
•Estando por detrás do produto, verifique se os quatro pés estão bem firmes no chão. E verifique também se o L marca o suporte esquerdo e se o R marca o suporte direito.
•Se os pés não estiverem bem firmes no chão, ou se os suportes direito e esquerdo estiverem trocados, retire ambos os suportes inferiores dos suportes superiores. Volte a encaixá-los no suporte superior oposto.
T• Nosta teline pystyyn.
•Vedä putkia ulospäin, kunnes nupit napsahtavat moottorirungon aukkoihin.
•Tarkista telineen takana seisten, että jokainen neljästä jalasta seisoo täysin suoraan. Varmista lisäksi, että vasemmassa jalassa on merkintä L ja oikeassa R.
•Mikäli jalat eivät seiso tasaisesti maassa tai vasen ja oikea ovat väärillä puolilla, irrota molemmat alaputket yläputkista. Asenna ne uudelleen vastakkaisen puolen yläputkeen.
M• Snu montasjen slik at riktig side vender opp.
•Dra ut beina slik at knappene smetter på plass i hullene i den motor- drevne rammen.
•Når du står bak produktet, skal alle fire støtter ligge flatt mot gulvet. Du bør også kontrollere at venstre og høyre støtte er merket med henholdvis L og R.
•Dersom støttene ikke ligger flatt mot gulvet, eller dersom venstre og høyre støtte er byttet om, fjernes begge nedre bein fra de øvre beina. Bytt dem om og sett dem på plass igjen.
s• Ställ enheten upprätt.
•Dra ut benen så att knapparna knäpper på plats i hålen i den motori- serade ramen.
•Sedd bakifrån skall produktens fyra fötter stå plant på golvet. Kontrollera att det står L på den vänstra foten och R på den högra.
•Om fötterna inte står plant på golvet, eller om vänster och höger fot sitter på fel sida, avlägsnar du de båda nedre benen från de övre benen och monterar dem på motsatt övre ben.
R• ™ËÎÒÛÙ ÙÔ Û˘Ó·ÚÌÔÏÔÁË̤ÓÔ Û‡ÓÔÏÔ Û fiÚıÈ· ı¤ÛË.
•ΔÚ·‚‹ÍÙ ٷ fi‰È· ÚÔ˜ Ù· ¤Íˆ ¤ÙÛÈ ÒÛÙ ٷ ÎÔ˘ÌÈ¿ Ó· «·ÛÊ·Ï›ÛÔ˘Ó» ̤۷ ÛÙȘ Ùڇ˜ ÙÔ˘ ÛÎÂÏÂÙÔ‡ Ì ÌÔÙ¤Ú.
•ŸÙ·Ó ÛÙ¤ÎÂÛÙ ›Ûˆ ·fi ·˘Ùfi ÙÔ ÚÔ˚fiÓ, Î·È Ù· Ù¤ÛÛÂÚ· ¤ÏÌ·Ù· Ú¤ÂÈ Ó· ·ÎÔ˘ÌÔ‡Ó Â›Â‰· Î·È ·fiÏ˘Ù· ÛÙÔ ‰¿Â‰Ô. ∂›Û˘, ‚‚·Èˆı›Ù fiÙÈ Ë ¤Ó‰ÂÈÍË L ‚Ú›ÛÎÂÙ·È ÛÙÔ ·ÚÈÛÙÂÚfi fi‰È Î·È Ë ¤Ó‰ÂÈÍË R ÛÙÔ ‰ÂÍÈfi.
•∂¿Ó Ù· ¤ÏÌ·Ù· ‰ÂÓ ·ÎÔ˘ÌÔ‡Ó Â›Â‰· Î·È ·fiÏ˘Ù· ÛÙÔ ‰¿Â‰Ô ‹ Â¿Ó ¤¯ÂÙÂ
ÙÔÔıÂÙ‹ÛÂÈ ·ÓÙ›ÛÙÚÔÊ· ÙÔ ·ÚÈÛÙÂÚfi Î·È ÙÔ ‰ÂÍÈfi ¤ÏÌ·, ‚Á¿ÏÙÂ Î·È Ù· ‰‡Ô οو fi‰È· ·fi Ù· ¿Óˆ fi‰È·. ∂·Ó·ÙÔÔıÂÙ‹ÛÙÂ, ÙÔ Î·ı¤Ó· ÛÙÔ ¿ÏÏÔ Â¿Óˆ fi‰È.