| | G Motorized Frame | K Motoriseret ramme |
| | F Boîtier du moteur | P Estrutura Motorizada |
| | D Motorisierter Rahmen | T Moottoroitu runko |
| | N Gemotoriseerd frame | M Motordrevet ramme |
| | I Telaio Motorizzato | s Motordriven ram |
| | E Estructura motorizada | R ™ÎÂÏÂÙfi˜ Ì ªÔÙ¤Ú |
| G Hole | K Åbning | |
| F Trou | P Abertura | |
| D Loch | T Aukko | |
| N Hole | M Hull | G Red Dot |
| I Foro | s Hål |
| F Repère rouge |
| E Orificio R ΔÚ‡· |
| D Roter Punkt |
| | |
| | | N Rode stip |
| G Tube | K Rør | I Punto Rosso |
| E Punto rojo |
| F Tube | P Tubo |
| K Rød prik |
| D Stange T Putki |
| P Ponto Vermelho |
| N Buis | M Rør |
| T Punainen piste |
| I Tubo | s Rör |
| M Rød prikk |
| E Tubo | R ™ˆÏ‹Ó·˜ |
| s Röd punkt |
| | |
GR ∫fiÎÎÈÓË ∫Ô˘ÎΛ‰·
Elbow Foot
| F Pied | | G Button | K Knap |
| D Winkel | |
| | F Bouton | P Botão |
| N Elleboogvoetje | |
| | D Knopf | T Nuppi |
| I Piede a Gomito | |
| | N Knopje | M Knapp |
| E Pie en forma de L |
| I Tasto | s Knapp |
| K Vinkelfod | |
| | E Botón | R ∫Ô˘Ì› |
| P Pé em Esquina | |
| | | |
| T Kyynärputki | | | |
| M Albustøtte | L | R | |
| s Krökfot | |
| | |
R °fiÓ·ÙÔ
4
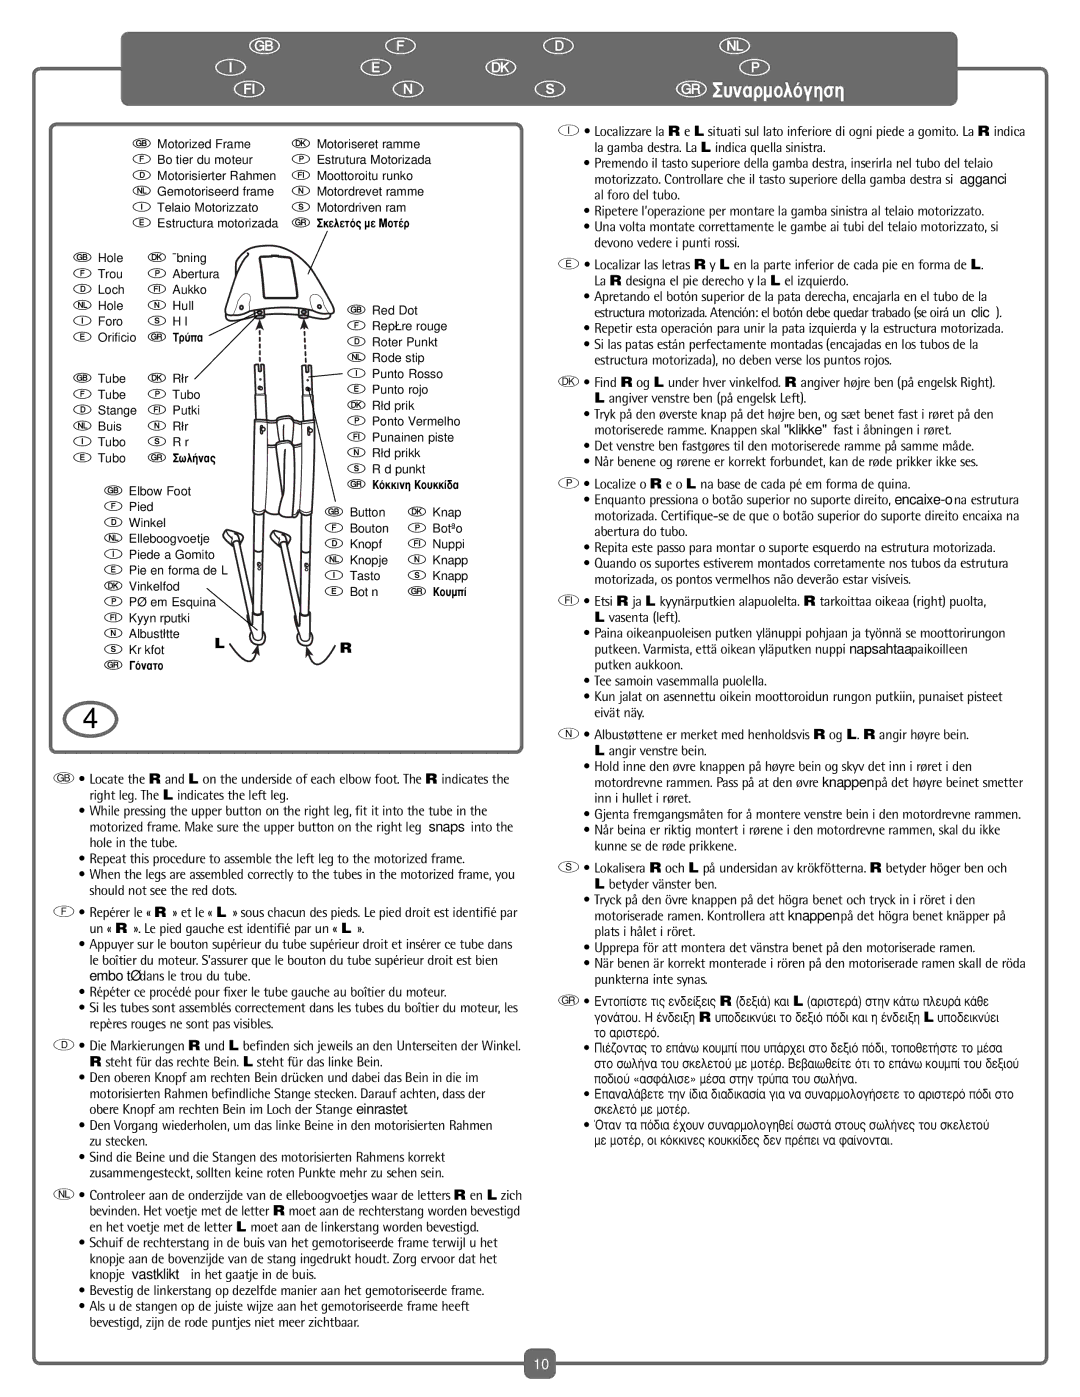
G• Locate the R and L on the underside of each elbow foot. The R indicates the right leg. The L indicates the left leg.
•While pressing the upper button on the right leg, fit it into the tube in the motorized frame. Make sure the upper button on the right leg “snaps” into the hole in the tube.
•Repeat this procedure to assemble the left leg to the motorized frame.
•When the legs are assembled correctly to the tubes in the motorized frame, you should not see the red dots.
F• Repérer le « R » et le « L » sous chacun des pieds. Le pied droit est identifié par un « R ». Le pied gauche est identifié par un « L ».
•Appuyer sur le bouton supérieur du tube supérieur droit et insérer ce tube dans le boîtier du moteur. S’assurer que le bouton du tube supérieur droit est bien emboîté dans le trou du tube.
•Répéter ce procédé pour fixer le tube gauche au boîtier du moteur.
•Si les tubes sont assemblés correctement dans les tubes du boîtier du moteur, les repères rouges ne sont pas visibles.
D• Die Markierungen R und L befinden sich jeweils an den Unterseiten der Winkel. R steht für das rechte Bein. L steht für das linke Bein.
•Den oberen Knopf am rechten Bein drücken und dabei das Bein in die im motorisierten Rahmen befindliche Stange stecken. Darauf achten, dass der obere Knopf am rechten Bein im Loch der Stange einrastet.
•Den Vorgang wiederholen, um das linke Beine in den motorisierten Rahmen zu stecken.
•Sind die Beine und die Stangen des motorisierten Rahmens korrekt zusammengesteckt, sollten keine roten Punkte mehr zu sehen sein.
N• Controleer aan de onderzijde van de elleboogvoetjes waar de letters R en L zich bevinden. Het voetje met de letter R moet aan de rechterstang worden bevestigd en het voetje met de letter L moet aan de linkerstang worden bevestigd.
•Schuif de rechterstang in de buis van het gemotoriseerde frame terwijl u het knopje aan de bovenzijde van de stang ingedrukt houdt. Zorg ervoor dat het knopje “vastklikt” in het gaatje in de buis.
•Bevestig de linkerstang op dezelfde manier aan het gemotoriseerde frame.
•Als u de stangen op de juiste wijze aan het gemotoriseerde frame heeft bevestigd, zijn de rode puntjes niet meer zichtbaar.
I• Localizzare la R e L situati sul lato inferiore di ogni piede a gomito. La R indica la gamba destra. La L indica quella sinistra.
•Premendo il tasto superiore della gamba destra, inserirla nel tubo del telaio motorizzato. Controllare che il tasto superiore della gamba destra si “agganci” al foro del tubo.
•Ripetere l’operazione per montare la gamba sinistra al telaio motorizzato.
•Una volta montate correttamente le gambe ai tubi del telaio motorizzato, si devono vedere i punti rossi.
E• Localizar las letras R y L en la parte inferior de cada pie en forma de L. La R designa el pie derecho y la L el izquierdo.
•Apretando el botón superior de la pata derecha, encajarla en el tubo de la estructura motorizada. Atención: el botón debe quedar trabado (se oirá un “clic”).
•Repetir esta operación para unir la pata izquierda y la estructura motorizada.
•Si las patas están perfectamente montadas (encajadas en los tubos de la estructura motorizada), no deben verse los puntos rojos.
K• Find R og L under hver vinkelfod. R angiver højre ben (på engelsk Right). L angiver venstre ben (på engelsk Left).
•Tryk på den øverste knap på det højre ben, og sæt benet fast i røret på den motoriserede ramme. Knappen skal "klikke" fast i åbningen i røret.
•Det venstre ben fastgøres til den motoriserede ramme på samme måde.
•Når benene og rørene er korrekt forbundet, kan de røde prikker ikke ses.
P• Localize o R e o L na base de cada pé em forma de quina.
•Enquanto pressiona o botão superior no suporte direito, encaixe-ona estrutura motorizada. Certifique-se de que o botão superior do suporte direito encaixa na abertura do tubo.
•Repita este passo para montar o suporte esquerdo na estrutura motorizada.
•Quando os suportes estiverem montados corretamente nos tubos da estrutura motorizada, os pontos vermelhos não deverão estar visíveis.
T• Etsi R ja L kyynärputkien alapuolelta. R tarkoittaa oikeaa (right) puolta, L vasenta (left).
•Paina oikeanpuoleisen putken ylänuppi pohjaan ja työnnä se moottorirungon putkeen. Varmista, että oikean yläputken nuppi napsahtaa paikoilleen putken aukkoon.
•Tee samoin vasemmalla puolella.
•Kun jalat on asennettu oikein moottoroidun rungon putkiin, punaiset pisteet eivät näy.
M• Albustøttene er merket med henholdsvis R og L. R angir høyre bein. L angir venstre bein.
•Hold inne den øvre knappen på høyre bein og skyv det inn i røret i den motordrevne rammen. Pass på at den øvre knappen på det høyre beinet smetter inn i hullet i røret.
•Gjenta fremgangsmåten for å montere venstre bein i den motordrevne rammen.
•Når beina er riktig montert i rørene i den motordrevne rammen, skal du ikke kunne se de røde prikkene.
s• Lokalisera R och L på undersidan av krökfötterna. R betyder höger ben och L betyder vänster ben.
•Tryck på den övre knappen på det högra benet och tryck in i röret i den motoriserade ramen. Kontrollera att knappen på det högra benet knäpper på plats i hålet i röret.
•Upprepa för att montera det vänstra benet på den motoriserade ramen.
•När benen är korrekt monterade i rören på den motoriserade ramen skall de röda punkterna inte synas.
R• ∂ÓÙÔ›ÛÙ ÙȘ ÂӉ›ÍÂȘ R (‰ÂÍÈ¿) Î·È L (·ÚÈÛÙÂÚ¿) ÛÙËÓ Î¿Ùˆ ÏÂ˘Ú¿ οı ÁÔÓ¿ÙÔ˘. ∏ ¤Ó‰ÂÈÍË R ˘Ô‰ÂÈÎÓ‡ÂÈ ÙÔ ‰ÂÍÈfi fi‰È Î·È Ë ¤Ó‰ÂÈÍË L ˘Ô‰ÂÈÎÓ‡ÂÈ ÙÔ ·ÚÈÛÙÂÚfi.
•¶È¤˙ÔÓÙ·˜ ÙÔ Â¿Óˆ ÎÔ˘Ì› Ô˘ ˘¿Ú¯ÂÈ ÛÙÔ ‰ÂÍÈfi fi‰È, ÙÔÔıÂÙ‹ÛÙ ÙÔ Ì¤Û· ÛÙÔ ÛˆÏ‹Ó· ÙÔ˘ ÛÎÂÏÂÙÔ‡ Ì ÌÔÙ¤Ú. μ‚·Èˆı›Ù fiÙÈ ÙÔ Â¿Óˆ ÎÔ˘Ì› ÙÔ˘ ‰ÂÍÈÔ‡ Ô‰ÈÔ‡ «·ÛÊ¿ÏÈÛ» ̤۷ ÛÙËÓ ÙÚ‡· ÙÔ˘ ۈϋӷ.
•∂·Ó·Ï¿‚ÂÙ ÙËÓ ›‰È· ‰È·‰Èηۛ· ÁÈ· Ó· Û˘Ó·ÚÌÔÏÔÁ‹ÛÂÙ ÙÔ ·ÚÈÛÙÂÚfi fi‰È ÛÙÔ ÛÎÂÏÂÙfi Ì ÌÔÙ¤Ú.
•ŸÙ·Ó Ù· fi‰È· ¤¯Ô˘Ó Û˘Ó·ÚÌÔÏÔÁËı› ÛˆÛÙ¿ ÛÙÔ˘˜ ۈϋÓ˜ ÙÔ˘ ÛÎÂÏÂÙÔ‡ Ì ÌÔÙ¤Ú, ÔÈ ÎfiÎÎÈÓ˜ ÎÔ˘ÎΛ‰Â˜ ‰ÂÓ Ú¤ÂÈ Ó· Ê·›ÓÔÓÙ·È.