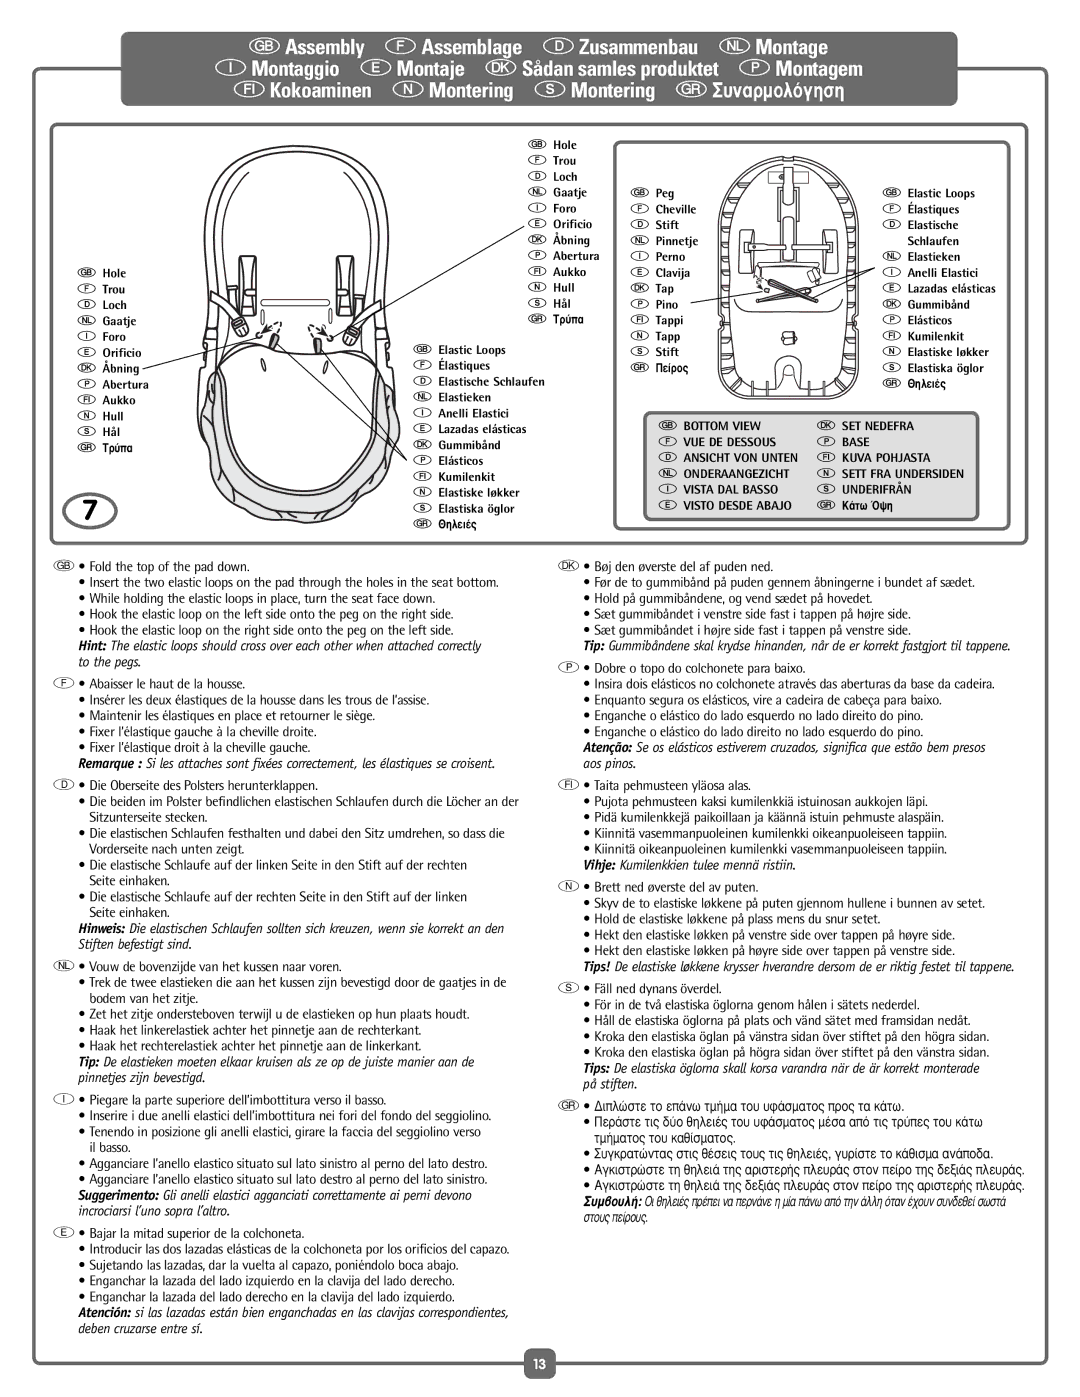
G• Fold the top of the pad down.
•Insert the two elastic loops on the pad through the holes in the seat bottom.
•While holding the elastic loops in place, turn the seat face down.
•Hook the elastic loop on the left side onto the peg on the right side.
•Hook the elastic loop on the right side onto the peg on the left side.
Hint: The elastic loops should cross over each other when attached correctly to the pegs.
F• Abaisser le haut de la housse.
•Insérer les deux élastiques de la housse dans les trous de l’assise.
•Maintenir les élastiques en place et retourner le siège.
•Fixer l’élastique gauche à la cheville droite.
•Fixer l’élastique droit à la cheville gauche.
Remarque : Si les attaches sont fixées correctement, les élastiques se croisent.
D• Die Oberseite des Polsters herunterklappen.
•Die beiden im Polster befindlichen elastischen Schlaufen durch die Löcher an der Sitzunterseite stecken.
•Die elastischen Schlaufen festhalten und dabei den Sitz umdrehen, so dass die Vorderseite nach unten zeigt.
•Die elastische Schlaufe auf der linken Seite in den Stift auf der rechten Seite einhaken.
•Die elastische Schlaufe auf der rechten Seite in den Stift auf der linken Seite einhaken.
Hinweis: Die elastischen Schlaufen sollten sich kreuzen, wenn sie korrekt an den Stiften befestigt sind.
N• Vouw de bovenzijde van het kussen naar voren.
•Trek de twee elastieken die aan het kussen zijn bevestigd door de gaatjes in de bodem van het zitje.
•Zet het zitje ondersteboven terwijl u de elastieken op hun plaats houdt.
•Haak het linkerelastiek achter het pinnetje aan de rechterkant.
•Haak het rechterelastiek achter het pinnetje aan de linkerkant.
Tip: De elastieken moeten elkaar kruisen als ze op de juiste manier aan de pinnetjes zijn bevestigd.
I• Piegare la parte superiore dell’imbottitura verso il basso.
•Inserire i due anelli elastici dell’imbottitura nei fori del fondo del seggiolino.
•Tenendo in posizione gli anelli elastici, girare la faccia del seggiolino verso il basso.
•Agganciare l’anello elastico situato sul lato sinistro al perno del lato destro.
•Agganciare l’anello elastico situato sul lato destro al perno del lato sinistro. Suggerimento: Gli anelli elastici agganciati correttamente ai perni devono incrociarsi l’uno sopra l’altro.
E• Bajar la mitad superior de la colchoneta.
•Introducir las dos lazadas elásticas de la colchoneta por los orificios del capazo.
•Sujetando las lazadas, dar la vuelta al capazo, poniéndolo boca abajo.
•Enganchar la lazada del lado izquierdo en la clavija del lado derecho.
•Enganchar la lazada del lado derecho en la clavija del lado izquierdo. Atención: si las lazadas están bien enganchadas en las clavijas correspondientes, deben cruzarse entre sí.
K• Bøj den øverste del af puden ned.
•Før de to gummibånd på puden gennem åbningerne i bundet af sædet.
•Hold på gummibåndene, og vend sædet på hovedet.
•Sæt gummibåndet i venstre side fast i tappen på højre side.
•Sæt gummibåndet i højre side fast i tappen på venstre side.
Tip: Gummibåndene skal krydse hinanden, når de er korrekt fastgjort til tappene.
P• Dobre o topo do colchonete para baixo.
•Insira dois elásticos no colchonete através das aberturas da base da cadeira.
•Enquanto segura os elásticos, vire a cadeira de cabeça para baixo.
•Enganche o elástico do lado esquerdo no lado direito do pino.
•Enganche o elástico do lado direito no lado esquerdo do pino.
Atenção: Se os elásticos estiverem cruzados, significa que estão bem presos aos pinos.
T• Taita pehmusteen yläosa alas.
•Pujota pehmusteen kaksi kumilenkkiä istuinosan aukkojen läpi.
•Pidä kumilenkkejä paikoillaan ja käännä istuin pehmuste alaspäin.
•Kiinnitä vasemmanpuoleinen kumilenkki oikeanpuoleiseen tappiin.
•Kiinnitä oikeanpuoleinen kumilenkki vasemmanpuoleiseen tappiin. Vihje: Kumilenkkien tulee mennä ristiin.
M• Brett ned øverste del av puten.
•Skyv de to elastiske løkkene på puten gjennom hullene i bunnen av setet.
•Hold de elastiske løkkene på plass mens du snur setet.
•Hekt den elastiske løkken på venstre side over tappen på høyre side.
•Hekt den elastiske løkken på høyre side over tappen på venstre side.
Tips! De elastiske løkkene krysser hverandre dersom de er riktig festet til tappene.
s• Fäll ned dynans överdel.
•För in de två elastiska öglorna genom hålen i sätets nederdel.
•Håll de elastiska öglorna på plats och vänd sätet med framsidan nedåt.
•Kroka den elastiska öglan på vänstra sidan över stiftet på den högra sidan.
•Kroka den elastiska öglan på högra sidan över stiftet på den vänstra sidan. Tips: De elastiska öglorna skall korsa varandra när de är korrekt monterade på stiften.
R• ¢ÈÏÒÛÙ ÙÔ Â¿Óˆ ÙÌ‹Ì· ÙÔ˘ ˘Ê¿ÛÌ·ÙÔ˜ ÚÔ˜ Ù· οو.
•¶ÂÚ¿ÛÙ ÙȘ ‰‡Ô ıËÏÂȤ˜ ÙÔ˘ ˘Ê¿ÛÌ·ÙÔ˜ ̤۷ ·fi ÙȘ Ùڇ˜ ÙÔ˘ οو ÙÌ‹Ì·ÙÔ˜ ÙÔ˘ ηı›ÛÌ·ÙÔ˜.
•™˘ÁÎÚ·ÙÒÓÙ·˜ ÛÙȘ ı¤ÛÂȘ ÙÔ˘˜ ÙȘ ıËÏÂȤ˜, Á˘Ú›ÛÙ ÙÔ Î¿ıÈÛÌ· ·Ó¿Ô‰·.
•∞ÁÎÈÛÙÚÒÛÙ ÙË ıËÏÂÈ¿ Ù˘ ·ÚÈÛÙÂÚ‹˜ ÏÂ˘Ú¿˜ ÛÙÔÓ Â›ÚÔ Ù˘ ‰ÂÍÈ¿˜ ÏÂ˘Ú¿˜.
•∞ÁÎÈÛÙÚÒÛÙ ÙË ıËÏÂÈ¿ Ù˘ ‰ÂÍÈ¿˜ ÏÂ˘Ú¿˜ ÛÙÔÓ Â›ÚÔ Ù˘ ·ÚÈÛÙÂÚ‹˜ ÏÂ˘Ú¿˜. ™˘Ì‚Ô˘Ï‹: √È ıËÏÂȤ˜ Ú¤ÂÈ Ó· ÂÚÓ¿ÓÂ Ë Ì›· ¿Óˆ ·fi ÙËÓ ¿ÏÏË fiÙ·Ó ¤¯Ô˘Ó Û˘Ó‰Âı› ÛˆÛÙ¿ ÛÙÔ˘˜ ›ÚÔ˘˜.