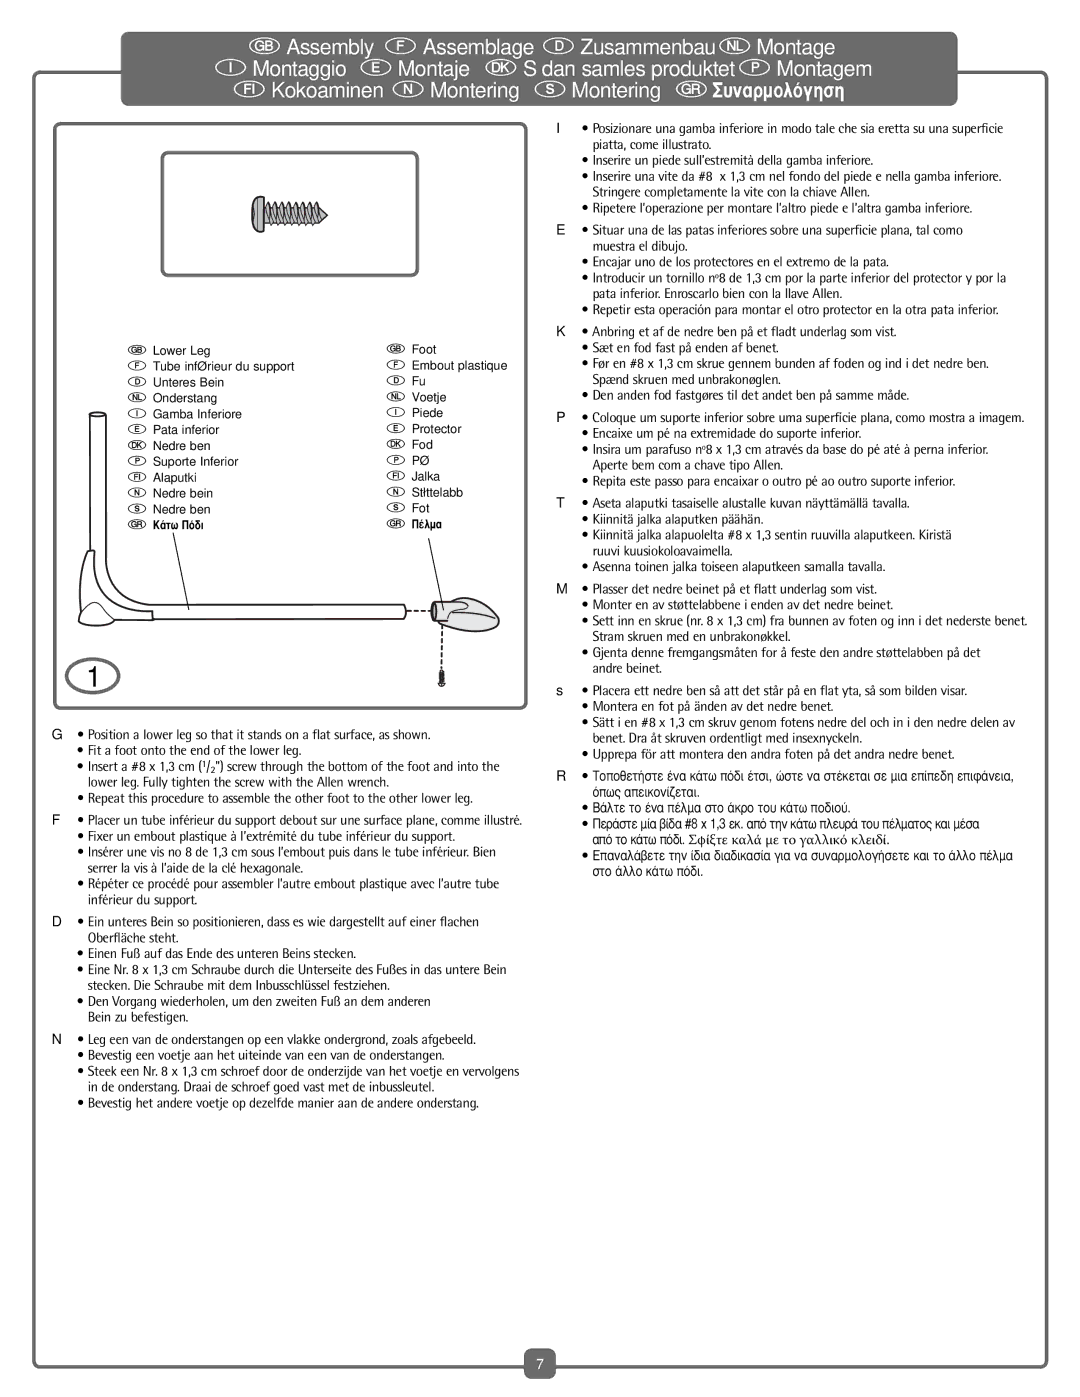
Fisher-Price C6410, H7184 manual Lower Leg Foot Tube inférieur du support

Models: C6410 H7184

1 44
Download 44 pages 8.97 Kb
Page 7
Image 7

GAssembly FAssemblage DZusammenbau NMontage

IMontaggio EMontaje KSådan samles produktet PMontagem TKokoaminen MMontering sMontering R™˘Ó·ÚÌÔÏfiÁËÛË

G Lower Leg

G Foot

F Tube inférieur du support

F Embout plastique

D Unteres Bein

D Fuß

N Onderstang

N Voetje

I Gamba Inferiore

I Piede

E Pata inferior

E Protector

K Nedre ben

K Fod

P Suporte Inferior

P Pé

T Alaputki

T Jalka

M Nedre bein

M Støttelabb

s Nedre ben

s Fot

R ∫¿Ùˆ ¶fi‰È

R ¶¤ÏÌ·

1

G• Position a lower leg so that it stands on a flat surface, as shown.

Fit a foot onto the end of the lower leg.

Insert a #8 x 1,3 cm (1/2") screw through the bottom of the foot and into the lower leg. Fully tighten the screw with the Allen wrench.

Repeat this procedure to assemble the other foot to the other lower leg.

F• Placer un tube inférieur du support debout sur une surface plane, comme illustré.

Fixer un embout plastique à l’extrémité du tube inférieur du support.

Insérer une vis no 8 de 1,3 cm sous l’embout puis dans le tube inférieur. Bien serrer la vis à l’aide de la clé hexagonale.

Répéter ce procédé pour assembler l’autre embout plastique avec l’autre tube inférieur du support.

D• Ein unteres Bein so positionieren, dass es wie dargestellt auf einer flachen Oberfläche steht.

Einen Fuß auf das Ende des unteren Beins stecken.

Eine Nr. 8 x 1,3 cm Schraube durch die Unterseite des Fußes in das untere Bein stecken. Die Schraube mit dem Inbusschlüssel festziehen.

Den Vorgang wiederholen, um den zweiten Fuß an dem anderen Bein zu befestigen.

N• Leg een van de onderstangen op een vlakke ondergrond, zoals afgebeeld.

Bevestig een voetje aan het uiteinde van een van de onderstangen.

Steek een Nr. 8 x 1,3 cm schroef door de onderzijde van het voetje en vervolgens in de onderstang. Draai de schroef goed vast met de inbussleutel.

Bevestig het andere voetje op dezelfde manier aan de andere onderstang.

I• Posizionare una gamba inferiore in modo tale che sia eretta su una superficie piatta, come illustrato.

Inserire un piede sull’estremità della gamba inferiore.

Inserire una vite da #8 x 1,3 cm nel fondo del piede e nella gamba inferiore. Stringere completamente la vite con la chiave Allen.

Ripetere l’operazione per montare l’altro piede e l’altra gamba inferiore.

E• Situar una de las patas inferiores sobre una superficie plana, tal como muestra el dibujo.

Encajar uno de los protectores en el extremo de la pata.

Introducir un tornillo nº8 de 1,3 cm por la parte inferior del protector y por la pata inferior. Enroscarlo bien con la llave Allen.

Repetir esta operación para montar el otro protector en la otra pata inferior.

K• Anbring et af de nedre ben på et fladt underlag som vist.

Sæt en fod fast på enden af benet.

Før en #8 x 1,3 cm skrue gennem bunden af foden og ind i det nedre ben. Spænd skruen med unbrakonøglen.

Den anden fod fastgøres til det andet ben på samme måde.

P• Coloque um suporte inferior sobre uma superfície plana, como mostra a imagem.

Encaixe um pé na extremidade do suporte inferior.

Insira um parafuso nº8 x 1,3 cm através da base do pé até à perna inferior. Aperte bem com a chave tipo Allen.

Repita este passo para encaixar o outro pé ao outro suporte inferior.

T• Aseta alaputki tasaiselle alustalle kuvan näyttämällä tavalla.

Kiinnitä jalka alaputken päähän.

Kiinnitä jalka alapuolelta #8 x 1,3 sentin ruuvilla alaputkeen. Kiristä ruuvi kuusiokoloavaimella.

Asenna toinen jalka toiseen alaputkeen samalla tavalla.

M• Plasser det nedre beinet på et flatt underlag som vist.

Monter en av støttelabbene i enden av det nedre beinet.

Sett inn en skrue (nr. 8 x 1,3 cm) fra bunnen av foten og inn i det nederste benet. Stram skruen med en unbrakonøkkel.

Gjenta denne fremgangsmåten for å feste den andre støttelabben på det andre beinet.

s• Placera ett nedre ben så att det står på en flat yta, så som bilden visar.

Montera en fot på änden av det nedre benet.

Sätt i en #8 x 1,3 cm skruv genom fotens nedre del och in i den nedre delen av benet. Dra åt skruven ordentligt med insexnyckeln.

Upprepa för att montera den andra foten på det andra nedre benet.

RΔÔÔıÂÙ‹ÛÙ ¤Ó· οو fi‰È ¤ÙÛÈ, ÒÛÙ ӷ ÛÙ¤ÎÂÙ·È Û ÌÈ· Â›Â‰Ë ÂÈÊ¿ÓÂÈ·, fiˆ˜ ·ÂÈÎÔÓ›˙ÂÙ·È.

μ¿ÏÙ ÙÔ ¤Ó· ¤ÏÌ· ÛÙÔ ¿ÎÚÔ ÙÔ˘ οو Ô‰ÈÔ‡.

¶ÂÚ¿ÛÙ ̛· ‚›‰· #8 x 1,3 ÂÎ. ·fi ÙËÓ Î¿Ùˆ ÏÂ˘Ú¿ ÙÔ˘ ¤ÏÌ·ÙÔ˜ Î·È Ì¤Û· ·fi ÙÔ Î¿Ùˆ fi‰È. Σφίξτε καλά με το γαλλικό κλειδί.

∂·Ó·Ï¿‚ÂÙ ÙËÓ ›‰È· ‰È·‰Èηۛ· ÁÈ· Ó· Û˘Ó·ÚÌÔÏÔÁ‹ÛÂÙÂ Î·È ÙÔ ¿ÏÏÔ ¤ÏÌ· ÛÙÔ ¿ÏÏÔ Î¿Ùˆ fi‰È.

7

Page 7
Image 7
Fisher-Price C6410, H7184 manual Lower Leg Foot Tube inférieur du support

C6410, H7184 specifications

Fisher-Price has long been a trusted name in the realm of children's toys, providing innovative products that inspire creativity and promote developmental play. Among their popular offerings are the Fisher-Price H7184 and C6410, two toys designed to captivate the imaginations of young children while assisting in their cognitive and physical growth.

The Fisher-Price H7184 is an interactive playset that encourages imaginative role-playing. This model features vibrant colors, engaging characters, and sound effects that draw children in, making it a captivating addition to any playroom. With its durable construction, the H7184 is built to withstand active play, ensuring it can handle the bumps and knocks that come with energetic usage. One of its standout characteristics is its ability to stimulate sensory development through various textures, sounds, and visual stimuli, aiding in the overall growth of the child’s senses.

On the other hand, the Fisher-Price C6410 offers a different but equally engaging experience. This toy is designed to promote fine motor skills and hand-eye coordination. Its intricate design includes movable parts, buttons, and switches that encourage children to manipulate and explore. The use of bright colors and fun characters make the C6410 not just a learning tool, but also a source of enjoyment and excitement for toddlers.

Both toys are integrated with innovative technologies that enhance the play experience. For instance, the H7184 might include smart sensors that respond to the child’s actions, creating an interactive narrative that evolves based on their play. Features such as lights and sounds not only add to the excitement but also provide auditory and visual feedback, reinforcing cause-and-effect learning.

Safety is paramount at Fisher-Price, which is evident in the H7184 and C6410’s designs. Both toys comply with strict safety standards, utilizing non-toxic materials and rounded edges to ensure a safe play environment. This attention to safety allows parents to feel confident as their children explore and learn through play.

In summary, the Fisher-Price H7184 and C6410 stand out in the market for their focus on sensory development, fine motor skills, and imaginative play. With their combination of fun, education, and safety, these toys are excellent choices for nurturing young minds.