GAssembly FAssemblage DZusammenbau NMontage

IMontaggio EMontaje KSådan samles produktet PMontagem TKokoaminen MMontering sMontering R™˘Ó·ÚÌÔÏfiÁËÛË

G Waist Belts

G Seat

F Attaches de sécurité

F Siège

D Bauchgurte

D Sitz

N Zijriempjes

N Zitje

I Cinture Vita

I Seggiolino

E Cinturones de seguridad

E Capazo

K Remme

K Sæde

P Tiras de Cintura

P Cadeira

T Kiinnityshihnat

T Istuin

M Magebelte

M Sete

s Midjebälten

s Säte

R ∑ÒÓ˜ ª¤Û˘

R ∫¿ıÈÛÌ·

G Pad


F Housse


D Polster

G Slots

N Kussen

I Imbottitura

F Fentes

E Colchoneta

D Schlitze

K Pude

N Gleufjes

P Colchonete

I Fessure

T Pehmuste

E Ranuras

M Pute

K Riller

s Dyna

P Fendas

R ⁄Ê·ÛÌ·

T Raot

8

M Spor

s Slitsar

R ∂ÛÔ¯¤˜

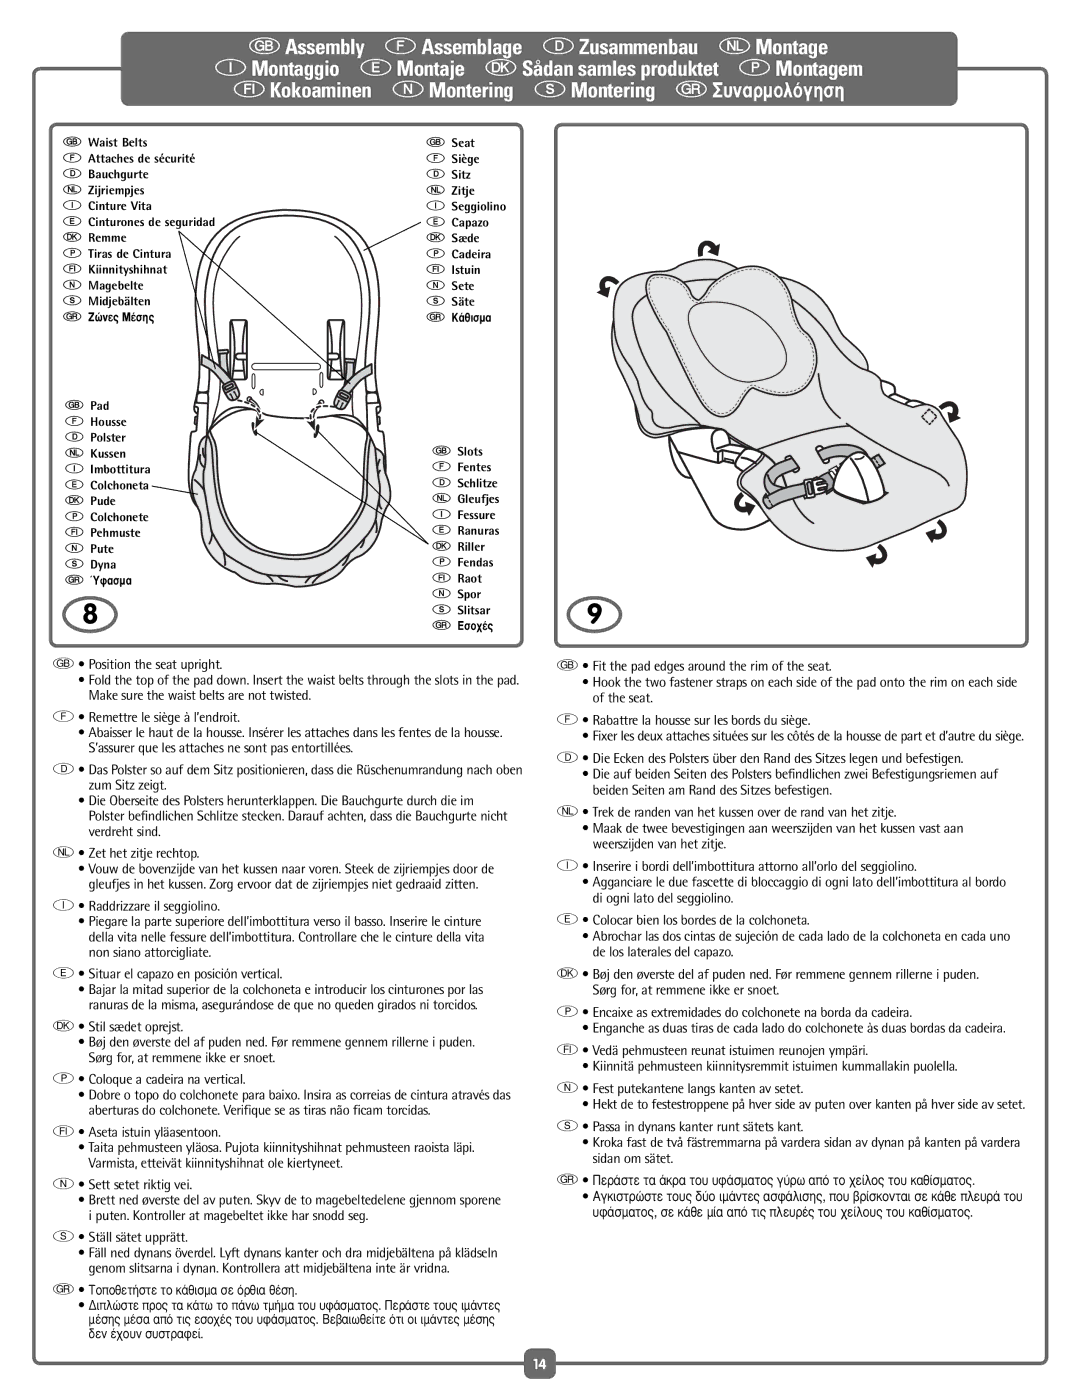
G• Position the seat upright.

Fold the top of the pad down. Insert the waist belts through the slots in the pad. Make sure the waist belts are not twisted.

F• Remettre le siège à l’endroit.

Abaisser le haut de la housse. Insérer les attaches dans les fentes de la housse. S’assurer que les attaches ne sont pas entortillées.

D• Das Polster so auf dem Sitz positionieren, dass die Rüschenumrandung nach oben zum Sitz zeigt.

Die Oberseite des Polsters herunterklappen. Die Bauchgurte durch die im Polster befindlichen Schlitze stecken. Darauf achten, dass die Bauchgurte nicht verdreht sind.

N• Zet het zitje rechtop.

Vouw de bovenzijde van het kussen naar voren. Steek de zijriempjes door de gleufjes in het kussen. Zorg ervoor dat de zijriempjes niet gedraaid zitten.

I• Raddrizzare il seggiolino.

Piegare la parte superiore dell’imbottitura verso il basso. Inserire le cinture della vita nelle fessure dell’imbottitura. Controllare che le cinture della vita non siano attorcigliate.

E• Situar el capazo en posición vertical.

Bajar la mitad superior de la colchoneta e introducir los cinturones por las ranuras de la misma, asegurándose de que no queden girados ni torcidos.

K• Stil sædet oprejst.

Bøj den øverste del af puden ned. Før remmene gennem rillerne i puden. Sørg for, at remmene ikke er snoet.

P• Coloque a cadeira na vertical.

Dobre o topo do colchonete para baixo. Insira as correias de cintura através das aberturas do colchonete. Verifique se as tiras não ficam torcidas.

T• Aseta istuin yläasentoon.

Taita pehmusteen yläosa. Pujota kiinnityshihnat pehmusteen raoista läpi. Varmista, etteivät kiinnityshihnat ole kiertyneet.

M• Sett setet riktig vei.

• Brett ned øverste del av puten. Skyv de to magebeltedelene gjennom sporene i puten. Kontroller at magebeltet ikke har snodd seg.

s• Ställ sätet upprätt.

Fäll ned dynans överdel. Lyft dynans kanter och dra midjebältena på klädseln genom slitsarna i dynan. Kontrollera att midjebältena inte är vridna.

RΔÔÔıÂÙ‹ÛÙ ÙÔ Î¿ıÈÛÌ· Û fiÚıÈ· ı¤ÛË.

¢ÈÏÒÛÙ ÚÔ˜ Ù· οو ÙÔ ¿Óˆ ÙÌ‹Ì· ÙÔ˘ ˘Ê¿ÛÌ·ÙÔ˜. ¶ÂÚ¿ÛÙ ÙÔ˘˜ ÈÌ¿ÓÙ˜ ̤Û˘ ̤۷ ·fi ÙȘ ÂÛÔ¯¤˜ ÙÔ˘ ˘Ê¿ÛÌ·ÙÔ˜. μ‚·Èˆı›Ù fiÙÈ ÔÈ ÈÌ¿ÓÙ˜ ̤Û˘ ‰ÂÓ ¤¯Ô˘Ó Û˘ÛÙÚ·Ê›.

9

G• Fit the pad edges around the rim of the seat.

Hook the two fastener straps on each side of the pad onto the rim on each side of the seat.

F• Rabattre la housse sur les bords du siège.

• Fixer les deux attaches situées sur les côtés de la housse de part et d’autre du siège.

D• Die Ecken des Polsters über den Rand des Sitzes legen und befestigen.

Die auf beiden Seiten des Polsters befindlichen zwei Befestigungsriemen auf beiden Seiten am Rand des Sitzes befestigen.

N• Trek de randen van het kussen over de rand van het zitje.

Maak de twee bevestigingen aan weerszijden van het kussen vast aan weerszijden van het zitje.

I• Inserire i bordi dell’imbottitura attorno all’orlo del seggiolino.

Agganciare le due fascette di bloccaggio di ogni lato dell’imbottitura al bordo di ogni lato del seggiolino.

E• Colocar bien los bordes de la colchoneta.

Abrochar las dos cintas de sujeción de cada lado de la colchoneta en cada uno de los laterales del capazo.

K• Bøj den øverste del af puden ned. Før remmene gennem rillerne i puden. Sørg for, at remmene ikke er snoet.

P• Encaixe as extremidades do colchonete na borda da cadeira.

• Enganche as duas tiras de cada lado do colchonete às duas bordas da cadeira.

T• Vedä pehmusteen reunat istuimen reunojen ympäri.

• Kiinnitä pehmusteen kiinnitysremmit istuimen kummallakin puolella.

M• Fest putekantene langs kanten av setet.

• Hekt de to festestroppene på hver side av puten over kanten på hver side av setet.

s• Passa in dynans kanter runt sätets kant.

Kroka fast de två fästremmarna på vardera sidan av dynan på kanten på vardera sidan om sätet.

R¶ÂÚ¿ÛÙ ٷ ¿ÎÚ· ÙÔ˘ ˘Ê¿ÛÌ·ÙÔ˜ Á‡Úˆ ·fi ÙÔ ¯Â›ÏÔ˜ ÙÔ˘ ηı›ÛÌ·ÙÔ˜.

∞ÁÎÈÛÙÚÒÛÙ ÙÔ˘˜ ‰‡Ô ÈÌ¿ÓÙ˜ ·ÛÊ¿ÏÈÛ˘, Ô˘ ‚Ú›ÛÎÔÓÙ·È Û οı ÏÂ˘Ú¿ ÙÔ˘ ˘Ê¿ÛÌ·ÙÔ˜, Û οı ̛· ·fi ÙȘ Ï¢ڤ˜ ÙÔ˘ ¯Â›ÏÔ˘˜ ÙÔ˘ ηı›ÛÌ·ÙÔ˜.

14

Page 14
Image 14
Fisher-Price H7184, C6410 manual Ställ sätet upprätt

C6410, H7184 specifications

Fisher-Price has long been a trusted name in the realm of children's toys, providing innovative products that inspire creativity and promote developmental play. Among their popular offerings are the Fisher-Price H7184 and C6410, two toys designed to captivate the imaginations of young children while assisting in their cognitive and physical growth.

The Fisher-Price H7184 is an interactive playset that encourages imaginative role-playing. This model features vibrant colors, engaging characters, and sound effects that draw children in, making it a captivating addition to any playroom. With its durable construction, the H7184 is built to withstand active play, ensuring it can handle the bumps and knocks that come with energetic usage. One of its standout characteristics is its ability to stimulate sensory development through various textures, sounds, and visual stimuli, aiding in the overall growth of the child’s senses.

On the other hand, the Fisher-Price C6410 offers a different but equally engaging experience. This toy is designed to promote fine motor skills and hand-eye coordination. Its intricate design includes movable parts, buttons, and switches that encourage children to manipulate and explore. The use of bright colors and fun characters make the C6410 not just a learning tool, but also a source of enjoyment and excitement for toddlers.

Both toys are integrated with innovative technologies that enhance the play experience. For instance, the H7184 might include smart sensors that respond to the child’s actions, creating an interactive narrative that evolves based on their play. Features such as lights and sounds not only add to the excitement but also provide auditory and visual feedback, reinforcing cause-and-effect learning.

Safety is paramount at Fisher-Price, which is evident in the H7184 and C6410’s designs. Both toys comply with strict safety standards, utilizing non-toxic materials and rounded edges to ensure a safe play environment. This attention to safety allows parents to feel confident as their children explore and learn through play.

In summary, the Fisher-Price H7184 and C6410 stand out in the market for their focus on sensory development, fine motor skills, and imaginative play. With their combination of fun, education, and safety, these toys are excellent choices for nurturing young minds.