GSwing, Waterglobe and Mobile Use FUtilisation de la balancelle, de l’aquarium et du mobile

DGebrauch von Schaukel, Aquariumkugel” und Mobile

NGebruik van de schommel, waterbol en mobiel

IUso dell’Altalena, del Globo Acquatico e della Giostrina EFuncionamiento del columpio, el acuario y el móvil.

KSådan bruges gyngen, vandkuglen og uroen PUtilização da Cadeira de Balanço, do Globo e do Móbile

TKeinun, vesimaailman ja mobilen käyttöohjeet

MBruk av huske, vannglobus og uro

sAnvända gunga, vattenglob och mobil RÃÚ‹ÛË Ù˘ ∞ÈÒÚ·˜, Ù˘ ¡ÂÚfiÌ·Ï·˜ Î·È ÙÔ˘ ŒÏÈη

GUSING THE TRAY

FUTILISATION DE LA TABLETTE D GEBRAUCH DER ABLAGE N GEBRUIK VAN HET SPEELBLAD I USO DEL RIPIANO

E UTILIZACIÓN DE LA BANDEJA

GSlot

F Fente

D Schlitz

NGleufje

I Fessura

ERanura

K Rille

PFenda

T Rako

M Spor

sSlot

R ∂ÛÔ¯‹

6

KBRUG AF BAKKEN P PARA USAR O TAMPO T TARJOTTIMEN KÄYTTÖ M FOR Å BRUKE BRETTET s ANVÄNDA BRICKAN R ÃÚ‹ÛË ÙÔ˘ ¢›ÛÎÔ˘

G Tray

F Tablette

D Ablage

N Speelblad

I Ripiano

E Bandeja

K Bakke

P Tampo

T Tarjotin

M Brett

s Bricka

R ¢›ÛÎÔ˜

G STORAGE

K OPBEVARING

F RANGEMENT

P ARRUMAÇÃO

D AUFBEWAHRUNG

T SÄILYTYS

N OPBERGEN

M OPPBEVARING

I COME RIPORRE I COMPONENTI

s FÖRVARING

E PARA GUARDAR EL COLUMPIO

R ∞ÔI‹Î¢ÛË

G Buttons

F Boutons

D Knöpfe

N Knopjes

I Tasti

EBotónes

K Knap

P Botões

TNuppeja

M Knappene

sKnapparna

R ÎÔ˘ÌÈ¿

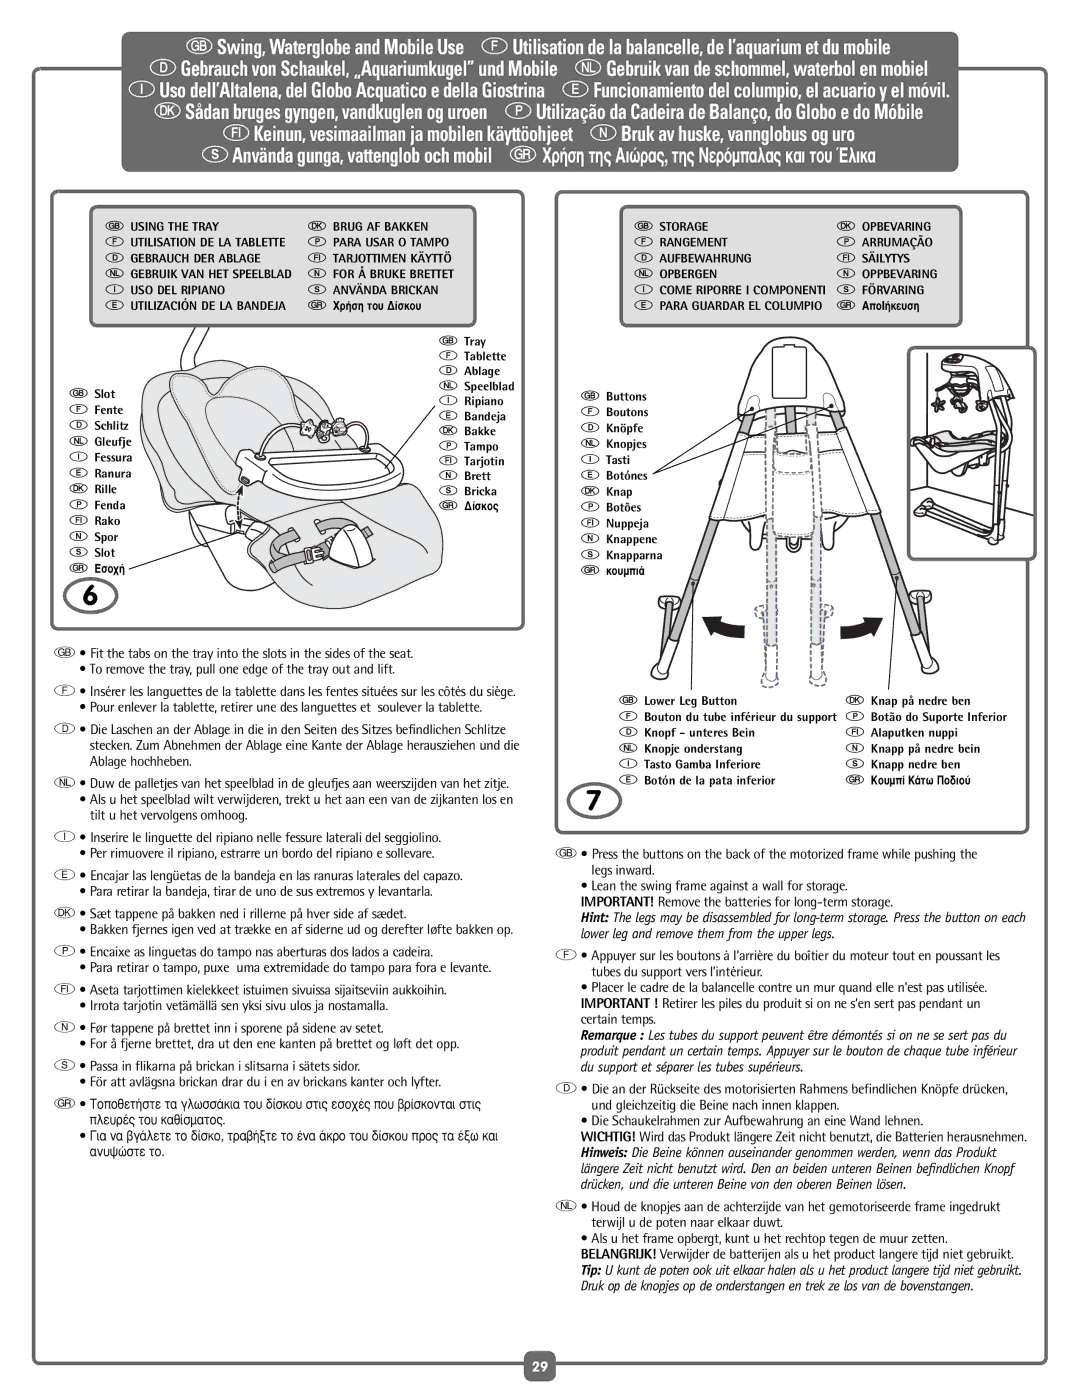
G• Fit the tabs on the tray into the slots in the sides of the seat.

• To remove the tray, pull one edge of the tray out and lift.

F• Insérer les languettes de la tablette dans les fentes situées sur les côtés du siège.

• Pour enlever la tablette, retirer une des languettes et soulever la tablette.

D• Die Laschen an der Ablage in die in den Seiten des Sitzes befindlichen Schlitze stecken. Zum Abnehmen der Ablage eine Kante der Ablage herausziehen und die Ablage hochheben.

N• Duw de palletjes van het speelblad in de gleufjes aan weerszijden van het zitje.

Als u het speelblad wilt verwijderen, trekt u het aan een van de zijkanten los en tilt u het vervolgens omhoog.

I• Inserire le linguette del ripiano nelle fessure laterali del seggiolino.

• Per rimuovere il ripiano, estrarre un bordo del ripiano e sollevare.

E• Encajar las lengüetas de la bandeja en las ranuras laterales del capazo.

• Para retirar la bandeja, tirar de uno de sus extremos y levantarla.

K• Sæt tappene på bakken ned i rillerne på hver side af sædet.

• Bakken fjernes igen ved at trække en af siderne ud og derefter løfte bakken op.

P• Encaixe as linguetas do tampo nas aberturas dos lados a cadeira.

• Para retirar o tampo, puxe uma extremidade do tampo para fora e levante.

T• Aseta tarjottimen kielekkeet istuimen sivuissa sijaitseviin aukkoihin.

• Irrota tarjotin vetämällä sen yksi sivu ulos ja nostamalla.

M• Før tappene på brettet inn i sporene på sidene av setet.

• For å fjerne brettet, dra ut den ene kanten på brettet og løft det opp.

s• Passa in flikarna på brickan i slitsarna i sätets sidor.

• För att avlägsna brickan drar du i en av brickans kanter och lyfter.

RΔÔÔıÂÙ‹ÛÙ ٷ ÁψÛÛ¿ÎÈ· ÙÔ˘ ‰›ÛÎÔ˘ ÛÙȘ ÂÛÔ¯¤˜ Ô˘ ‚Ú›ÛÎÔÓÙ·È ÛÙȘ Ï¢ڤ˜ ÙÔ˘ ηı›ÛÌ·ÙÔ˜.

°È· Ó· ‚Á¿ÏÂÙ ÙÔ ‰›ÛÎÔ, ÙÚ·‚‹ÍÙ ÙÔ ¤Ó· ¿ÎÚÔ ÙÔ˘ ‰›ÛÎÔ˘ ÚÔ˜ Ù· ¤Íˆ Î·È ·Ó˘„ÒÛÙ ÙÔ.

G Lower Leg Button

K Knap på nedre ben

FBouton du tube inférieur du support P Botão do Suporte Inferior

D Knopf - unteres Bein

T Alaputken nuppi

N Knopje onderstang

M Knapp på nedre bein

I Tasto Gamba Inferiore

s Knapp nedre ben

E Botón de la pata inferior

R ∫Ô˘Ì› ∫¿Ùˆ ¶Ô‰ÈÔ‡

7

G• Press the buttons on the back of the motorized frame while pushing the legs inward.

Lean the swing frame against a wall for storage.

IMPORTANT! Remove the batteries for long-term storage.

Hint: The legs may be disassembled for long-term storage. Press the button on each lower leg and remove them from the upper legs.

F• Appuyer sur les boutons à l’arrière du boîtier du moteur tout en poussant les tubes du support vers l’intérieur.

Placer le cadre de la balancelle contre un mur quand elle n’est pas utilisée. IMPORTANT ! Retirer les piles du produit si on ne s’en sert pas pendant un certain temps.

Remarque : Les tubes du support peuvent être démontés si on ne se sert pas du produit pendant un certain temps. Appuyer sur le bouton de chaque tube inférieur du support et séparer les tubes supérieurs.

D• Die an der Rückseite des motorisierten Rahmens befindlichen Knöpfe drücken, und gleichzeitig die Beine nach innen klappen.

Die Schaukelrahmen zur Aufbewahrung an eine Wand lehnen.

WICHTIG! Wird das Produkt längere Zeit nicht benutzt, die Batterien herausnehmen. Hinweis: Die Beine können auseinander genommen werden, wenn das Produkt längere Zeit nicht benutzt wird. Den an beiden unteren Beinen befindlichen Knopf drücken, und die unteren Beine von den oberen Beinen lösen.

N• Houd de knopjes aan de achterzijde van het gemotoriseerde frame ingedrukt terwijl u de poten naar elkaar duwt.

Als u het frame opbergt, kunt u het rechtop tegen de muur zetten. BELANGRIJK! Verwijder de batterijen als u het product langere tijd niet gebruikt. Tip: U kunt de poten ook uit elkaar halen als u het product langere tijd niet gebruikt. Druk op de knopjes op de onderstangen en trek ze los van de bovenstangen.

29

Page 29
Image 29
Fisher-Price C6410, H7184 manual Come Riporre I Componenti

C6410, H7184 specifications

Fisher-Price has long been a trusted name in the realm of children's toys, providing innovative products that inspire creativity and promote developmental play. Among their popular offerings are the Fisher-Price H7184 and C6410, two toys designed to captivate the imaginations of young children while assisting in their cognitive and physical growth.

The Fisher-Price H7184 is an interactive playset that encourages imaginative role-playing. This model features vibrant colors, engaging characters, and sound effects that draw children in, making it a captivating addition to any playroom. With its durable construction, the H7184 is built to withstand active play, ensuring it can handle the bumps and knocks that come with energetic usage. One of its standout characteristics is its ability to stimulate sensory development through various textures, sounds, and visual stimuli, aiding in the overall growth of the child’s senses.

On the other hand, the Fisher-Price C6410 offers a different but equally engaging experience. This toy is designed to promote fine motor skills and hand-eye coordination. Its intricate design includes movable parts, buttons, and switches that encourage children to manipulate and explore. The use of bright colors and fun characters make the C6410 not just a learning tool, but also a source of enjoyment and excitement for toddlers.

Both toys are integrated with innovative technologies that enhance the play experience. For instance, the H7184 might include smart sensors that respond to the child’s actions, creating an interactive narrative that evolves based on their play. Features such as lights and sounds not only add to the excitement but also provide auditory and visual feedback, reinforcing cause-and-effect learning.

Safety is paramount at Fisher-Price, which is evident in the H7184 and C6410’s designs. Both toys comply with strict safety standards, utilizing non-toxic materials and rounded edges to ensure a safe play environment. This attention to safety allows parents to feel confident as their children explore and learn through play.

In summary, the Fisher-Price H7184 and C6410 stand out in the market for their focus on sensory development, fine motor skills, and imaginative play. With their combination of fun, education, and safety, these toys are excellent choices for nurturing young minds.