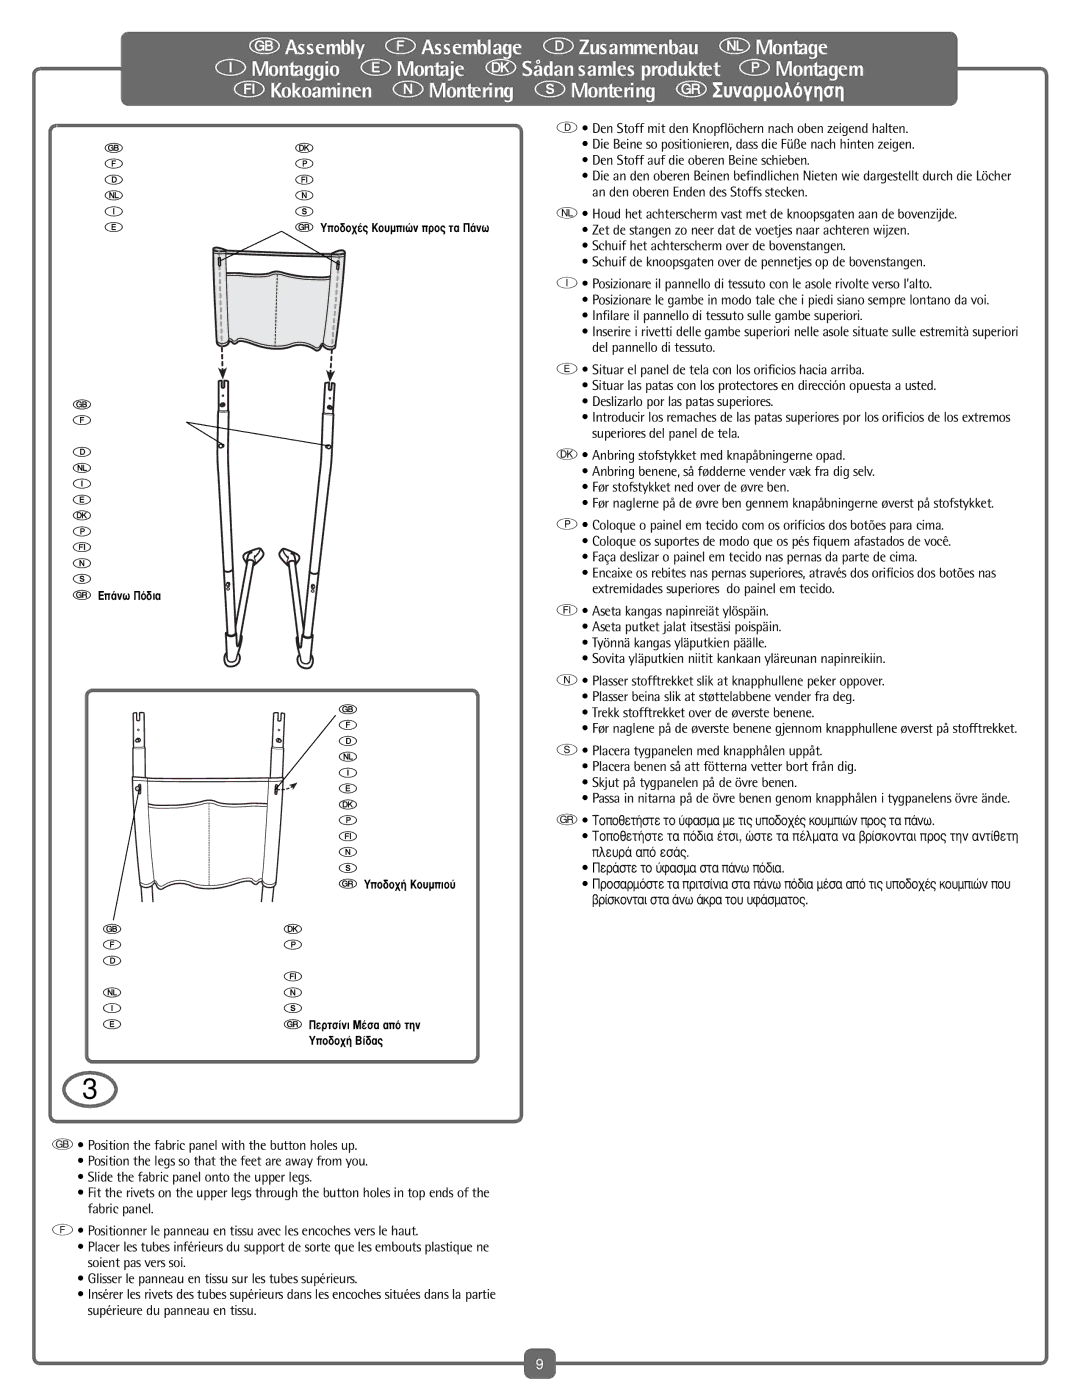
Fisher-Price C6410, H7184 manual Button Holes Up Knapåbninger opad Encoches vers le haut

Models: C6410 H7184

1 44
Download 44 pages 8.97 Kb
Page 9
Image 9

GAssembly FAssemblage DZusammenbau NMontage

IMontaggio EMontaje KSådan samles produktet PMontagem TKokoaminen MMontering sMontering R™˘Ó·ÚÌÔÏfiÁËÛË

G Button Holes Up

K Knapåbninger opad

F Encoches vers le haut

P Orifícios dos botões para Cima

D Knopflöcher nach oben

T Napinreiät ylös

N Knoopsgaten aan bovenzijde

M Knapphull oppover

I Asole Verso l’Alto

s Knapphål uppåt

E Orificios hacia arriba

R ÀÔ‰Ô¯¤˜ ∫Ô˘ÌÈÒÓ ÚÔ˜ Ù· ¶¿Óˆ

G Upper Legs

FTubes supérieurs du support

DObere Beine

NBovenstangen

IGambe Superiori

EPatas superiores

KØvre ben

PSuportes Superiores

T Yläputket

MØvre bein s Övre ben R ∂¿Óˆ ¶fi‰È·


G Button Hole


F Encoche


D Knopfloch


N Knoopsgat


I Foro Tasto


E Orificio


K Knapåbning opad


P Abertura do Botão


T Aukko


M Knapphull


s Knapphål


R ÀÔ‰Ô¯‹ ∫Ô˘ÌÈÔ‡

G Rivet Through Button Hole

K Nagle gennem knapåbning

F Rivet dans l’encoche

P O Rebite Através da

D Niete - durch das

Abertura do Botão

Knopfloch gesteckt

T Nuppi aukon läpi

N Pennetje door knoopsgat

M Nagle gjennom knapphull

I Rivetto nel Foro Tasto

s Nit genom knapphål

E Remache por el orificio

R ¶ÂÚÙÛ›ÓÈ ª¤Û· ·fi ÙËÓ


ÀÔ‰Ô¯‹ 웉·˜

D• Den Stoff mit den Knopflöchern nach oben zeigend halten.

Die Beine so positionieren, dass die Füße nach hinten zeigen.

Den Stoff auf die oberen Beine schieben.

Die an den oberen Beinen befindlichen Nieten wie dargestellt durch die Löcher an den oberen Enden des Stoffs stecken.

N• Houd het achterscherm vast met de knoopsgaten aan de bovenzijde.

Zet de stangen zo neer dat de voetjes naar achteren wijzen.

Schuif het achterscherm over de bovenstangen.

Schuif de knoopsgaten over de pennetjes op de bovenstangen.

I• Posizionare il pannello di tessuto con le asole rivolte verso l’alto.

Posizionare le gambe in modo tale che i piedi siano sempre lontano da voi.

Infilare il pannello di tessuto sulle gambe superiori.

Inserire i rivetti delle gambe superiori nelle asole situate sulle estremità superiori del pannello di tessuto.

E• Situar el panel de tela con los orificios hacia arriba.

Situar las patas con los protectores en dirección opuesta a usted.

Deslizarlo por las patas superiores.

Introducir los remaches de las patas superiores por los orificios de los extremos superiores del panel de tela.

K• Anbring stofstykket med knapåbningerne opad.

Anbring benene, så fødderne vender væk fra dig selv.

Før stofstykket ned over de øvre ben.

Før naglerne på de øvre ben gennem knapåbningerne øverst på stofstykket.

P• Coloque o painel em tecido com os orifícios dos botões para cima.

Coloque os suportes de modo que os pés fiquem afastados de você.

Faça deslizar o painel em tecido nas pernas da parte de cima.

Encaixe os rebites nas pernas superiores, através dos orifícios dos botões nas extremidades superiores do painel em tecido.

T• Aseta kangas napinreiät ylöspäin.

Aseta putket jalat itsestäsi poispäin.

Työnnä kangas yläputkien päälle.

Sovita yläputkien niitit kankaan yläreunan napinreikiin.

M• Plasser stofftrekket slik at knapphullene peker oppover.

Plasser beina slik at støttelabbene vender fra deg.

Trekk stofftrekket over de øverste benene.

Før naglene på de øverste benene gjennom knapphullene øverst på stofftrekket.

s• Placera tygpanelen med knapphålen uppåt.

Placera benen så att fötterna vetter bort från dig.

Skjut på tygpanelen på de övre benen.

Passa in nitarna på de övre benen genom knapphålen i tygpanelens övre ände.

RΔÔÔıÂÙ‹ÛÙ ÙÔ ‡Ê·ÛÌ· Ì ÙȘ ˘Ô‰Ô¯¤˜ ÎÔ˘ÌÈÒÓ ÚÔ˜ Ù· ¿Óˆ.

ΔÔÔıÂÙ‹ÛÙ ٷ fi‰È· ¤ÙÛÈ, ÒÛÙ ٷ ¤ÏÌ·Ù· Ó· ‚Ú›ÛÎÔÓÙ·È ÚÔ˜ ÙËÓ ·ÓÙ›ıÂÙË ÏÂ˘Ú¿ ·fi ÂÛ¿˜.

¶ÂÚ¿ÛÙ ÙÔ ‡Ê·ÛÌ· ÛÙ· ¿Óˆ fi‰È·.

¶ÚÔÛ·ÚÌfiÛÙ ٷ ÚÈÙÛ›ÓÈ· ÛÙ· ¿Óˆ fi‰È· ̤۷ ·fi ÙȘ ˘Ô‰Ô¯¤˜ ÎÔ˘ÌÈÒÓ Ô˘ ‚Ú›ÛÎÔÓÙ·È ÛÙ· ¿Óˆ ¿ÎÚ· ÙÔ˘ ˘Ê¿ÛÌ·ÙÔ˜.

3

G• Position the fabric panel with the button holes up.

Position the legs so that the feet are away from you.

Slide the fabric panel onto the upper legs.

Fit the rivets on the upper legs through the button holes in top ends of the fabric panel.

F• Positionner le panneau en tissu avec les encoches vers le haut.

Placer les tubes inférieurs du support de sorte que les embouts plastique ne soient pas vers soi.

Glisser le panneau en tissu sur les tubes supérieurs.

Insérer les rivets des tubes supérieurs dans les encoches situées dans la partie supérieure du panneau en tissu.

9

Page 9
Image 9
Fisher-Price C6410, H7184 manual Button Holes Up Knapåbninger opad Encoches vers le haut

C6410, H7184 specifications

Fisher-Price has long been a trusted name in the realm of children's toys, providing innovative products that inspire creativity and promote developmental play. Among their popular offerings are the Fisher-Price H7184 and C6410, two toys designed to captivate the imaginations of young children while assisting in their cognitive and physical growth.

The Fisher-Price H7184 is an interactive playset that encourages imaginative role-playing. This model features vibrant colors, engaging characters, and sound effects that draw children in, making it a captivating addition to any playroom. With its durable construction, the H7184 is built to withstand active play, ensuring it can handle the bumps and knocks that come with energetic usage. One of its standout characteristics is its ability to stimulate sensory development through various textures, sounds, and visual stimuli, aiding in the overall growth of the child’s senses.

On the other hand, the Fisher-Price C6410 offers a different but equally engaging experience. This toy is designed to promote fine motor skills and hand-eye coordination. Its intricate design includes movable parts, buttons, and switches that encourage children to manipulate and explore. The use of bright colors and fun characters make the C6410 not just a learning tool, but also a source of enjoyment and excitement for toddlers.

Both toys are integrated with innovative technologies that enhance the play experience. For instance, the H7184 might include smart sensors that respond to the child’s actions, creating an interactive narrative that evolves based on their play. Features such as lights and sounds not only add to the excitement but also provide auditory and visual feedback, reinforcing cause-and-effect learning.

Safety is paramount at Fisher-Price, which is evident in the H7184 and C6410’s designs. Both toys comply with strict safety standards, utilizing non-toxic materials and rounded edges to ensure a safe play environment. This attention to safety allows parents to feel confident as their children explore and learn through play.

In summary, the Fisher-Price H7184 and C6410 stand out in the market for their focus on sensory development, fine motor skills, and imaginative play. With their combination of fun, education, and safety, these toys are excellent choices for nurturing young minds.